What's new
Photoshop Gurus Forum

Welcome to Photoshop Gurus forum. Register a free account today to become a member! It's completely free. Once signed in, you'll enjoy an ad-free experience and be able to participate on this site by adding your own topics and posts, as well as connect with other members through your own private inbox!

SIMPLE EXTRACTION OF LUMINOSITY FROM IMAGE


thebestcpu

Guru
Messages
3,112
Likes
2,868
There are several color mode used within Photoshop such as RGB, CMYK, Grayscale, LAB, etc. There is another 3 channel model not explicitly used in file saving yet is available in various places in Photoshop being Luminosity, Hue, and Saturation as used in the Layer Blend modes (not to be confused with the HSB model you see in the Color Picker).

Note that in this mode/model, "Color" is used in this model which is a shortcut representing the combination of "Hue" and "Saturation"

In this particular color mode/model, Luminosity represents the perceived grayscale brightness of the image.

In Photoshop, this Luminosity is simply a weighting of the RGB colors of an image per the following formula:

Luminosity = (0.3 * R) + (0.59 * G) + (0.11 * B) as a grayscale value.

Sometimes in photo restoration work working with the Luminosity component separate from the Color (Hue and Saturation) components can be handy.

Here is a simple way to extract out that Luminosity grayscale value.

This first image is an sRGB image with a full spectrum at maximum saturation:
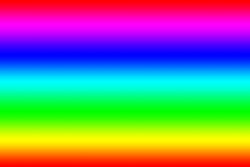
sRGB-Spectrum.jpg


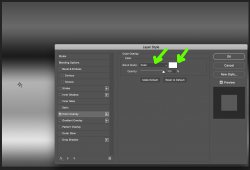
To extract the Luminosity, simply add a Layer Style of Color Overlay, open the Color Overlay Panel, set the blend to Color, and the color component to any grayscale value (I use white because its easy to do).

The resulting image is the grayscale Luminosity. Its just that simple:

Luminosity-Extracted-sRGB.jpg


-----------LESS IMPORTANT DETAILS BELOW---------------

It is a bit more involved than above yet also not as important yet you should be aware.

As it turns out, there are many models for the "perceived Luminosity" of an image that can be the source of many academic discussions.

Closer to the gold standard for perceived Luminosity of a image is the "L" component of the LAB model (which is available in Photoshop)

I also wanted to point out that no matter what RGB color space you are in, Photoshop uses the same formula given above. Since the underlying color numbers are different in each RGB color space, the above described Luminosity result will appear a bit different depending on what Color Space you are using.

Below is a color chart starting on the left with the same sRGB full spectrum at maximum saturation. Each of the succeeding grayscale images to the right are the same colors converted into different color mode / spaces with the Luminosity extracted i.e. LAB, sRGB, Adobe RGB, PS, ProPhoto RGB
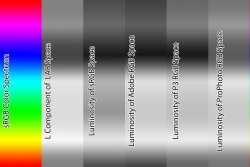
Luminosity-vs-color-space.jpg

As you can see, they are not the same. It does not make a lot of difference when working within one color space, yet if are trying to duplicate a particular effect, being in a different color space than a given example, will not yield the same result.

Just a simple TIP with some background details.
 
Last edited:
John,
Once you've successfully isolated the Luminosity, what do you do with it? Can you give one or two practical examples of how this would be applied to editing an image?
 
Per @Rich54 request here is the first of three sample examples of how one can use the technique of the above posted TIP. Its just another tool in the toolbox to use when separating out Luminosity from Color (Hue and Saturation) for post processing.

Note that an equivalent to using the Layer Style Color Overlay tip above is by instead adding an Pixel or Solid Color Layer set to a gray tone (I use white) and having the blend set to Color. The approach in the TIP just saves a Layer in the Layer Stack.

Example #1
A NEW WAY TO REMOVE MOIRÉ

Some camera sensors with imaging high frequency component images create a sensor based Moiré pattern. There are some that have both color striations (each to remove with painting with Color Blend) and those that also have luminosity striations with the Color.
The technique in the attached video link that I posted many years ago deals with the luminosity striations separately and then reintegrate and resolve the color striations.
In the tutorial below, I used a separately white Layer set to Color Blend to extract out the Luminosity. With the TIP above, I could have applied the Layer Style in the TIP above to the Hue Saturation Layer and saved a Layer.

A New Way To Remove Moiré

Here is an example processing of a Moiré image below:

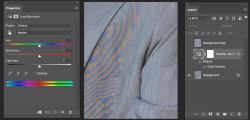
The original image:
Screen Shot 2020-11-13 at 10.19.16 AM.png


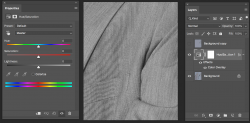
The following image is the Luminosity extracted:

Screen Shot 2020-11-13 at 10.19.37 AM.png

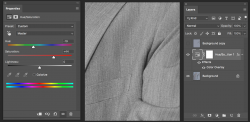
Using the Hue Sat Layer with the Color Overlay TIP applied and using the approach in video link, the Luminosity striations are removed:

Screen Shot 2020-11-13 at 10.22.55 AM.png

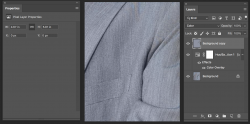
A final Layer added with Blend set to Color and the regular suit color painted over the color striations and we are done:

Screen Shot 2020-11-13 at 10.23.13 AM.png

Two more sample examples coming in additional replies below
John Wheeler
 
Sample example #2
REMOVING IMAGE STAINS UTILIZING EXTRACTED LUMINOSITY

I leverage the image below online with credit given to

The same technique use in removing Moiré patterns in sample example 1 can also be used in removing a number of stains in images.

The image used below is leveraged from and credit to
Tran Trieu Hai
facebook.com/chupanhcuoidepnhatmienbac

Some images can have consistent staining from all sorts or sources. Using a very similar approach shown in the sample example #1 posted earlier such stains are relatively easy to use. Watching the video in sample example #1 above would be helpful as I won't repeat the details here.

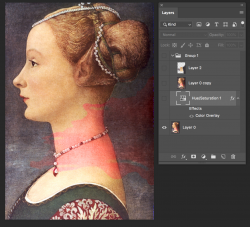
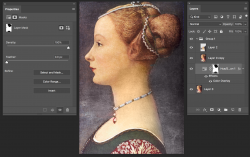
The image below has a stain that goes from the right side of the image over the neck of the subject and on to the left. It has changed both the color of the image and the luminosity of the image:

Screen Shot 2020-11-13 at 11.05.24 AM.png


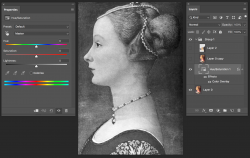
Here is the same image with a Hue Sat Layer (no adjustments) with the Luminosity extracted:

Screen Shot 2020-11-13 at 11.06.43 AM.png

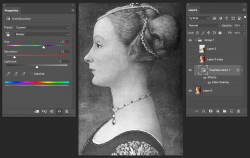
Using the same technique of Hue/Sat adjustments from the video the luminosity component of the stain was eliminated:

Screen Shot 2020-11-13 at 11.07.23 AM.png

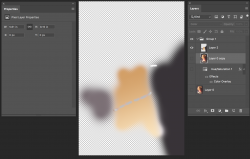
The original image added in Layer Above with blend to Color and another Layer also with Color Blend mode where colors were painted in to correct the Color portion of the stain over the neck and on both sides:

Screen Shot 2020-11-13 at 11.08.53 AM.png

As a final tuneup, I noticed that some other reds in the image where not at the original desired luminosity and added a Layer Mask on the Hue Sat Layer and Limited the adjustments where they were not desired and we are done:

Screen Shot 2020-11-13 at 11.10.32 AM.png

Quite a simple process with adjusting sliders and then painting over.

For comparison, here is the link to the online tutorial by a different author using the same image yet I thought was a more complex approach:

John Wheeler
 
SAMPLE EXAMPLE 3 (Part 1)

HIGHER ACCURACY CONVERSION TO B&W

This example comes in two posts. Part 1 demonstrates how you can create a more accurately tuned B&W conversion and Part 2 (the next post) will apply an example of this technique.

As you know, you can covert a color image to a B&W image by applying a B&W adjustment Layer which contains 6 sliders to change the Luminosity at different Hues.

You can also convert to B&W with finer tune adjustments by using a Hue/Sat Layer and add the Layer Style of Color Overlay set to white and the Blend to Color. The initial default value will just be the Luminosity as described in the initial tip. However, you can use the dropdown in the Hue/Sat Layer to also change various Hues independently yet with a twist, higher accuracy and flexibility as I will show below.

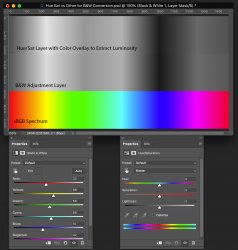
I am going to start with a horizontal sRGB fully saturated color spectrum from left to right.
The lower third will show the original colors of the spectrum
The upper third will show the result when applying a Hue/Sat Layer with the Layer Style set to extract the Luminosity
The middle third shows the result when applying a B&W adustment Layer (I set the sliders to match the default Hue/Sat Layer for ease of comparison in later steps)

Default-Conversions.jpg


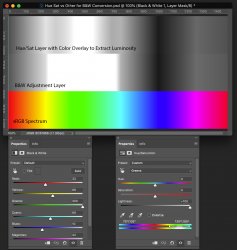
This next image shows what happens when I turn up the Green slider in the B&W adjustment Layer and also select Green in the Hue/Sat Layer and also turn up the LIghtness Slider.
Note that the with of the Hues selected are much wider with the B&W adjustment Layer yet finer tuned (narrower in the Hue/Sat Layer.
Also note in the Hue Sat Properties panel that there in the spectrum bar it shows the Hue range being changed. There are four mini sliders in those adjustments where you change the Hues impact by sliding left or right, the width of the Hues impacted by widening or narrowing the middle tow sliders, and you can also control the fall off of with the outer two sliders.
The details of these sliders can be found in this link to the Adobe Help file: Help File to Hue/Sat Adjustments

Green-Hues-lighter.jpg


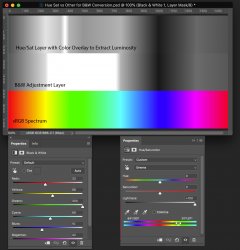
In this next image all I did was narrow the green hues to be adjusted and also shifted the Hues closer to yellow. So I can more specifically choose the Hue range that I want to convert to &W and choose to make it darker or lighter and by how much with the Lightness slider.
Note that the Hue/Sat Layer dropdown allows you to choose up to 6 colors and independently adjust the Hue, Hue width, and the falloff. So considerable flexibility.

Green-Narrow.jpg


So this part 1 of example three was to show that extracting the Luminosity after using a Hue/Sat Adjustment Layer allows finer tune controls in converting to B&W.
In the next post (Part 2), I will give a specific example
John Wheeler
 
SAMPLE EXAMPLE 3 (Part 2)

HIGHER ACCURACY CONVERSION TO B&W

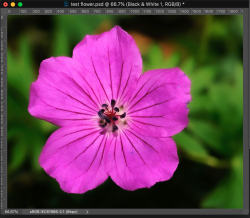
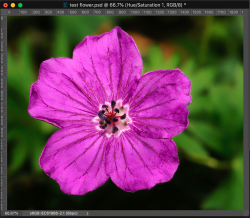
Now for a specific example. We will start with a simple flower with primarily Magenta colors:

Screen Shot 2020-11-15 at 11.34.01 PM.png


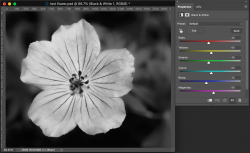
Now by just applying a B&W conversion Layer the default settings give a light color:

Screen Shot 2020-11-15 at 11.34.21 PM.png

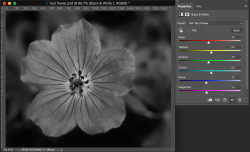
I turned this down a bit and the Magenta slider turned down all of the magenta colors to make them all a bit darker. Most of the other sliders have little effect on the flower:

Screen Shot 2020-11-15 at 11.34.41 PM.png

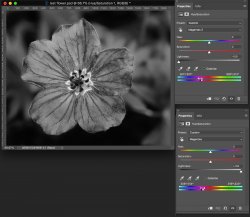
Now instead, I apply the Hue/Sat Layer with the Luminosity extracted and I use two of the dropdown color sliders, one to turn down some of the flowers Magenta with a narrow Hue setting and then change another portion of the flowers Hues with another narrow Hue adjustment to increase the lightness (both property panels shown).
I won't claim any artistic awards, just trying to demonstrate how such a tool in your tool box might open up some possibilities:

Example-Flower-narrow-Hue-shifts.jpg

And just for grins, I overlayed the original image in another Layer and set the blend to Color to shown the same original picture with the adjusted Luminoity based on Narrow Hue ranges:

Screen Shot 2020-11-15 at 11.37.24 PM.png

Hope this opens up some ideas on how to use this simple tool to extract out Luminosity. My example used the Hue Sat Layer yet it can work on any Color adjustment Layer so go hope you go and try it out.
Hope you find these ideas useful
John Wheeler
 

Back
Top