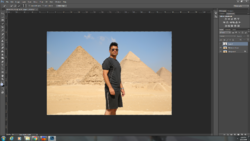
You have to invert the selection not the image (select in the upper menu), then you resize the image to 1080x1350, select the background image and press "control+t" to change the size, maintain control pressed when movind the size that way the scale will not change, and adjust the image to the new size.
Photoshop Gurus Forum
Welcome to Photoshop Gurus forum. Register a free account today to become a member! It's completely free. Once signed in, you'll enjoy an ad-free experience and be able to participate on this site by adding your own topics and posts, as well as connect with other members through your own private inbox!
You are using an out of date browser. It may not display this or other websites correctly.
You should upgrade or use an alternative browser.
You should upgrade or use an alternative browser.
Resize image of me and Pyramids in Egypt
- Thread starter Paradise19
- Start date
Paradise19
Well-Known Member
- Messages
- 61
- Likes
- 1
Ok I inverted the selection. How do I crop the background? And why do I need to crop the background? I don't know how to select the background image. I wish you would be willing to show me how to do thisYou have to invert the selection not the image (select in the upper menu), then you resize the image to 1080x1350, select the background image and press "control+t" to change the size, maintain control pressed when movind the size that way the scale will not change, and adjust the image to the new size.
Paradise19
Well-Known Member
- Messages
- 61
- Likes
- 1
You dont have to crop the background only resize it, dont worry, tomorrow i make a visual guide, i have to go now.
Thank you so much. I appreciate that. I tried to resize the background to 1080 x 1350 but it won't let me. I will wait until tomorrow for your help.
- Messages
- 23,906
- Likes
- 13,636
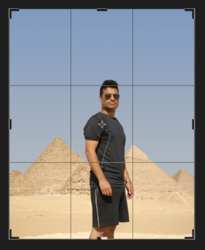
Yes I used a similar process with a few differences.That looks really good! Did you use the same method as Argos laid out? Can I ask how you replaced the sky rather than cloning it?
I first open the image document and made a selection of the subject (you) and removed the background.
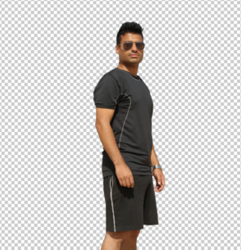
I then opened another copy of the image in a new document.
I Used the Rectangle Tool to create a 1080 x 1350 rectangle.
I then made yet another selection of the subject and used a "Hide Selection" layer mask.
I then applied the layer mask, by right clicking the layer and selecting "apply layer mask".
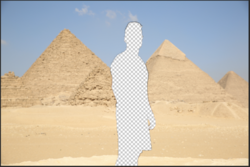
I then removed the sky from the original image.
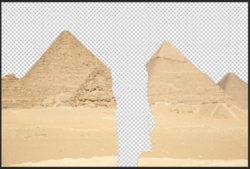
I placed the newly cropped background layer above the 1080 x 1350 rectangle and added a clipping mask.
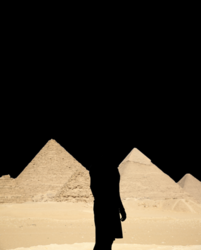
On a new layer, I used the Gradient Tool to create the new sky.
Open the Gradient Editor, Use the foreground to background preset..
Change the color stops on the Gradient Editor or set the foreground and background by sampling the sky from original image.
Set the Gradient to linear.
Drag the gradient up or down while holding the shift key.
Watch this VIDEO.
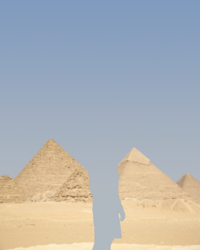
I then placed the new sky layer between the 1080 x 1350 rectangle layer and the Cropped background layer and added a clipping mask.
Next I switched back over to subject document and used the Move Tool to drag and drop the subject into the second document (on the tab).
I then used free transform to adjust and position the subject.
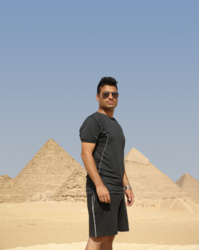
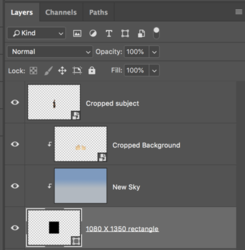
I saved this PSD file so I can go back to it for edits if needed.
All that remains to do is to crop the image with the snap function and "save as"........jpg, png, etc,.
Paradise19
Well-Known Member
- Messages
- 61
- Likes
- 1
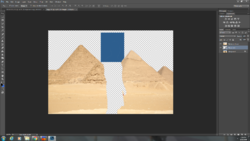
Thank you for that step by step guide. The end result you achieved is amazing! I spent a few hours now trying to do what you did and this is as far as I got. When I add the newly cropped background in the rectangle box and add a clipping mask, that's all that happens. But yours turned out different. Any idea on what I'm doing wrong?

- Messages
- 23,906
- Likes
- 13,636
Yes, you don't have the background copy layer clipped to the rectangle layer.Any idea on what I'm doing wrong?
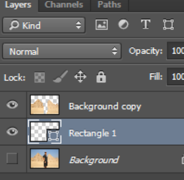
Right click the background copy layer and select create clipping mask or hover your cursor between the two layers while holding down the alt/option key, you will see the cursor turn into a box with a black angled arrow pointing down, then click.
Paradise19
Well-Known Member
- Messages
- 61
- Likes
- 1
Yes, you don't have the background copy layer clipped to the rectangle layer.
View attachment 86478
Right click the background copy layer and select create clipping mask or hover your cursor between the two layers while holding down the alt/option key, you will see the cursor turn into a box with a black angled arrow pointing down, then click.
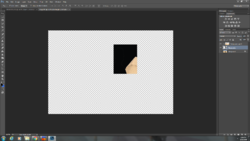
I tried that and the image still doesn't completely fill the rectangle. I can see the image when I move the rectangle around though.
- Messages
- 23,906
- Likes
- 13,636
Sorry, I did leave that part out............I thought it was mentioned in an earlier post. I could be wrong.
Select/Highlight the background copy layer.
Now you have to use Free Transform to make the image fit. Hit Cmd/Cntrl + T.
Hold down the shift + Opt/Alt key and drag one of the corners inward towards the center.
Select/Highlight the background copy layer.
Now you have to use Free Transform to make the image fit. Hit Cmd/Cntrl + T.
Hold down the shift + Opt/Alt key and drag one of the corners inward towards the center.
Paradise19
Well-Known Member
- Messages
- 61
- Likes
- 1
Sorry, I did leave that part out............I thought it was mentioned in an earlier post. I could be wrong.
Select/Highlight the background copy layer.
Now you have to use Free Transform to make the image fit. Hit Cmd/Cntrl + T.
Hold down the shift + Opt/Alt key and drag one of the corners inward towards the center.
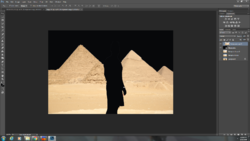
No worries...thanks for mentioning it. I hit Cntrl + T and the rectangle fits the photo (as shown in pic below). How come I need to hold down the shift + alt key and drag one of the corners inwards towards the center?
- Messages
- 23,906
- Likes
- 13,636
You stretched the rectangle to fit the background copy when you were supposed to shrink the the background copy to fit the rectangle.
Holding the Shift + Opt/Alt key will maintain the background copy's proportions while moving a corner handle towards the center.
Please read the instructions carefully.
Holding the Shift + Opt/Alt key will maintain the background copy's proportions while moving a corner handle towards the center.
Please read the instructions carefully.
Paradise19
Well-Known Member
- Messages
- 61
- Likes
- 1
You stretched the rectangle to fit the background copy when you were supposed to shrink the the background copy to fit the rectangle.
Holding the Shift + Opt/Alt key will maintain the background copy's proportions while moving a corner handle towards the center.
Please read the instructions carefully.
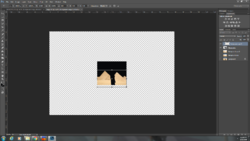
Sorry about that. I understand what you're saying. I did as you said and this is what it looks like. I don't know why it's still a rectangle (landscape mode) because when you got to this stage, yours was in portrait mode. I apologize for bombarding you with messages. I'm really trying my best. I've been at this for hours now.
Paradise19
Well-Known Member
- Messages
- 61
- Likes
- 1
You stretched the rectangle to fit the background copy when you were supposed to shrink the the background copy to fit the rectangle.
Holding the Shift + Opt/Alt key will maintain the background copy's proportions while moving a corner handle towards the center.
Please read the instructions carefully.
Wait...you did width 1080 height 1350 correct? One of the pics Argos had posted showed vice versa. Now I know why I got confused. I have to do it the way you did.
- Messages
- 23,906
- Likes
- 13,636
Wait...you did width 1080 height 1350 correct? One of the pics Argos had posted showed vice versa. Now I know why I got confused. I have to do it the way you did.

Photoshop ussually have multiple ways of doing things, and if you are a beginner can be a little crazy if you follow instructions from two different persons.
I step aside at this one, It will be easier follow Iamsam instructions, its alot better teacher than me and his english doesn't suck .
.
Keep going like this and it will be alot easier in no time.
Cheers and good luck!
I step aside at this one, It will be easier follow Iamsam instructions, its alot better teacher than me and his english doesn't suck
 .
.Keep going like this and it will be alot easier in no time.
Cheers and good luck!
Paradise19
Well-Known Member
- Messages
- 61
- Likes
- 1
Photoshop ussually have multiple ways of doing things, and if you are a beginner can be a little crazy if you follow instructions from two different persons.
I step aside at this one, It will be easier follow Iamsam instructions, its alot better teacher than me and his english doesn't suck.
Keep going like this and it will be alot easier in no time.
Cheers and good luck!
Well I wanted to learn both ways as I'm having a little trouble with the last step in IamSam's instructions. And it's always good to know different ways for doing things. Your English doesn't suck. I can understand what you're saying. Can you please still make a quick visual guide for me how to do it? I'm sure you did your previous examples within a few minutes and I have spent over 8 hours already trying to do this. I need to do this for several more pictures from my vacation. When you posted your example yesterday, you did it so fast. I'm curious to know how.
Please do help me
- Messages
- 23,906
- Likes
- 13,636
It's not impossible at all and it works really well. Repeating myself----Holding the Shift + Opt/Alt key will maintain the background copy's proportions while moving a corner handle towards the center.The last step seems impossible. I've tried using free transform to fit me in the picture but it shrinks me down really bad where I look really short and stubby.
OK, maybe my way is too difficult even though it can easily be done in about 2 minutes. I will turn this back over to Argos.Well I wanted to learn both ways as I'm having a little trouble with the last step in IamSam's instructions.
Paradise19
Well-Known Member
- Messages
- 61
- Likes
- 1
"The last step seems impossible. I've tried using free transform to fit me in the picture but it shrinks me down really bad where I look really short and stubby. "
Seems like you forgot to use control while doing it like Iamsam or me told you.
I cropped myself out of the picture and then selected myself again and applied invert like you said. You originally said to crop the background but then said to resize it. When I resize it, everything shrinks. I am stuck here.
