What's new
Photoshop Gurus Forum

Welcome to Photoshop Gurus forum. Register a free account today to become a member! It's completely free. Once signed in, you'll enjoy an ad-free experience and be able to participate on this site by adding your own topics and posts, as well as connect with other members through your own private inbox!

PSD files with layers and mask need to make with hard edges


I'm going crazy with the photoshop. now another issue:
1. when I resize manually the true single vector with hard edges (anti-aliased Off) using "free transform" - and after i done and click OK, it makes the whole vector with soft edges.... how to preserve hard edges while using "free transform"?
2. I tied to solve the issues using - nearest neighbors (preserve hard edges - under image size) before and after using "free transform" doesn't help. what is the "nearest neighbors" for? and it seems never works, I tried different 20 scenarios and it never works
Hi @samsimon
I feel the same frustrations sometimes with Photoshop.
For forum members to best help you a little more clarity would help on the problem.
Maybe posting another PSD example.
From your description it is not clear if you are working with paths/vectors and the Pen tool or Shapes or something else.
It is also not clear if we are working on the same problem of pixlels up against transparence (i.e. the prior partial transparency issue) or pixels up against pixels having antialiasing.
Lots of directions to go I am sure, we just need to know where on the map you are to give you better directions
John Wheeler

ADDED NOTE: If this is a new issue, it can help to start another post so it gets more attention. If is just another case of your prior problem, posting in the same thread is appropriate.
 
For the image you provided a very quick and simple Action can do the work to remove the anti-alias transparency. The image shows the result to the left, the ending Layer Stack (started with the one you provided), and the short action steps to get the job done. The Action just merged all visible Layers, pulled the transparency out to a Layer Mask, removed with anti alias with a threshold adjustment on the Mask (I just used the default value of 128) and then applied the mask to make and end result a single image with surround transparency (no partial transparency)
View attachment 117459
Am I doing something wrong? I had to bring it to 255.... or I mess up somewhere?
 
Hi @samsimon
Yes you did make a mistake in following my instructions.

You created a selection on the image and then turned the selection into a Layer Mask. What you need to do is not create a selection yet instead use the:
Layer > Layer Mask > From Transparency command

The two approaches are not the same.

With your approach the Layer Mask is created yet it leaves the transparency still in the pixels also with anti-aliasing.

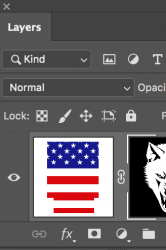
The way you can tell the difference is looking at the pixel thumbnail in the Layer Mask. With my approach you will see the entire flag, in your approach you will still see the thumnail with the transparency still in.

If you do it correctly, the Layer Panel should look as in the following image. Your approach does not.

2.png

Hope that helps.
John Wheeler
 
Hi @samsimon
Unfortunately old versions of PS do not have that command. There is a workarounds yet none quite as easy so will post. Several posts back there is one of the workarounds by @SCTRWD that may be good enough.
If you have your image and follow those instructions, all partial transparency will be removed yet the full transparency pixels will remain. A minor downside of this approach is that the edges of the original image will grow out a bit more than the approach I originally suggested which takes the mid point of the transparency for the new edge (or you can choose with the transparency slider.
Why don't you give it a try and see if it is good enough for you. Workaround to remove transparency

If you start with a single Layer with no Layer mask as you starting point, there are keyboard shortcuts that help accelerate the process. Using Cmd+J (Cntl+J on PCs) will duplicate the Layer and then follow with Cmd + E (Cntl +E on PCs) to merge the two Layers back down into 1 Layer. Doing this the number of times recommended in the link will remove all the partial transparency.

If that approach does not work for you, there is another approach where you can still adjust the position of the edge yet takes a few more few more steps.
John Wheeler
 
Hi @samsimon
If you start with a single Layer with no Layer mask as you starting point, there are keyboard shortcuts that help accelerate the process. Using Cmd+J (Cntl+J on PCs) will duplicate the Layer and then follow with Cmd + E (Cntl +E on PCs) to merge the two Layers back down into 1 Layer. Doing this the number of times recommended in the link will remove all the partial transparency.
gotcha, thanks! Last thing and I will stop bothering you (I hope at least for a long time :))
when I resize manually this design with hard edges (anti-aliased Off) using "free transform" - and after i done and click OK, it makes the whole vector with soft edges.... how to preserve hard edges while using "free transform"?
 

Attachments

Hi @samsimon
A couple questions. What version of PS do you have and does it support Smart Objects?

As I recall, I saw a separate post by you on this topic yet I can no longer find it (may have been deleted). The file that was posted was the original AI vector file.
I opened that into PS as a Smart Object and transformed the Smart Object and the sharp edges were maintained. Do you have that AI file and can you repost it here.
John Wheeler

ADDED EDIT: It does beg the question because if you do have the vector files and can open them as a Smart Object, all your edge problems would be solved without all the extra steps that have been posted. This question has already been asked in this thread by @JJLAPIN and maybe another forum member. So a third question: Do you have access to al the vector files with which you were having edge problems?

1. Version - CS 4 Ver. 11
2. Yes, it supports Smart objects.
3. I've just tried -> smart object then resize (both Ai and PSD files) - it didn't work
4. The thing is I have 70% of Ai, and other 30% only PSD files (as original - and they are not vectors) - thus I'm trying to figure out if I can adjust them.
5. This "hotel" file is Ai originally, I converted it to PSD to figure out if I could somehow play with it, to figure out if I can fix the issue with resizing and preserving the hard edges.
 

Attachments

Last edited:
HI @samsimon
I may not be able to answer your question on PS CS4 as I do not have that on my machine as the oldest I have is CS6 which is 9 versions old so CS4 is 11 versions old.

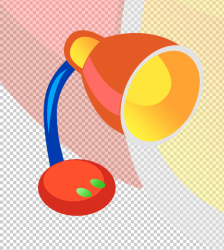
I open a file in PS and then File > Place Embedded the AI file which ends up in a Smart Object. It starts with a resizing box and I turned off the checkbox or anti-alias and increase the image to fit in a 1500 x 1000 pixel image. I save as a PNG to preserve the transparency and saved it as a ZIP file attached. If you download the ZIP file and open the PNG, you will see that there is no anti-aliasing when I did some arbitrary resizing for the edges along the transparency and I did not see any along pixel to pixel color boundaries.

I cannot experiment to let you know what will or will not work in CS4 for Smart Objects so cannot confirm a way to do it.

I think once you have anti-aliasing it is baked in. The parallel is added salt as you are cooking. Not easy to take the salt back out once it is in.
So, the techniques that have been described already are ones that I would recommend.

Hope this helps some
John Wheeler

View attachment Lamp.png.zip

ADDED EDIT: I used a zip file because I have noticed that when saving and them downloading from the PS Gurus site, the PNGS and some anti-aliasing added in (website issue/feature) and @IamSam is looking into that as a separate topic.
 
I open a file in PS and then File > Place Embedded the AI file which ends up in a Smart Object. It starts with a resizing box and I turned off the checkbox or anti-alias and increase the image to fit in a 1500 x 1000 pixel image. I save as a PNG to preserve the transparency and saved it as a ZIP file attached. If you download the ZIP file and open the PNG, you will see that there is no anti-aliasing when I did some arbitrary resizing for the edges along the transparency and I did not see any along pixel to pixel color boundaries.
very strange thing, friend gave me his laptop with Photoshop CC 2014, and I got the same thing - soft edges. And he tried on his PC, he has CC 2017. same thing. hm...
 
200% Zoom after Free transform.
Screen Shot 2020-12-08 at 6.44.35 PM.png


It's all about where and what you start with.
 
This is 241px x 259px................it's not a good place to start.
Screen Shot 2020-12-08 at 6.48.59 PM.png
 
I open a file in PS and then File > Place Embedded the AI file which ends up in a Smart Object. It starts with a resizing box and I turned off the checkbox or anti-alias and increase the image to fit in a 1500 x 1000 pixel image. I save as a PNG to preserve the transparency and saved it as a ZIP file attached. If you download the ZIP file and open the PNG, you will see that there is no anti-aliasing when I did some arbitrary resizing for the edges along the transparency and I did not see any along pixel to pixel color boundaries.
CC 2014
 
Your expectations for your file is too high...............please stop.

You need something like this.
4000px x 4000px

This is a screenshot of the actual image! As I have stated..........it's where and what you start with.
Screen Shot 2020-12-08 at 7.53.21 PM.png

Saved PNG, duplicated and free transformed smaller!

Screen Shot 2020-12-08 at 8.03.57 PM.png
Screen Shot 2020-12-08 at 8.04.14 PM.png
 

Hi @samsimon
Nice video and it did reveal something you should change to try again (you may kick yourself in the rear for missing it). In my image below when the Free Transform is being used on the Smart Object, you have anti-aliasing turned on. Not sure this will solve you issue given its CS4 yet you should give it a try.
John Wheeler

Free-Transform-Left-Turned-On.jpg
 

Back
Top