What's new
Photoshop Gurus Forum

Welcome to Photoshop Gurus forum. Register a free account today to become a member! It's completely free. Once signed in, you'll enjoy an ad-free experience and be able to participate on this site by adding your own topics and posts, as well as connect with other members through your own private inbox!

the easiest way to make non fuzzy edges


samsimon

Well-Known Member
Messages
46
Likes
5
Hey,
Edges on my vector and text (300 DPI) are fuzzy and this cause the white outline when print (direct-to-garment). I see the issue when I zoom in, see the slight rough edges (shades)
The easiest fastest way to fix it?

PS
I thought vectors don't have edges.... but I've checked a lot free and paid vectors and they all have edges (very very tiny one) but still when print, it makes the edge white....
 
With my limited knowledge-
If anti-alias is selected, this will add a feather around the edges. For DTG make sure you don't use anti-alias.

Usually, they would run a white undertone before printing, so maybe that's sticking out. Your printer should / might know how to fix that.
 
With my limited knowledge-
If anti-alias is selected, this will add a feather around the edges. For DTG make sure you don't use anti-alias.

Usually, they would run a white undertone before printing, so maybe that's sticking out. Your printer should / might know how to fix that.
My poor self has CS 4 Ver 11.... under what tool to do it for current design? I'm noob within PS. I found how to fix the text, but not the design...
 
Last edited:
It's not that it is a tool. Using and not using it has different results. This does not apply to Vector.
But when you save a Vector file to some other Raster format for printing say like "jpeg" or "png" it will surely affect the borders.

Here is a very good video explaining anti-aliasing and its uses. Hope this helps.

I fixed the text.
I need to fix the vectors, all of them have edges...
 
I fixed the text.
I need to fix the vectors, all of them have edges...
Hm, I just noticed, turning off the "jaggies" - messing up with the font thickness and overall shape... it makes it terribly fat... compare to "Strong" and "Smooth"
 
hmm..I do not know what could be the problem is exactly. But for DTG printing, sometimes anti-aliasing is not the best option. I think it may take a few test prints to figure it out.
Or it could be an entirely different problem. It would be best to talk to the printer.
 
hmm..I do not know what could be the problem is exactly. But for DTG printing, sometimes anti-aliasing is not the best option. I think it may take a few test prints to figure it out.
Or it could be an entirely different problem. It would be best to talk to the printer.
They replied and said it's edges... I need to make them solid 100%... otherwise they will print it as white outlines...
 
Oh Okay, you forgot the edges! :) Good that it got solved!
not solved, I need to figure out how to make all the edges 100% solid.... I have 67 designs.... I need the best way how to solve the issues... I only know the manual way, which will take hours...

sdghdhdfh.PNG

sdgsdh.PNG
 
Hi samsimon
I think I understand you issue. Your vendor cannot handle partial transparent pixels. They need either solid color or completetly transparent.
If that is the case, we need to get rid of the partial transparency in a productive way.
To best understand how to do this, it would help to have these three items.

1) a full example of that has this partial transparency. Partial transparency can be embedded in the pixels or caused by masking. How its fixed depends on if you have one or the other or both.

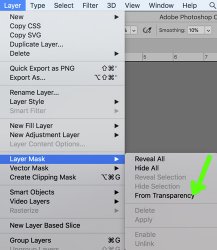
2) Also, I don't remember if CS4 has the ability to create a Layer Mask from Transparency as in the Layer command dropdown below. That got added in at some point yet not sure if CS4 has that capability or not. The answer to this determines which paths can be taken (or not) to solve your problem.

From-Transparency.jpg

3) Are all your designs in PNG format ready to go to your printers or are they in some other format (e.g. PSD), just need to know the starting point from which we are working.

4) When the project is done, where do you want the solid edge to occur. At the faintest part of the edge, the solid part of the edge or in the middle part of the transparency. This may influcence how to proceed as well.

As an aside, key rule to remember. When you find yourself in a hole, first rule is to stop digging :)

John Wheeler
 
Hello,

1. So I figure out for AI (vector) files. I almost figure it out for Text (PSD files) - but I want my text to be with Smooth anti-aliasing, but be without edges - because when I pick "anti-aliasing Off" - it makes my text fat and ugly, and I cannot figure it out for PNG files.

2. I don't think so
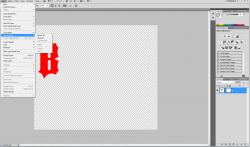
132.PNG

3. 90% are PSD, 10% are PNG

4. " At the faintest part of the edge, the solid part of the edge or in the middle part of the transparency " - not sure, but I think solid part of the edge?

PS
I dig myself into 4 holes already....;) thx

bee.png
 

Attachments

Last edited:
OK, I think I hav a way to sharpen up your edges in CS4 and I have attached an example of the "BE" charters that can as a transparent PNG file.

Please verify that the version provided below will meet your need. Note when you zoom in to the smallest level, it will be jaggy going along pixel boundaries. The only way to have fewer jaggys in a raster image is to go to higher resolution. Yet, for printing on fabric, this should not be needed as 300 dpi is higher than the resolution than almost all fabrics.

A second item is that this can all be done manually and if you want it automated with a single Action, you would need to have all the files in the same structure and format. You have both raster based text and Text Layers in PSD files. Those cannot be processed exactly the same way.

Also, handling a single Layered PNG file would be easy and if you have files that are multiple levels, the text and raster and Masks then it is much more complicated. I suggest if you want automation for all of the designs, it needs to be very consistent from file to file. It might be easest to output them all to a single Layer PNG file with transparency and then I could walk you through a set of commands that you could turn into an action and then batch process all of the PNG files at once.

Yet first things first, who does the image below work for you? I just took out the transparent edge.
John Wheeler

PS - you will need to open the file in Photoshop and view at 100% or the application your are using for printing and not just look at it on the forum screen

bee no edge transparency.png
 
I have a question - how are you printing the type? I assume - possibly wrongly - that you have process (CMYK) images that print with the type and you are trying to print the type also in CMYK to achieve a particular color.
If what I write is accurate, I think you should produce your type either in Illustrator or a layout program like InDesign and print the type in a single PMS color. This will avoid pixel based artwork for your type and produce it as a single piece of line art.
So your artwork can be in 4/C process + your type in a single PMS color.
As far as printing white underneath the artwork, it depends on the process and the color being printed.
So try to render your type as a single color piece of line art, not as a 4/C process file. This will avoid the jaggies you're writing about.
I also have one more question - what process is being use to print the garments? What I write above is geared towards silkscreen printing. DTG can't do spot colors or render them poorly. It's a tough choice but depends on the quality you're demanding and the price you're willing to pay.
Discuss the options with your printer and lay out your problem. Don't let the conversation end with them telling you to get rid of the jaggies. They are your best resource since they know their capabilities and resources.
If the vendor/printer is of no help, find another vendor. Printing is a creative art - they shouldn't just be selling packaged groceries off the shelf.
- Jeff
 
I think no matter what you do unless your shapes has just straight rectangular shapes you will get jaggies in PS.
If you have illustrator you can try importing them so it recognizes the font and gives you the same text which would be vector . Then you can export them to .eps file format which would also be vector and give that to you printer. This will not have jaggies. And they will be clean and smooth.

And Printers will typically have "choke" settings that will get rid of the outline!
That option is available for DTG printers. Because as I mentioned previously there will always be a coat of white before printing on DTG printers to get the perfect colors and that is what, is sticking out as borders. So, usually they would use the "choke settings" to get rid of them. Its as simple as that. It should not be this complex to print what you are trying to print. Just 2 or 3 test print runs should be good to get it right. I have seen more complex and realitic pictures being printed with transperancey with no problems on a DTG printer. I do not know why the printer has not used this feature.
As @JeffK mentioned try another printer also before you decide that it is what you did is the problem.
 
1. Yes, this image works for me. Because it keeps "smooth shape" and it seems anti-aliasing is off (not there) - so how to do it? for the Text when I'm creating it? and for the Designs (PNG) files that already done? - same steps?
2. I will do it all manually - not a problem
thx
 
1. I'm tired fighting with Redbubble (POD) that I want to try to use.... they are printing company... they told me to get rid of the "shades"
2. think they use DTG
3. I only have PS on my PC (I got no money, and not selling anything yet, just started, and want to try....)
4. Company only accept PNG files
5. here - how they printed my test/sample

sdhdhd.PNG
 
Hi smasimon
I will assume that if you get rid of the partial transparency then those images will work for you. You will need to try a sample print to verify.
Both @JeffK and @puraidodes had good comments which beg the question why the printers are being more cooperative with you as have these soft edges is very common and they should have been able to help/accommodate. Yet such as it is.

Note the the approach I give below will work in CS4 for every situation of which I can think for how transparency is created. What it does is eliminate any partial transparency and make solid the underlying color. This may or may not be what you want. If you have a very wide width of partial transparency, then the image will appear to grow.

There may be other ways to do this yet was going for one easy to implement for you.

1) You need to make sure you have a single pixel Layer (not text Layer) that only has pixels, pixels with partial transparency, and pixels with full transparency (no color at all). This single Layer should not have and Layer Mask or Vector masks (those can be merged into the pixels pretty easily if you need help with that). Also not, that since you want to have transparency, this cannot be a background Layer (which has no transparency).

If you don't have a single Layer, one pretty fool proof way to get down to one Layer and preserve transparency is to add one empty Layer and use the Layer > Merge Layers command (won't work with a single Layer)

2) Once you have this single pixel Layer with no masks you follow the following keyboard shortcut commands

Cmd+J followed by Cmd+E (Cntl+J followed by Cntl+E for PCs)
Repeat the above pair of commands 9 times (for 8 bit depth images) if you are using 16 bit images let me know.

Every time a pair of the above commands is done, a Layer is duplicated and merged back into the original. It appears that there is no change yet with each iteration, the transparency is reduced (opacity is increased). I won't get into the math yet the smallest amount of transparency (for 8 bit images) will yield totally by using 9 iterations. It takes more interations with 16 bit files.

When done, save as a PNG with the transparency and you are done.

Note that this could be turned into an Action and run on a batch of files in a folder for productivity yet thought this would be a good starting point for you to try.

If you find that the image enlarges to big when taking our the transparency, then its still possible to do yet maybe not quite as easily. The sample I returned to you was done with the steps I provided above so hope it works for your other designs.

Hope this helps so give it a try
John Wheeler

PS - There are several ways to remove the transparency in Photoshop yet fewer in the CS4 era so chose the one way that seemed the easiest to implement with the least confusion.
 

Back
Top