Photoshop Gurus Forum
Welcome to Photoshop Gurus forum. Register a free account today to become a member! It's completely free. Once signed in, you'll enjoy an ad-free experience and be able to participate on this site by adding your own topics and posts, as well as connect with other members through your own private inbox!
You are using an out of date browser. It may not display this or other websites correctly.
You should upgrade or use an alternative browser.
You should upgrade or use an alternative browser.
Removing a black background
- Thread starter iamalvir
- Start date
- Messages
- 22,948
- Likes
- 13,328
What have you tried?s there any more efficient technique
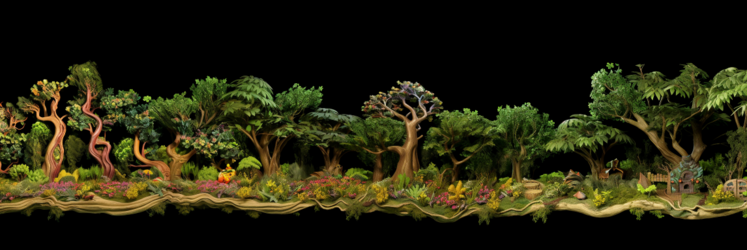
Hi IamSam - I tried quite a few... color range selection/refine mask, channel layers>contrast/curves/levels, magic eraser, Filter>Other>Minimum effect on the mask layer.... auto-remove background just doesn't work... I haven't use (just yet) the "manual" tracing i.e. pen and quick mask painting... I am just wondering if there still other options/way to do this quick but cleaner...What have you tried?
From all those things you've tried, it sounds as if you're fairly adept at Photoshop. Are you familiar with the Calculations command (found within the Image menu)? I was playing around with your image and I think I obtained a decent result using Calculations to create a new channel that will later be used as a layer mask.
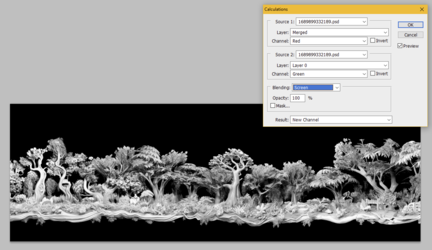
In the channels palette, I saw that the Red and Green channels provide the best contrast vs. the black background. I went to Image>Calculations and created a new channel that combines the Red and Green channels using a blend mode (that I selected) of Screen. Here are the settings:
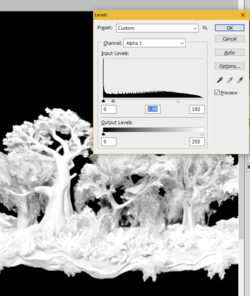
From here, I applied a Levels adjustment to this new channel to boost the whites and midtones:
After that, I selected the brush tool and changed the brush blend mode (not the layer blend mode) to Overlay. With a large overlay brush, I painted white across all the light portions of the image, which forced most of the gray-ish tones to be pure white. You don't need to be very careful because the overlay blend mode prevents the white from having any effect on anything that is pure black.
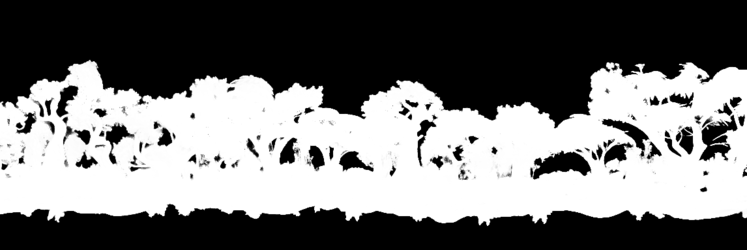
Here's my final new channel that I created:
I copied your image to a new layer and turned off the visibility of the bottom layer. Then I loaded a selection from my new channel and created a layer mask from it. To aid in seeing what's going on, I temporarily added a red background layer. It looks decent, but the edges are still a bit choppy and jaggy:
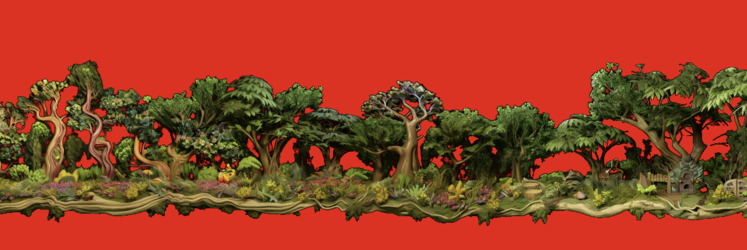
As my final step to remove the choppiness, I went into the layer mask itself and applied a one-pixel gaussian blur to the entire layer mask. Then I applied a Levels adjustment to the layer mask, moving the black slider pretty far to the right until the jaggyness was gone.
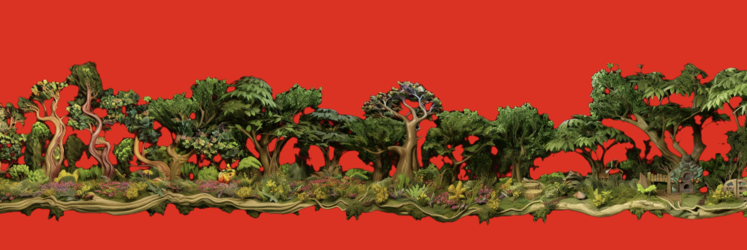
Here's the final result:
In the channels palette, I saw that the Red and Green channels provide the best contrast vs. the black background. I went to Image>Calculations and created a new channel that combines the Red and Green channels using a blend mode (that I selected) of Screen. Here are the settings:

From here, I applied a Levels adjustment to this new channel to boost the whites and midtones:

After that, I selected the brush tool and changed the brush blend mode (not the layer blend mode) to Overlay. With a large overlay brush, I painted white across all the light portions of the image, which forced most of the gray-ish tones to be pure white. You don't need to be very careful because the overlay blend mode prevents the white from having any effect on anything that is pure black.
Here's my final new channel that I created:

I copied your image to a new layer and turned off the visibility of the bottom layer. Then I loaded a selection from my new channel and created a layer mask from it. To aid in seeing what's going on, I temporarily added a red background layer. It looks decent, but the edges are still a bit choppy and jaggy:

As my final step to remove the choppiness, I went into the layer mask itself and applied a one-pixel gaussian blur to the entire layer mask. Then I applied a Levels adjustment to the layer mask, moving the black slider pretty far to the right until the jaggyness was gone.
Here's the final result:

From all those things you've tried, it sounds as if you're fairly adept at Photoshop. Are you familiar with the Calculations command (found within the Image menu)? I was playing around with your image and I think I obtained a decent result using Calculations to create a new channel that will later be used as a layer mask.
In the channels palette, I saw that the Red and Green channels provide the best contrast vs. the black background. I went to Image>Calculations and created a new channel that combines the Red and Green channels using a blend mode (that I selected) of Screen. Here are the settings:
View attachment 138710
From here, I applied a Levels adjustment to this new channel to boost the whites and midtones:
View attachment 138711
After that, I selected the brush tool and changed the brush blend mode (not the layer blend mode) to Overlay. With a large overlay brush, I painted white across all the light portions of the image, which forced most of the gray-ish tones to be pure white. You don't need to be very careful because the overlay blend mode prevents the white from having any effect on anything that is pure black.
Here's my final new channel that I created:
View attachment 138712
I copied your image to a new layer and turned off the visibility of the bottom layer. Then I loaded a selection from my new channel and created a layer mask from it. To aid in seeing what's going on, I temporarily added a red background layer. It looks decent, but the edges are still a bit choppy and jaggy:
View attachment 138714
As my final step to remove the choppiness, I went into the layer mask itself and applied a one-pixel gaussian blur to the entire layer mask. Then I applied a Levels adjustment to the layer mask, moving the black slider pretty far to the right until the jaggyness was gone.
Here's the final result:
View attachment 138715
Thank you Rich54! This looks pretty neat. I will try this and see how it will blend into my base image (the other image that I will put this one on...) I appreciate you! Cheers
thebestcpu
Guru
- Messages
- 2,999
- Likes
- 2,769
Hi @iamalvir
As always, there are many ways to approach a problem in Photoshop. Here is one more way:
Here is your original image and a solid blue Layer underneath:
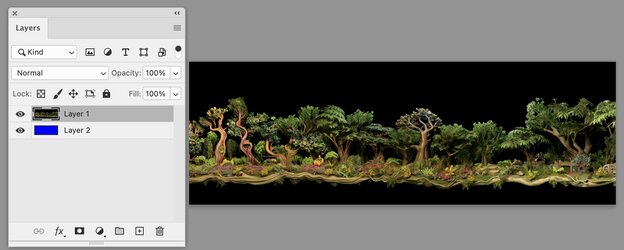
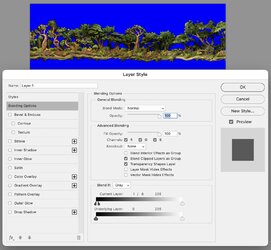
Now opening up the Layer Styles on your image I am using the Top Blend If sliders to remove the black to see the underlying blue Layer. I am moving the far left slider to the postion of "1" and then by holding down the option key (Alt key on a PC) and sliding it slightly to the right which allows some dynamic feathering of what will become a mask. You can tune both positions to your desired point and come back and change again if desired:
If you want a Layer Mask (optional) you add a empty Layer on the top of the stack and turn off the blue Layer:
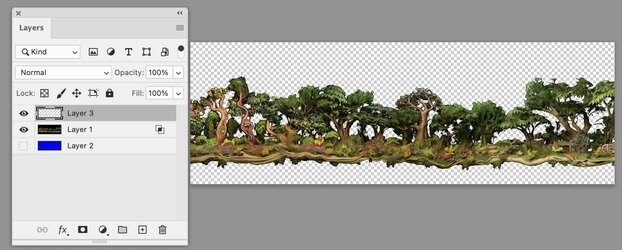
Stamp to this empty Layer Shift+ Opt + CMD + E (Shift + Alt + Ctrl + E on PC I believe). This forces the transparency into the new Layer instead of being in the Layer Style
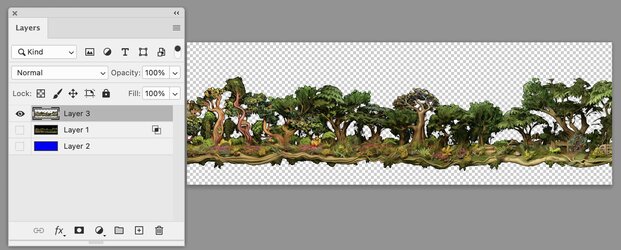
Now I have turned back on the blue Layer and used the Layer > Layer Mask > Create from Transparency Command on the top Layer to move the transparency into a Layer Mask
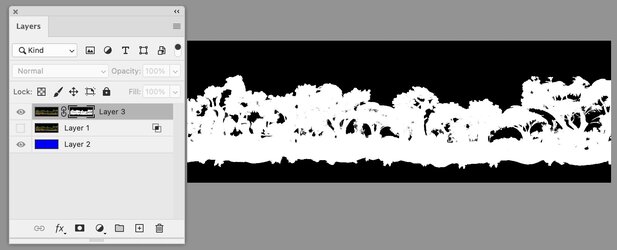
And here is viewing just the Layer Mask:
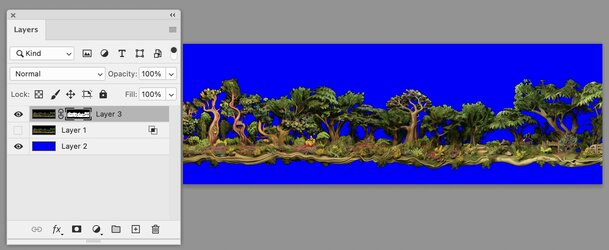
As @Rich54 mentioned to smooth out the mask you can just add around 1 pixel of Gaussian blur to taste. I added 0.3 amount of blur on this example:
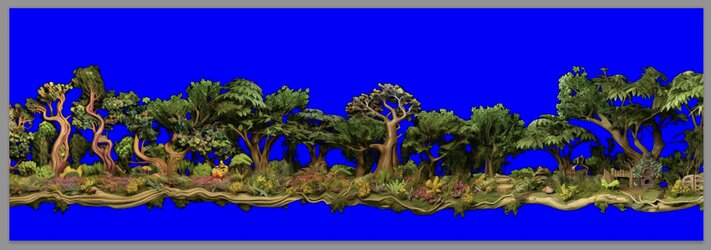
With a final result with the blue background. At this point there may be subtle areas that you do not want showing through and those can be editing by hand on the Layer Mask Just another approach to consider
John Wheeler
As always, there are many ways to approach a problem in Photoshop. Here is one more way:
Here is your original image and a solid blue Layer underneath:

Now opening up the Layer Styles on your image I am using the Top Blend If sliders to remove the black to see the underlying blue Layer. I am moving the far left slider to the postion of "1" and then by holding down the option key (Alt key on a PC) and sliding it slightly to the right which allows some dynamic feathering of what will become a mask. You can tune both positions to your desired point and come back and change again if desired:

If you want a Layer Mask (optional) you add a empty Layer on the top of the stack and turn off the blue Layer:

Stamp to this empty Layer Shift+ Opt + CMD + E (Shift + Alt + Ctrl + E on PC I believe). This forces the transparency into the new Layer instead of being in the Layer Style

Now I have turned back on the blue Layer and used the Layer > Layer Mask > Create from Transparency Command on the top Layer to move the transparency into a Layer Mask

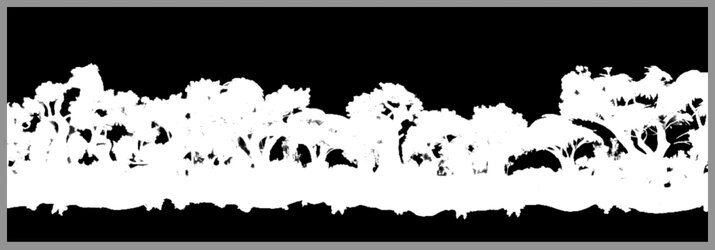
And here is viewing just the Layer Mask:

As @Rich54 mentioned to smooth out the mask you can just add around 1 pixel of Gaussian blur to taste. I added 0.3 amount of blur on this example:

With a final result with the blue background. At this point there may be subtle areas that you do not want showing through and those can be editing by hand on the Layer Mask Just another approach to consider
John Wheeler

Thanks a lot @thebestcpu ! I will also try this and add it to my "library" of techniques!Hi @iamalvir
As always, there are many ways to approach a problem in Photoshop. Here is one more way:
Here is your original image and a solid blue Layer underneath:
View attachment 138739
Now opening up the Layer Styles on your image I am using the Top Blend If sliders to remove the black to see the underlying blue Layer. I am moving the far left slider to the postion of "1" and then by holding down the option key (Alt key on a PC) and sliding it slightly to the right which allows some dynamic feathering of what will become a mask. You can tune both positions to your desired point and come back and change again if desired:
View attachment 138740
If you want a Layer Mask (optional) you add a empty Layer on the top of the stack and turn off the blue Layer:
View attachment 138741
Stamp to this empty Layer Shift+ Opt + CMD + E (Shift + Alt + Ctrl + E on PC I believe). This forces the transparency into the new Layer instead of being in the Layer Style
View attachment 138742
Now I have turned back on the blue Layer and used the Layer > Layer Mask > Create from Transparency Command on the top Layer to move the transparency into a Layer Mask
View attachment 138743
And here is viewing just the Layer Mask:
View attachment 138744
As @Rich54 mentioned to smooth out the mask you can just add around 1 pixel of Gaussian blur to taste. I added 0.3 amount of blur on this example:
View attachment 138745
With a final result with the blue background. At this point there may be subtle areas that you do not want showing through and those can be editing by hand on the Layer Mask Just another approach to consider
John Wheeler
View attachment 138746

