What's new
Photoshop Gurus Forum

Welcome to Photoshop Gurus forum. Register a free account today to become a member! It's completely free. Once signed in, you'll enjoy an ad-free experience and be able to participate on this site by adding your own topics and posts, as well as connect with other members through your own private inbox!

Preserving brush results with color dodge mode on transparent canvas?


NoName

Active Member
Messages
32
Likes
3
Hello all,

Is it possible to use a brush with color dodge mode, brush over an image on a different layer, then copy the results with the image layer being a transparent canvas? Currently, if I delete the image on which a brush was applied (in color dodge mode), unless the image remains, the resulting brush with the effect of color dodge is not preserved (it just pretends that the image was never there in the first place). I'd like to get the result of painting with the brush in color dodge mode on the image, but then having the image itself be transparent so I can copy the result and use it elsewhere. Is this possible?
To illustrate this better, here's the setup:

Layer 1 (brush layer) <-- color dodge mode
Layer 0 (bg layer with image)

What I want after brushing while keeping the result untouched:

Layer 1 (brush layer) <--color dodge mode, brush applied, results preserved
Layer 0 (transparent)

Photoshop version is Adobe Photoshop CC 2015.

Thank you for any help.
 
Hello and welcome to PSG.

Just a few questions.

Is layer 1 from your first example above just a blank new layer? Or is it a copy of the background image layer?

Either way in my own experiments, nothing happens to Layer 1 whether it's a new blank layer.........which is nothing but a solid color after brushing, or if it's a copy of the background image layer, when I delete the "image layer".

Maybe a screen shot of your layers panel would help.
 
I did find a situation that matches your description.

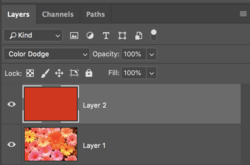
When you say paint in color doge mode, are you referring to the layers blending mode in the layers panel?
Screen Shot 2018-06-25 at 5.56.19 PM.png

Or are you referring to the Painting mode of the Brush Tool itself?
Screen Shot 2018-06-25 at 5.56.34 PM.png
 
If your using a blank new layer and your also using the layers blending mode set to "color dodge", and then painting in that layer.

Screen Shot 2018-06-25 at 6.04.57 PM.png
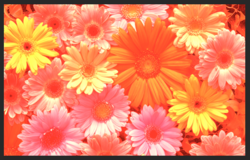
Result
Screen Shot 2018-06-25 at 6.05.06 PM.png

Then just select/highlight the the Layer 2 layer, press Shift + Opt/Alt + Cmd/Contrl + E.
This merges all visible layers into a single target layer without harming the original layers. (turn off all layers that you don't want included!)
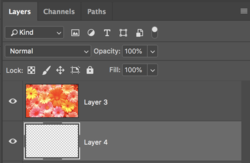
Then add a blank transparent layer below it.
Screen Shot 2018-06-25 at 6.05.26 PM.png
 
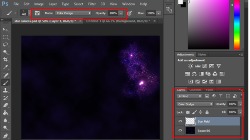
Thank you for the constructive explanation IamSam. What I'm trying to do is create a star field using a star field brush and taking the result to apply elsewhere. The way the brush is designed, it seems to work properly only with the layout I explained in the OP, but the problem I have is in extracting the blended starfield with its blended appearance, but divorced from the Space background. For sake of easiness, I have named Layer 0 as Space BG and Layer 1 as Star Field. Blend mode of the brush and star field are both Color Dodge.

Below is the setup (image slightly scrunched):

DNywH99.png

The problem is I can't extract the blended, purplish star field without it reverting back to its unblended, white form when I copy it and paste it into a new document or Save As. I want to keep the blended, colored star field, but not the space background (i.e. the star field should be on a transparent canvas).

Forgive me if I've misunderstood, but in your solution, the result is fused.

Thanks!
 
The problem is as you can see each star in this brush goes from white-purplish color and blends to color of underlying layer, in this example "Space BG"
There are two things that may help you a little:

SOLUTION 1:
1. When you have your graphic ready ( stars painted ) - Select all (CMD/Ctrl+A)
2. Edit > Copy Merged
3. Paste in your desired document and change blend mode of layer to screen

SOLUTION 2: (more close to what you want but with worse result)
1. When you have your graphic ready ( stars painted ) - CMD/Ctrl click on StarField layer Thumbnail to select this layer transparency
2. Edit > Copy Merged
3. Paste where you want

Hope that I understood you well and this helps a little ;)
 
but the problem I have is in extracting the blended starfield with its blended appearance, but divorced from the Space background.
I want to keep the blended, colored star field, but not the space background
I understand now what your wanting to do, thanks for the extra info it really helped. All the talk of blending and color modes was confusing and not really needed because you were always wanting to isolate the blended star field and it's black or dark background.

Ok, at the moment I would like to say that what your trying to do will only work as long as your adding the result to a similar background. You may have to use a blending option that might alter the result from it's original form when applied to another image.

I would select/highlight both the layers copy using Cmd/Cntrl + J, then Cmd/Cntrl + E to merger...........this saves the original
Then I would apply a layer mask to the copied and merged layer.
Use your Brush Tool set to black, lower your opacity and flow, use a soft edged brush setting, and slowly go to work masking out all of space background around the star field until your happy with the end result.

As I stated before, once you have saved this result and you try to add it to another similar BG, you may have to use a blending option that will alter the appearance of the saved result.

Having stated this, I'm going to try and find another way but I'm pressed for time right now.

Can you upload the star field brush or link us to it?
 
Thank you revnart and IamSam. I have noted both your solutions and copied your posts into a word document located in this project's directory. IamSam, if you could find another way to achieve this result, that'd be awesome!

I will keep watching this thread and look forward to a solution if you are able to find one.

Thanks again!
 
Any chance you could share a cropped version of the PSD in a post here (or share through file sharing service)? That would make it easier to duplicate your work and come up with alternatives.
Just a suggestion
John Wheeler
(hope I did not miss it if you already shared and I did not see it)
 
Thanks for that suggestion thebestcpu!

I'm not sure what you mean by "cropped version" of the PSD, but I have attached the PSD file in question along with the brush that was used (its free to use).

Hope this helps!
 

Attachments

^ close, but not quite.

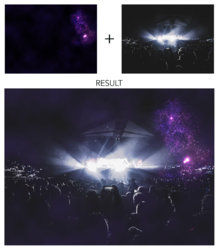
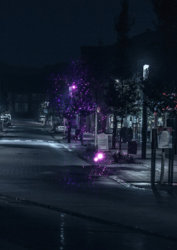
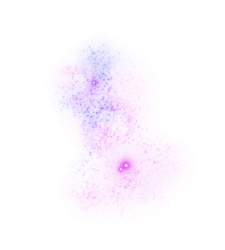
The goal is to separate the stars from the space background once the blended effect of the space bg has been applied to the stars (thanks to color dodge). The reason for doing so is to obtain an image of the stars, with transparency, after they have been blended with the space bg (i.e. darkish, purplish stars), instead of an image where the blended stars are permanently fused with the space bg. This is so it can be applied anywhere, both inside and outside Photoshop and on any background I choose.

In your image above, the stars are still fused with the space bg. :cry:
 
It's solution number 2 from one of my previous posts, but you have to remember that putting it on a bright background will make a little darker halos around stars.You can always set stars blend mode to screen to get rid of that problem.
 
@revnart My apologies for not trying your solution 2 earlier. After trying it out proper, it does appear to be working the way I intend it to.

@IamSam I've attached the space bg I've used for this project. I'm still curious to see what your solution is (if its different than revnart's) if you're still willing to provide one (I promise I'll test it!).

Thank you all!

star canvas BG.png
 
Thank you IAmSam. I'd wager you used a different method to achieve that result? Looks great.

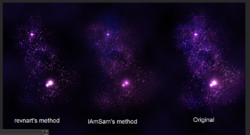
I have attached an image below that compares the methods mentioned so far (not sure what IAmSam's method was tho). Take a look:

star comp.PNG

They both look pretty good, but I think it might be beneficial to merge the two outcomes.
 
I'd wager you used a different method to achieve that result?
Yes I did and the end result could be tweaked to look more like the original, it would have taken more time than I had. I just threw that example together, I really wasn't expecting it to hold up against a comparison...........more of an option.

However, I believe revenart's solution will work the best. For the moment, I don't see any way of merging the two outcomes from your example.
 

Back
Top