
Photoshop Gurus Forum
Welcome to Photoshop Gurus forum. Register a free account today to become a member! It's completely free. Once signed in, you'll enjoy an ad-free experience and be able to participate on this site by adding your own topics and posts, as well as connect with other members through your own private inbox!
You are using an out of date browser. It may not display this or other websites correctly.
You should upgrade or use an alternative browser.
You should upgrade or use an alternative browser.
Photoshop Painting Techniques
- Thread starter Professor M
- Start date
-
- Tags
- tecniques
Professor M
Active Member
- Messages
- 30
- Likes
- 0
Thanks, man!~ I'll send other examples when they are ready. If u have other tips for me, please feel free.
Professor M
Active Member
- Messages
- 30
- Likes
- 0
Professor M
Active Member
- Messages
- 30
- Likes
- 0
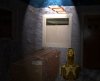
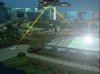
Hello, everyone. I hope that this month turns out intereestingly. To start, I present a photo manipulation which I just featured on deviantart in my profile there. Everyone's help has proved enlightening. The idea is rather Lovecraftian, from his Cthulhu Mythos series, which inspired my stories.
Attachments
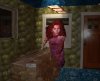
If you want to literally paint the walls (in PS) you can create a new empty layer, set the layer property to Color and paint.
That's not the way to do it though and it's not going to look right.
Copy the background layer, now you have 2 layers.
You need to make a selection of the walls only, invert the selection and create a layer mask.
This new layer with the mask shows only the walls, the original layer shows the rest of the image.
With the Alt key held down make a new Hue/Saturation adjustment layer and check the box that says "Use Previous Layer to Create Clipping Mask".
Now as you adjust the Hue/Saturation sliders the colors will change on the walls only.
View attachment 1265
Hi Steve,
A newbie here with a question. Couldn't the same thing be accomplished faster without the layer mask? i.e., Just make a new layer and select the walls; then make the hue/saturation adjustment layer and change the wall colors. Not as many steps, although going through the steps you posted did teach me more than I already knew about the layer mask section. Thanks.
Professor M
Active Member
- Messages
- 30
- Likes
- 0
In fact, sometimes I just make a layer of the target areas and do not invert for layer mask and I can change their properties in the same manner. Everyone is very useful in this endeavour.
Professor M
Active Member
- Messages
- 30
- Likes
- 0
Hi! Regarding my thread, I have found that making separate layers of the settings (wall etc) and then using the layer styles and so forth as suggestede works better; because still the pattern style for layers only paints in a straight line. The rest is still ok. Thanks all.
Professor M
Active Member
- Messages
- 30
- Likes
- 0
Try this out: there are ways to make dripping and 3D texts but I wonder how to make lines and patterns along the pen tool more 3D.
Professor M
Active Member
- Messages
- 30
- Likes
- 0
That makes at least two of us, friend. Today, I tried some ways but could not get satisfactory results. Hang in there though.
Steve
Retired Administrator
- Messages
- 7,868
- Likes
- 1,506
Hi Steve,
A newbie here with a question. Couldn't the same thing be accomplished faster without the layer mask? i.e., Just make a new layer and select the walls; then make the hue/saturation adjustment layer and change the wall colors. Not as many steps, although going through the steps you posted did teach me more than I already knew about the layer mask section. Thanks.
Hi Kitsap, I've been away for a week and I'm trying to catch up, sorry for the delay.
The layer doesn't really slow you down, it's one step.
With that mask you you can refine you're selection, add areas you missed, eliminate areas that bleed into the rest of the image, smooth out or feather a transition if you need to.
Without the mask, you're stuck with your selection, good or bad, and can't make detailed corrections.
Steve
Retired Administrator
- Messages
- 7,868
- Likes
- 1,506
Just can't help it, but am I the only one here who can't figure out what it's all about?
I'm really lost, and it seems like hopelessly...
Lol, it's nope hopeless, what can't you figure out?
Professor M
Active Member
- Messages
- 30
- Likes
- 0
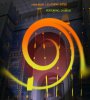
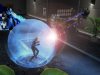
Hi. Steve, you're ever so on the ball. I am going to post my latest edits for everyone's enjoyment. You all and the other tuts I studied came in very handy.
Attachments

Professor M
Active Member
- Messages
- 30
- Likes
- 0


Hi Kitsap, I've been away for a week and I'm trying to catch up, sorry for the delay.
The layer doesn't really slow you down, it's one step.
With that mask you you can refine you're selection, add areas you missed, eliminate areas that bleed into the rest of the image, smooth out or feather a transition if you need to.
Without the mask, you're stuck with your selection, good or bad, and can't make detailed corrections.
Well now I'm the one who's been offline for a few days, so I send my own apologies ... That does make sense Steve; I didn't think about making corrections/refinements at that particular juncture. You learn something every day around here ... but hey, that's the point. Thanks!
Steve
Retired Administrator
- Messages
- 7,868
- Likes
- 1,506
Well now I'm the one who's been offline for a few days, so I send my own apologies ... That does make sense Steve; I didn't think about making corrections/refinements at that particular juncture. You learn something every day around here ... but hey, that's the point. Thanks!
You're welcome, glad to help.
Professor M
Active Member
- Messages
- 30
- Likes
- 0
Scott20015
Well-Known Member
- Messages
- 46
- Likes
- 1
Here's a quickly done color change.
1) Use color range to get most of wall color selected and then use brushes in quickmask to clean up and add/remove as needed.
2) Use a layer set "solid color" and choose color. Set that layer style to "color" or "hue" (whichever looks best).
3) If needed change opacity of that layer to show shadows better.
Professor M
Active Member
- Messages
- 30
- Likes
- 0
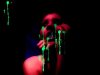
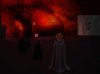
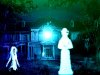
I saw the work mentioned and tried some like it too; but the effect was not so spectacular as I am apt to attempt. Check out what I did so far; I am on other websites as a member. Someone is collecting them too!
Attachments

Last edited by a moderator: