Photoshop Gurus Forum
Welcome to Photoshop Gurus forum. Register a free account today to become a member! It's completely free. Once signed in, you'll enjoy an ad-free experience and be able to participate on this site by adding your own topics and posts, as well as connect with other members through your own private inbox!
You are using an out of date browser. It may not display this or other websites correctly.
You should upgrade or use an alternative browser.
You should upgrade or use an alternative browser.
Not sure how to fix these edges with motion blur
- Thread starter Drumbum
- Start date
- Copy your image twice onto new layers. Turn off the visibility of the bottom two layers.
- On the top layer, make a careful selection of the plane and apply a layer mask. You should now have an image of only the plane. Turn this image off for now.
- Reactivate the selection you made of the plane.
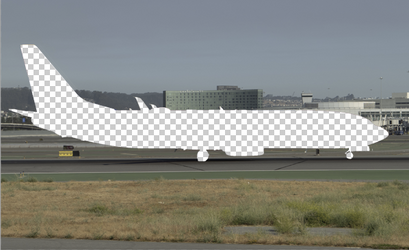
- Go to your middle layer and press Delete. You have now deleted the plane, leaving a hole of transparency. Like this:
- Reactivate the selection of the plane.
- On this same middle layer, go to Select>Modify>Expand and expand the selection by a few pixels.
- Go to Edit>Fill>Content Aware.
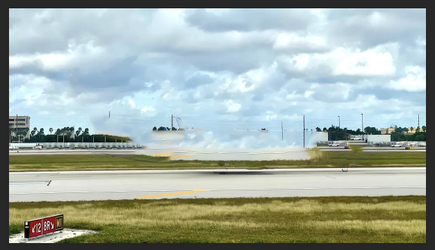
- The hole where the plane used to be is now filled with an approximation of the immediate background.
- Once you've filled the hole, you can now apply your motion blur to this image.
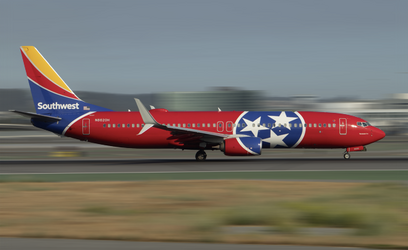
- Turn the top layer back on, restoring the original airplane.
Ordinarily, I hate Content-Aware and feel that it does a poor job, especially with my very old version of Photoshop. But in this case, your extreme Motion Blur compensates for any imperfections of the content-aware filter.
- Messages
- 23,225
- Likes
- 13,423
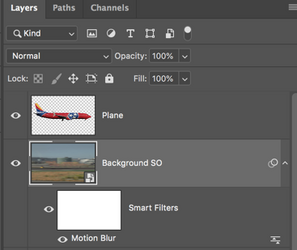
Exactly what I was working up! You beat me to it! The only thing I did different was that I converted the layer I used content aware on (which I called background) to a Smart Object so I could easily adjust the blur setting if needed. (Note: I also applied the layer mask to the plane layer, which is not a good idea unless you are confident that you will not need to change the mask!)

Hi there,
Thanks very much for the guidance, I have spent several hours going through the steps you provided and it is slowly starting to come together. I have a reasonable result.
But: In step 2 selecting the plane for a layer mask, I spend ages moving the mask around to fill and remove areas as required.
However in step 3 when it comes to deleting the plane from the middle layer, I am unsure how to reactivate the “modified” selection of the plane in order to leave a hole the same as the plane selected in the top layer.
I have been simply pressing “select subject” again and this just redefines the plane with imperfections that I had to clean up in step one.
Sorry if this is not a clear description of my predicament?
Can you guide me as to what you mean with "reactivate the selection you made of the plane"?
Cheers and thanks again, very helpful.
- Messages
- 23,225
- Likes
- 13,423
This is normal depending on the Tool you are using. The best tool to use would be the Pen Tool, but it has a learning curve. The Quick Selection Tool is easy to learn and works well, but it does require adding and subtracting from the selection.But: In step 2 selecting the plane for a layer mask, I spend ages moving the mask around to fill and remove areas as required.
Once you have the plane selected and have added your layer mask, just hit Cmd/Cntrl + click the planes layer mask in the layers panel. This will reactivate the planes selection.However in step 3 when it comes to deleting the plane from the middle layer, I am unsure how to reactivate the “modified” selection of the plane in order to leave a hole the same as the plane selected in the top layer.

This is normal depending on the Tool you are using. The best tool to use would be the Pen Tool, but it has a learning curve. The Quick Selection Tool is easy to learn and works well, but it does require adding and subtracting from the selection.
Once you have the plane selected and have added your layer mask, just hit Cmd/Cntrl + click the planes layer mask in the layers panel. This will reactivate the planes selection.
View attachment 145720
Thanks again guys, this has been very helpful.
But I am still struggling with several issues.
This is what I have done thus far running into problem number one.
- Created 2 duplicate layers then deselected the bottom 2 using the eye button.
- Outlined the plane using SELECT SUBJECT then refined the plane in certain areas.
- Then pressed CREATE MASK FROM SELECTION
- Deselected the eye for the top mask (now all are deselected)
- Reactivated the selection by pressing CTL/CMD plus clicking the mask icon on top layer
- It loads a pop up box with the following options:
- Disable
- Delete
- Apply
- Add
- Subtractinersect.
Cheers and thanks
- Messages
- 23,225
- Likes
- 13,423
None of these are correct. No "box" should appear. The selection should just load.........in other words, you will just see the marching ants.It loads a pop up box with the following options:
- Disable
- Delete
- Apply
- Add
- Subtractinersect.
Cmd/Cntrl is just one key. Command on a mac and Control on a PC.Reactivated the selection by pressing CTL/CMD plus clicking the mask icon on top layer
On a mac, you have both a control key and a command key, if you hit them both and click the layer mask you will get this.....
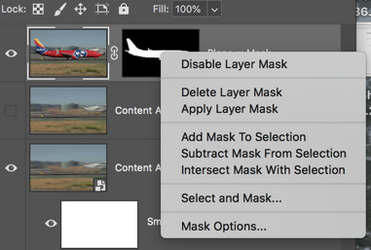
Only push one key! The command on a mac OR the control on a PC!
IAMSAM
thanks, got it, my silly mistake.
I have that problem solved and I can now progress to FILL CONTENT AWARE.
On the second layer which is a background but with a hole where the plane should be.
When I select FILL CONTENT AWARE, it takes about 30 seconds of spinning wheel then the background dissapears and the entire layer is just white pixels with a dotted black outline where the plane was.
Again, your patience is really appreciated.
- Messages
- 23,225
- Likes
- 13,423
When you added the layer mask to select the plane, was the mask all black with a white plane? Like the image below?When I select FILL CONTENT AWARE, it takes about 30 seconds of spinning wheel then the background dissapears and the entire layer is just white pixels with a dotted black outline where the plane was.

Or was it all white with a black plane?

If it was all white with a black plane, then you need to click the layer mask one time to select (you will see it in the white brackets), then hit Cmd/Cntrl + I to invert the selection. Then try the Content aware fill again.
IAMSAM
Thanks very much, this has been weeks of struggle to get this to work and finally success.
I managed to get the exact reults with the photo above however when I started working on a similar plane I keep getting the message "Could not fill because there are not enough source pixels on the selected layer" when selecting FILL CONTENT AWARE.
Arrgghh, any ideas on this one.
thanks again.
- Messages
- 23,225
- Likes
- 13,423
Ok..........at this point I have to ask, are you still working in the same document that you stated with? If so, you may need to start from scratch on a new document and apply what you have learned and follow the instructions again. If you are still working in the old document, it's really hard to tell what has been done, or what exactly you are doing, without seeing screen shots or you posting the PSD file.
The error indicates that you are not using the correct layer for what you're trying to do. I can't see what layer you are on and what has or has not been done to that layer. It would really help if I could see what you are doing!!!!
The error indicates that you are not using the correct layer for what you're trying to do. I can't see what layer you are on and what has or has not been done to that layer. It would really help if I could see what you are doing!!!!
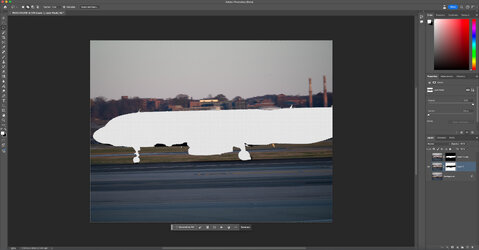
This is a new document, I have started again maybe a dozen times. I will attach a screenshot of the latest attempt.
The top layer is the plane with no background.
The middle layer is the background with no plane as you can see.
My next step is to complete the FILL CONTENT AWARE.
Sometimes I get the message "Could not fill because there are not enough pixels ......." but now I am finding when I try FILL CONTENT AWARE after the spinning wheel I still get a complete white image with a black dotted outline of the plane.

Aha! I see where your problem is.
This is the new file you're working on (below). In the middle layer, when you are deleting the airplane, you are deleting it with a layer mask. Do not use a layer mask on the middle layer. Go onto the layer itself and delete the actual pixels of the airplane. The fact that you're using a layer mask probably explains why Content-Aware is giving you such erratic results.

This is the new file you're working on (below). In the middle layer, when you are deleting the airplane, you are deleting it with a layer mask. Do not use a layer mask on the middle layer. Go onto the layer itself and delete the actual pixels of the airplane. The fact that you're using a layer mask probably explains why Content-Aware is giving you such erratic results.

- Messages
- 23,225
- Likes
- 13,423
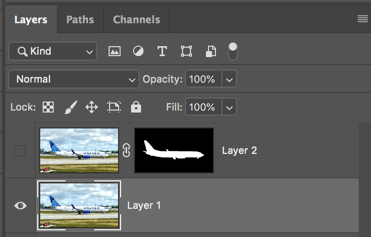
This is because you are using a layer mask on the "middle" layer as Rich explains. The layer mask with the white background makes a selection of the background and not the plane. This is why it's removing the entire background and leaving the marching ants in the outline of the plane. Delete the layer mask of the "middle" image. Keep the "middle" image (Layer 1 on yours) layer highlighted, hit Cmd/Cntrl + click the layer mask of the airplane layer (Layer 1 copy on yours), now go to your Content Aware fill.but now I am finding when I try FILL CONTENT AWARE after the spinning wheel I still get a complete white image with a black dotted outline of the plane.
Your layers panel should look like this. Middle layer highlighted.
Then add the selection by Cmd/Cntrl + clicking on the layer mask of the plane layer.
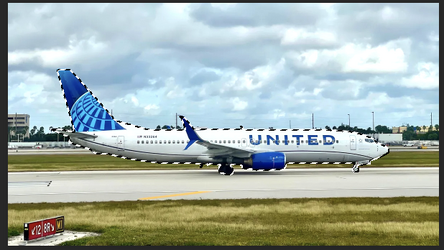
Your document should look like this..
Now with the application of the EDIT > FILL > content aware.........it should come out with some funny (but usable) image like this...
Your layers panel should now look like this.....
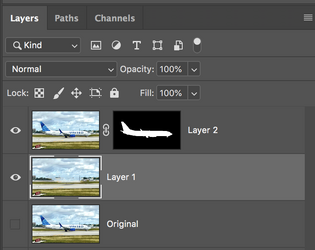
All that's left to do is to apply a Motion Blur to the middle layer.


