What's new
Photoshop Gurus Forum

Welcome to Photoshop Gurus forum. Register a free account today to become a member! It's completely free. Once signed in, you'll enjoy an ad-free experience and be able to participate on this site by adding your own topics and posts, as well as connect with other members through your own private inbox!

Merging Two Image Together


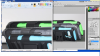
The best all round too for just about any job is the Pen Tool.
Any of the other selections tools work great as well.
If your having trouble with small areas hit the command/control + (plus + or minus -) keys to zoom in and out.

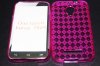
The transparency you see in post #3 is the case itself.
 
Hello,
I'm actually trying the pen tool, it seems to be the one that takes the most time.
Base on your experience, what tool is the fastest way to make the image below
 

Attachments

  • $_3.jpg
    $_3.jpg
    123.7 KB · Views: 1
Pen Tool to isolate and remove background.

Command/control + J to duplicate the image.

Move Tool to move the duplicated image to it's new position.

Hue & Saturation adjustment layer (set to colorize) for the color changes.
 
look at my image
this was done with quick selection tool, the circle 2 bar in the left paint picture has white ugly spot, basally I already have all those phone cover piture, as you see in the attach I did it, I just want to make it look proffessinal without the white spots.

but pen takes like forver for just 1 picture, what if I had 20
 

Attachments

  • 1234.png
    1234.png
    1.5 MB · Views: 2
The ugly spot is called aliasing. The Pen Tool will help eliminate this.

Even if you have 20, the Pen Tool will still be the best bet.

You need to learn the Pen Tool and you will get faster.

There are several other better ways to isolate objects, but you will have to become much more familiar with Photoshop before we can get into those.
 
Hello,
I see, ok I will try my best to work with pen, just a quick question beside pen, quick selection, magic selection what other tool can also remove background, that way I can test with the others also. By the way do I have to turn on anything with paint, since its tracing, isn' it even harder? since I have to be exact, you have to look so hard that you didn't miss out every corner and holes.

Then regarding to my post #3 earlier,you said transparent was by case itself, if I use the picture below, I can never do this for some reason. since the item has diamond shape, I don't know how to remove the background

also how can I change the hue and saturation of the black part ONLY in picture post #22 on top because I notice by defaut it only change the fruity colors, and colorize will change both.
 

Attachments

  • $_57.jpg
    $_57.jpg
    211.8 KB · Views: 1
Last edited:
This image is really a poor candidate for background removal. These transparent cases need to photographed properly to avoid the need to use Photoshop to make any changes. At the very least, just a better photo, with the phone posed straight up and on white background if at all possible.
 
I have to run now to pick up the GF from work. If you have further questions, there are other very qualified members who can help!

Good luck!
 
Hello,
Ok thanks so much sam! I will await your & every other member professional reply about this. If you can when you get back, I just need to know about my other 2 question In previous post #26. Then another one came up when you said I need to take the photograph line up straight and white bg for removal. Question is what if I line up the product straight, but it still end up slanted in some way, what can we do to fix this? then if I use white bg, since the case is transparent I'm afraid that the white would also appear in the background inside the diamond part of the case and if that happens, we still wouldn't be able to do the background removal, since there white inside.
 

Back
Top