
Photoshop Gurus Forum
Welcome to Photoshop Gurus forum. Register a free account today to become a member! It's completely free. Once signed in, you'll enjoy an ad-free experience and be able to participate on this site by adding your own topics and posts, as well as connect with other members through your own private inbox!
You are using an out of date browser. It may not display this or other websites correctly.
You should upgrade or use an alternative browser.
You should upgrade or use an alternative browser.
Merging Two Image Together
- Thread starter iztmbpic
- Start date


Hello,
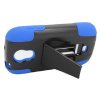
Yes exactly like that, just maybe a little more realistic, but its is enough already if its not possible. Like the hole on top of the camera to the left is showing white spot instead the 2nd picture top left.
But yes that's exactly what I wanted.
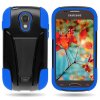
Then another one I wanted to find out is basically very similar to the one you just did, very minor changes. If you check the image below attached to this post, you can see that its transparent, which is probably the only different compared to the other one. I don't know if that transparent was going through photoshop or was it just the case itself that made it transparent by default after doing the merging.

Yes exactly like that, just maybe a little more realistic, but its is enough already if its not possible. Like the hole on top of the camera to the left is showing white spot instead the 2nd picture top left.
But yes that's exactly what I wanted.
Then another one I wanted to find out is basically very similar to the one you just did, very minor changes. If you check the image below attached to this post, you can see that its transparent, which is probably the only different compared to the other one. I don't know if that transparent was going through photoshop or was it just the case itself that made it transparent by default after doing the merging.
Last edited:
- Messages
- 23,842
- Likes
- 13,617
Sorry, but I was not trying to be realistic at all, that's for you to do when you make your own.
I still don't understand what you want.
Here's what I did....
Take your first image, open into Ps and cut out all the appropriate holes and the background.
Open the second image in Ps. Then use one of the selection tools and make a selection of the camera lens from the second image, copy the selection, then paste it into the first image. Place the copied selection layer below the original. Position with the free transform function. Do the same for any other parts of the phone that show through the cover.
OR, you could cut out the entire phone in the second image and move it into the first image with the Move tool and then transform.
Hello,
Base on your experience, which process do you think is faster leaving the best or same quality? the selection then transform or move & transform. Base on saying, it sounds to be that the move is like a 1,2 and 3 move.
By the way do you know of any idea related to my previous post image with the transparency if it was done through the cover being transparent itself or photoshop made it transparent when put both the product and the phone together.
Using your mouse and cursor, simply click on the layer in the layers panel, and drag the layer below the other.
I went to the layer panel, merge them together, end up below image
Attachments
You need to move the layer of the selection of the camera lens below the layer with the phone cover.
Yeah that was my main concern, I can't find the option anywhere either to make the full mobile or the camera lens below the phone cover layer. Also how would I possible know if after transforming the camera lens fit phone cover camera hole perfectly, I just resize it base of observing but nothing else.


- Messages
- 23,842
- Likes
- 13,617
Here are some tutorials for you to look at:
http://www.youtube.com/watch?v=OzGENXihWM4
http://www.photoshopcafe.com/tutoria...efine-edge.htm
http://planetphotoshop.com/using-refine-edge.html
http://www.youtube.com/watch?v=nOjzTbP8eT8
http://www.youtube.com/watch?v=Rl0SV...eature=related
http://tutvid.com/selecting-hair-dif...shop-tutorial/
http://planetphotoshop.com/masking-with-channels-2.html
http://planetphotoshop.com/using-cha...photoshop.html
http://psd.tutsplus.com/tutorials/to...-selections-1/
http://psd.tutsplus.com/tutorials/to...-selections-2/
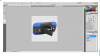
Post a screen shot of your layers panel and let's see what could be wrong.
screenshot attached
Attachments


AHH!!
I finally found it. IT WORKED, but I notice one thing what if I get another sample of a phone cover and the phone mobile picture in 2 total huge difference size. Like the phone cover is 1500x2000 while the phone mobile is 500x700, how can I possible put that in with perfect fitting since the size is huge different, this way the camera len would be so much smaller if I pull it over, and resizing would make it funky or sloppy looking.
I finally found it. IT WORKED, but I notice one thing what if I get another sample of a phone cover and the phone mobile picture in 2 total huge difference size. Like the phone cover is 1500x2000 while the phone mobile is 500x700, how can I possible put that in with perfect fitting since the size is huge different, this way the camera len would be so much smaller if I pull it over, and resizing would make it funky or sloppy looking.
- Messages
- 23,842
- Likes
- 13,617
Just reduce the size of the phone cover image (1500 x 2000) to a more reasonable size. Use IMAGE > IMAGE SIZE.
Any other size changes on either image can be made with the Transform function. Up-sizing the smaller of the two images will cost you some resolution.
Any other size changes on either image can be made with the Transform function. Up-sizing the smaller of the two images will cost you some resolution.
Hello,
I was wondering what is the best tool to not only clear out the background but the part of the phone cover that is going to be used of the mobile phone. Such as the camera lens which is easier, but how about the speaker volume, and every other smaller ones, I'm using quick selection tool, it is easy to get rid of the background and bigger spots, but all the very small little hole is very hard to remove, im planning to do the move & transform but its so hard to get rid of all the empty holes in the phone cover.
By the way any idea about the transparent in post #3 of this thread.