What's new
Photoshop Gurus Forum

Welcome to Photoshop Gurus forum. Register a free account today to become a member! It's completely free. Once signed in, you'll enjoy an ad-free experience and be able to participate on this site by adding your own topics and posts, as well as connect with other members through your own private inbox!

How to turn borders of clip-art into transparent pixels?


(I've been trying and editing so much stuff today that it might be slightly different from what I posted in the beginning, not sure, brain has been getting fried a bit)
Ah.......that explains it. We can only work with what you post as examples! As long as you're happy, then I will go away!! LOL!
 
As long as you're happy, then I will go away!! LOL!
I indeed am, and this will work for what I am using this for.

But I now also realise that this solution does not make possible how I described it in posts of mine, namely that you would be able to select the to-transparency-converted layer, copy it, and use it for simply pasting it on other images or projects.
Again, I am completely satisfied with how this working now, so no need for anyone to put in more time and effort into this on my behalf.

I just thought to mention and clarify this in case it's useful information for others interested in this topic.
 
Eureka, I finally found what seems to be the perfect solution for this.

- Open your image, make sure it is in Greyscale.
- Go to the Channels panel.
- Hold Ctrl / Cmd and left-click the Gray channel to make a selection.
- Press Shift + Ctrl / Cmd + I to inverse the selection.
- Go to the Layers panel.
- Click the Create a new layer button.
- Make sure the foreground color is black.
- Press Alt + Backspace to fill the selection with black.
- Press Ctrl / Cmd + D to deselect.
- Delete the Background layer.

This was 1000x more difficult to find the solution for than I was expecting.
(thank you, somebody named Wolff on some Stack Exchange graphic design sub)

In hindsight, a topic title/search query something like: 'transform greyscale to alpha channel' would probably be more descriptive.

PS
At IamSam: this will work on my first example image of the tiny dog.
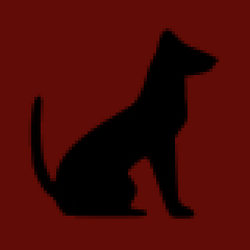
But, as I explained somewhere further in the thread, the red in that picture was only to clearly illustrate the resulting light-grey borders surrounding the dog, and you should replace the red with full white before using it to test it yourself.
 
Last edited:
Eureka, I finally found what seems to be the perfect solution for this.

- Open your image, make sure it is in Greyscale.
- Go to the Channels panel.
- Hold Ctrl / Cmd and left-click the Gray channel to make a selection.
- Press Shift + Ctrl / Cmd + I to inverse the selection.
- Go to the Layers panel.
- Click the Create a new layer button.
- Make sure the foreground color is black.
- Press Alt + Backspace to fill the selection with black.
- Press Ctrl / Cmd + D to deselect.
- Delete the Background layer.

This was 1000x more difficult to find the solution for than I was expecting.
(thank you, somebody named Wolff on some Stack Exchange graphic design sub)

In hindsight, a topic title/search query something like: 'transform greyscale to alpha channel' would probably be more descriptive.

PS
At IamSam: this will work on my first example image of the tiny dog.
But, as I explained somewhere further in the thread, the red in that picture was only to clearly illustrate the resulting light-grey borders surrounding the dog, and you should replace the red with full white before using it to test it yourself.
Would you mind showing what your final result was from the above process?
 
Would you mind showing what your final result was from the above process?
Sure.

Little doggie (at 400%):

doggienewmethod.png

Andromeda original (flat, greyscale)

andromedawhitebefore.png

Andromeda transformed to transparent:

andromedatransparentafter.png
overlayed over red background:

andromedatransparentoverred.png
 
Now I understand what you're going for. Initially I thought you were trying to eliminate that red background (which was only there for illustration anyway), and then sharpen, not pixelate, the dog image. It was almost counterintuitive to me. My first attempt was just to see if I was going in the right direction which I clearly wasnt.
Using your image as a model and working on the original image with the red background:

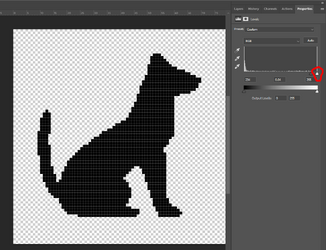
- Using Select>Color Range, I deleted all of the red background
- Then applied a levels adjustment layer and pushed the adjustment arrows all the way to the right

Here's my result - screenshot of the edited original size...

1720628584418.png
 
Here's my result - screenshot of the edited original size...
??
That's really ugly and pixelated.
You would get the same result when simply using the magic wand on the inner black part of the dog and delete the rest?
It would also not work on the andromeda image example?
Am I missing something here?
 
??
That's really ugly and pixelated.
You would get the same result when simply using the magic wand on the inner black part of the dog and delete the rest?
It would also not work on the andromeda image example?
Am I missing something here?
Always a kind word from you on my efforts. The difference in the pixelation is the difference between the 80px X80px image you originally posted that I worked with and the new one you just posted above which is 320px X 320px above. But no need to answer - I won't contribute any further.
 
Here is a similar approach using the command Image > Apply Image

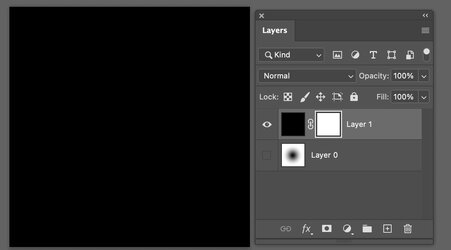
First, set up your Layer Stack with the original Layer on the bottom (Layer 0 in my example). Black Layer above, and add a blank (white) Layer Mask.
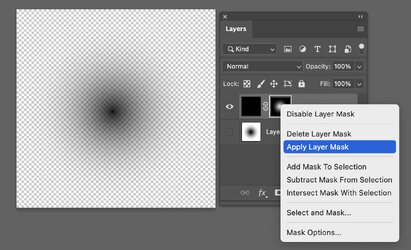
Turn off the visibility of Layer 0 as in the image below and click on the Layer Mask (which selects it)
Screenshot 2024-07-10 at 12.40.20 PM.jpg

Now use the Image > Apply Image command with the following settings. This will directly show the end result via the mask (not yet in the transparency). Note that the source is Layer 0 and Channel is RGB and inverted is selected. The result is place in the Layer Mask as that was selected in the prior step
Screenshot 2024-07-10 at 12.49.59 PM.jpg

Now just right-click on the Layer Mask and choose Apply Layer Mask.
Screenshot 2024-07-10 at 12.41.06 PM.jpg

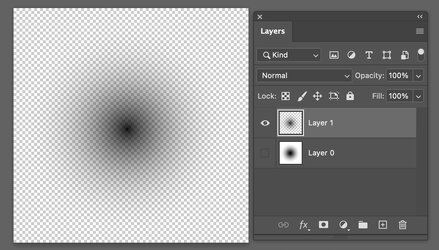
With that last step you now have the image with transparency instead of white
Screenshot 2024-07-10 at 12.42.47 PM.jpg

It's just another approach that does the same thing. The original Layer was preserved as well.
John Wheeler
 
Always a kind word from you on my efforts.

Not sure how you could have interpreted anything I said as unkind.
I was only giving my honest opinion on the results that your screenshots showed. Which in both cases were clearly not so good.
And I have thanked everyone that made the effort to answer and reply to this thread.

Also, 'the picture I posted above' was also 80x80. That's why it specifically says: at 400%.
The enlargement makes it easier to see how good the results are.

What a weird vibe you are introducing here, I hope it's not too common on this forum.
 
Thanks thebestcpu
I'm going to take a short break from all this, but I'll take a look at your solution and report back somewhere this weekend.
Cheers!
Your welcome @jist
Just as a side note, your very first post and image were Indexed color images. Most of
any approach mentioned in the thread will only work once it is converted to RGB mode.
John Wheeler
 
Just as a side note, your very first post and image were Indexed color images.
Ah yes, sorry for that.
I have a habit of running my png's through PNGGauntlet before posting them on fora. (saving some space)
But that probably also changes them to 'indexed color'.
So I shouldn't do that when posting images here...

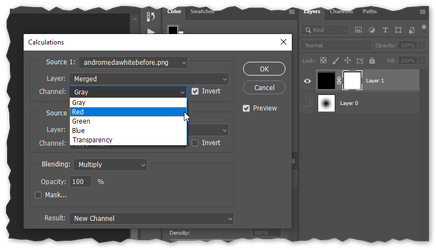
When I try to follow your instructions, I can't get it working.
And my 'calculations' panel looks different from yours. (e.g. no 'RGB' channel to select)
I opened it from the menu bar at the top. Should I open it in a different manner?

2024-07-13_onb62.png
 
CORRECTION CORRECTION CORRECTION
Hi @jist and @IamSam
My prior post on the approach needs a correction to address why your attempt at following my instructions did not match mine.

You need to use the Image > Apply Image command, but I accidentally said to use Image > Image Calculation at one point in the text.
The images originally posted correctly show the Apply Image panel being used. I started the thread saying to use Apply Image, yet my text was inconsistent.

IamSam - If you prefer, you can go ahead and make that one correction in my original explanation of the approach and delete this post, whatever you think would be best.

I corrected the text of the approach in the copy below.

Sorry for the confusion.
John Wheeler.


Here is a similar approach using the command Image > Apply Image

First, set up your Layer Stack with the original Layer on the bottom (Layer 0 in my example). Black Layer above, and add a blank (white) Layer Mask.
Turn off the visibility of Layer 0 as in the image below and click on the Layer Mask (which selects it)
View attachment 145770

Now use the Image > Apply Image command with the following settings. This will directly show the end result via the mask (not yet in the transparency). Note that the source is Layer 0 and Channel is RGB and inverted is selected. The result is place in the Layer Mask as that was selected in the prior step
View attachment 145771

How just right-click on the Layer Mask and choose Apply Layer Mask.
View attachment 145772

With that last step you now have the image with transparency instead of white
View attachment 145773

It's just another approach that does the same thing. The original Layer was preserved as well.
John Wheeler
 
IamSam - If you prefer, you can go ahead and make that one correction in my original explanation of the approach and delete this post, whatever you think would be best.
I corrected the original post and I will leave this one up as well. Great stuff! Thanks.
 
Thanks guys!
Now I was able got this approach to work too. And it indeed does exactly what I have been asking for.

So now I (we) have two solutions to tackle this ;-)
(I'm probably going to stick to the first one that I mentioned earlier, since that one is probably just easier for me to remember)
 
Thanks guys!
Now I was able got this approach to work too. And it indeed does exactly what I have been asking for.

So now I (we) have two solutions to tackle this ;-)
(I'm probably going to stick to the first one that I mentioned earlier, since that one is probably just easier for me to remember)
You're welcome @jist
Just as a thought, either approach could be recorded in an Action to save you some effort if you use this a lot, and also, then there would be even less to remember.
John Wheeler
 
either approach could be recorded in an Action
Ah yes, that's a great suggestion.
'Actions' is indeed something that I'm usually not even considering or thinking of, and yet it can be very helpful.

Just out of interest on the technicalities behind the screens of both solutions that we now have (which I am not afraid to say, neither I really understand the workings of ;-)
Does one have any advantages over the other? Or any difference in results?
 
Hi @jist
I do not think there is any difference between the two, and they should provide the same result.

What may not have been mentioned clearly enough for either solution is that they assume you are working with a grey image where you want pure white to represent 100% transparency and pure black to be 0% transparency. Any grey tones would have partial transparency, with the lighter grays having more transparency than the darker grays.

So if you are working with images that don't fully reach full white or full black, then no part of the image would be fully transparent or fully opaque respectively. You would have similar issues with color images. These mentioned cases would need more steps.

So I would move ahead with the one you are more comfortable with.
John Wheeler
 
Yep, I think that's a good evaluation/epilogue on what this was actually all about Alfie.
(@moderators: feel free to change the subject title, tags, or whatever to make things more clear or useful to others)

While I wouldn't be too concerned about the blacks of the source image being fully black, the whites indeed would better be fully white, so not to put some fog over whatever image you overlay the result of this upon?

I'm fully content with now being able to extract a blackish icon/symbol/glyph/logo or whatever from a b&w (greyscale) image that has a white background (preserving the looks of its gradient borders), but I can imagine that some will want to extend this to extracting such elements from images that are not so clearly b&w, and maybe even full colour.
So, maybe this won't be the end of this thread? (it could be an interesting subject for black-belts?)

Anywayz, my riddle has been solved. Twice.
Much appreciation to each and everyone that has been replying and contributing.
 
Last edited:

Back
Top