What's new
Photoshop Gurus Forum

Welcome to Photoshop Gurus forum. Register a free account today to become a member! It's completely free. Once signed in, you'll enjoy an ad-free experience and be able to participate on this site by adding your own topics and posts, as well as connect with other members through your own private inbox!

How to turn black or dark coloured clothing/items white?!?!


I appreciate the help but I need as much detail on the item as possible. Although your process may be quicker, I feel ibclares is closer to what I am after......saying that, I cant manage to get either of your results!

You can get back detail very easy. Before you went through my aforementioned process, you need to duplicate your shirt layer so you have the original underneath. Let me explain. When you open up an image in Photoshop, it opens as a locked background layer. you need to change this this a regular layer by double clicking the background layer, which will bring up a new layer dialogue box. click OK and it will become an editable layer.
Once this is done, you can click on the layer and drag it to the create new layer icon below(right next to the trash can)
This will duplicate the layer.

After this is done, going through the aforementioned process on the top layer will get you the results shown in my previous post.
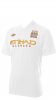
Once those results are achieved, you can go to the eraser tool on the left tool bar. Click and hold to get options, then select the magic eraser. With the magic eraser tool on 100% opacity and a low tolerance(mine was on three) simply click on each letter, the eagle symbol and the Umbro symbol, and they should disappear, revealing the detailed, colored ones beneath.

It should look like this.
 

Attachments

  • Manchester-City-New-Away-Jersey-2013.jpg
    Manchester-City-New-Away-Jersey-2013.jpg
    107.7 KB · Views: 4
Fatboy's solution is pretty good, but it still leaves the problem of realistic color. Peta's green t-shirt is very noisy. That is a problem. You may be able to add blurs and such. It would be great to find a really easy 2 or 3 step solution, We're getting there. To just change a color is easy enough. Got to layer>adjustments>selective color and move the sliders around. Getting the white and the correct lighting is a bit more difficult. The main problem I see is the contrast. Using the original red sihrt on overlay will help but will add a minimal hue which can be altered with selective color, hue/sat, or photo filter to make it warmer or cooler. Maybe once the color is to your satisfaction, you can merge-copy and work with the contrast if the pixels are there.
 
Fatboy's solution is pretty good, but it still leaves the problem of realistic color. Peta's green t-shirt is very noisy. That is a problem. You may be able to add blurs and such. It would be great to find a really easy 2 or 3 step solution, We're getting there. To just change a color is easy enough. Got to layer>adjustments>selective color and move the sliders around. Getting the white and the correct lighting is a bit more difficult. The main problem I see is the contrast. Using the original red sihrt on overlay will help but will add a minimal hue which can be altered with selective color, hue/sat, or photo filter to make it warmer or cooler. Maybe once the color is to your satisfaction, you can merge-copy and work with the contrast if the pixels are there.

I agree, as nothing real life is pure white because of light and color bouncing everywhere. My process should definitely be taken steps further to produce a pleasing, believable result. If this were against a darker background, I wouldn't have gone as light either.
 
I think we have done more than enough here.

Hi, I have been using Photoshop for a while now but have recently been invited to help design some sportswear. I want to initially take existing clothing and change the colours and add designs. As an example, how would I get this soccer kit to be either all white or white on everything apart from the shorts?

I have managed to get yellow to go white using the hue/saturation tool but dark colours seem like its impossible. I do also want to know how to go from white to a darker colour but maybe I should save that for my next thread.

We have done a very good job of showing several ways to create a white shirt from black. After all, Idn's original request included just changing the color. That can be done as I said with layer adjustments and there are several options: selective color, hue/saturation, photo filter. Selective color works really well for the dark colors, then you may need to add other techniques as we've discussed if you want pastel hues.
 
Fatboy's solution is pretty good, but it still leaves the problem of realistic color. Peta's green t-shirt is very noisy. That is a problem. You may be able to add blurs and such. It would be great to find a really easy 2 or 3 step solution, We're getting there. To just change a color is easy enough. Got to layer>adjustments>selective color and move the sliders around. Getting the white and the correct lighting is a bit more difficult. The main problem I see is the contrast. Using the original red sihrt on overlay will help but will add a minimal hue which can be altered with selective color, hue/sat, or photo filter to make it warmer or cooler. Maybe once the color is to your satisfaction, you can merge-copy and work with the contrast if the pixels are there.

There will definitely be neither few steps solution nor universal way. Both approaches we have till now have its advantages and shortcomings, they would probably be used based on task and personal preferences.

You are right, hue can be used, in this technique it is even better than Photo filter for less damaging the picture ( although keep in mind how small resolution picture we work with here ) but selecting colour will be more difficult.

That is what I wrote in one of my previous posts, if we can fool human eye with negative to see it still plastic, negative approach will be often better, since it does not have the strong transformation. On the other hand, if it goes against the logic of how the object/scene is lit, then you cannot use it at all.

Of course there is always hope to find another solution, so we will try :-)
manmask.jpg
 
Last edited:
I played around with the make the red shirt white idea guys. I did 2 things slightly different. I used hue/sat layer to desaturate. Then I did the levels adjustment layer, but didn't move the middle slider all the way left. This leaves more shadow detail in the shirt itself. Then to put a touch of color back in, I bumped up the saturation just a tad and played with the color slider. Once you get the hang of this, you'll know where to leave the sat slider to make it a 2 step operation to get the white.

Here's a method I used to make deeper colors from the white shirt:

base layer is white shirt;
duplicate and set to linear burn;
cmd/ctl click the thumbnail to get the shirt selection;
make new layer, and fill with chosen color (or fill new layer with color and clip to shirt layer below);
copy the white shirt linear burn layer and move to the top of the stack.

Try different blend modes to vary the hue and vibrancy; overlay, multiply, etc.

The linear blend helps to set the details of the shirt.

shirtColor3.PNG

Good Job Fatboy!
 
I played around with the make the red shirt white idea guys. I did 2 things slightly different. I used hue/sat layer to desaturate. Then I did the levels adjustment layer, but didn't move the middle slider all the way left. This leaves more shadow detail in the shirt itself. Then to put a touch of color back in, I bumped up the saturation just a tad and played with the color slider. Once you get the hang of this, you'll know where to leave the sat slider to make it a 2 step operation to get the white.

Here's a method I used to make deeper colors from the white shirt:

base layer is white shirt;
duplicate and set to linear burn;
cmd/ctl click the thumbnail to get the shirt selection;
make new layer, and fill with chosen color (or fill new layer with color and clip to shirt layer below);
copy the white shirt linear burn layer and move to the top of the stack.

Try different blend modes to vary the hue and vibrancy; overlay, multiply, etc.

The linear blend helps to set the details of the shirt.

Good Job Fatboy!

Well this sounds pretty good, thank you very much, the shirt looks excellent. Just I am too sleepy ( 1:30 a.m. ) to try it now, but I am looking for tomorrow. BTW I did not have the levels middle slider all the way left, it can be seen on my last picture, but you are absolutely right, you have to play with it to get the feel and experience, but I think this method will work. I like that you can use colour instead of hue, you get better colour selection.

BTW I see you are using groups, I have to learn it too, especially with those new group functions in CS6 :-)
 

Back
Top