Hello: I am trying to resize photos to go in "first 12 months" photo frame. The openings are 1.5w x 2h inches. I cropped my image to 1.5x2, then i resized it the same. I tried creating a new file using a canvas size of like 8x10, then I was brought in the first image, the problem is the image took up the entire canvas. I can't figure out what I'm doing wrong. Can anyone help? My goal is to have the lap print 4x6 prints with 2 of the 1.5x2 images on them, then cut them out to fit the frame. Thanks for any suggestions. I have tired several of the youtube tutorials, but nothing has worked so far.
Photoshop Gurus Forum
Welcome to Photoshop Gurus forum. Register a free account today to become a member! It's completely free. Once signed in, you'll enjoy an ad-free experience and be able to participate on this site by adding your own topics and posts, as well as connect with other members through your own private inbox!
You are using an out of date browser. It may not display this or other websites correctly.
You should upgrade or use an alternative browser.
You should upgrade or use an alternative browser.
How to get resized images on a 4x6 canvas
- Thread starter cdtcpa
- Start date
Very likely, the print resolution (see red arrow below) of your small 1.5 x 2 image is different from the resolution of your 8 x 10 image. For printing, a resolution of 300 pixels per inch is usually standard. Make sure that your small images and the large 8 x 10 canvas are all consistently set at 300 pixels per inch. Then, once you resize everything to the correct height and width, your small images should fit within the canvas the way you expect.
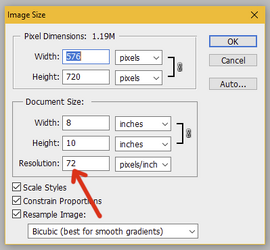

Very likely, the print resolution (see red arrow below) of your small 1.5 x 2 image is different from the resolution of your 8 x 10 image. For printing, a resolution of 300 pixels per inch is usually standard. Make sure that your small images and the large 8 x 10 canvas are all consistently set at 300 pixels per inch. Then, once you resize everything to the correct height and width, your small images should fit within the canvas the way you expect.
Thank you for responding! My resolution is higher than 300 on the resized images, instead of lower. Will that still make a difference?
The important thing is that all of your files need to have the same resolution. If you want to use 633, then everything needs to be 633. If all the individual files and your canvas have the same resolution, you should be able to fit them on your canvas.
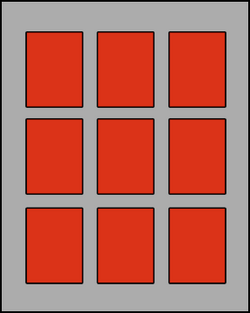
If your plan is to print your images, you might want to check with the printer to see what resolution they are expecting. If your files are set at a resolution of 633 pixels per inch, but the printer itself is set at something different, I'm not sure what will happen.

If your plan is to print your images, you might want to check with the printer to see what resolution they are expecting. If your files are set at a resolution of 633 pixels per inch, but the printer itself is set at something different, I'm not sure what will happen.
Ok, I will have to check with the lab. The problem is I read that you shouldn't "resample", and the only way I can get the resolution smaller is to resample, otherwise it changes my height & width. Do you think it will cause an issue with quality when I resample?
Thank you very much for your responses!
Thank you very much for your responses!
Do you think it will cause an issue with quality when I resample?
I don't know. It depends on the quality of the original images.
ok, thanks again. Once other question, I thought when you were editing an image, if you saved it as psd, you could go back and make changes to the changes you made? I cropped an image and saved as psd, but there is no history before the crop to go back and undo it.
- Messages
- 24,254
- Likes
- 13,737
When you close a saved PSD document out of Ps, you will lose all history states. You can save the document a thousands times while working on it, and depending on what you set your history states to in prefs, you can go back to a previous state or snap shot. But as soon as that document is closed, you will lose all history states for that document.I thought when you were editing an image, if you saved it as psd, you could go back and make changes to the changes you made? I cropped an image and saved as psd, but there is no history before the crop to go back and undo it.
Prefs > Performance > History and Cache > History states.
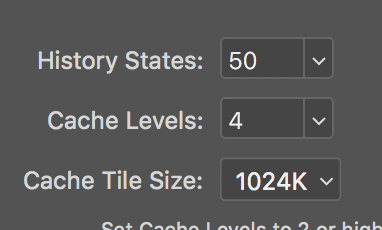
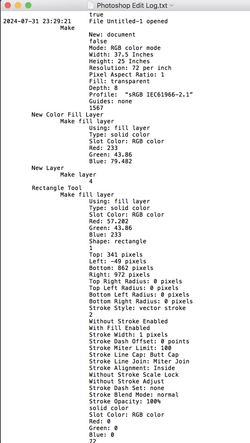
There is a History Log that can be kept in a metadata file or a text file which will tell you everything you do in any document............but it can't be recalled, it's only a log.
Prefs > History Log
- Messages
- 3,354
- Likes
- 3,092
Hi @cdtcpa
There are many ways to approach your project, so the good news is that you can choose. Based on your first request, I will show you an approach to put 1.5 x 2-inch images on a 4x6 for printing and cutting.
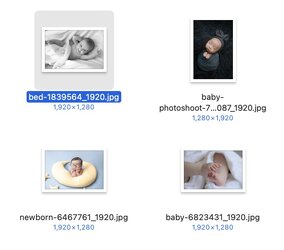
I am going to fit three arbitrary baby images as examples of the approach that I got off the internet:
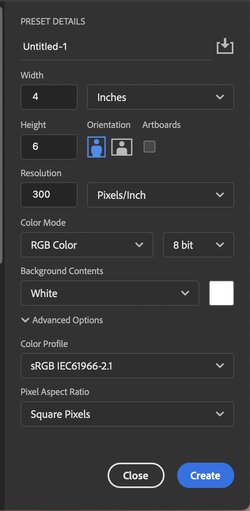
First, create a blank document that is 4x6 inches at 300 dpi. Note I can fit four 1.5 x 2 inch images in this 4x6 size.
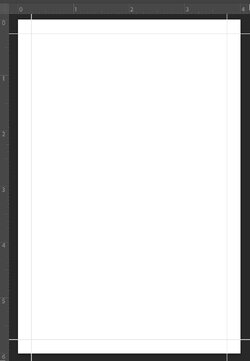
I set the ruler to the inch scale and left a 1/4-inch margin on all sides, using Photoshop guides to avoid the edges.
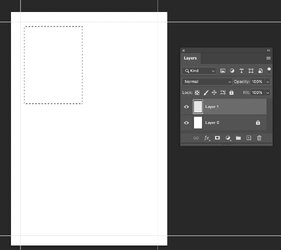
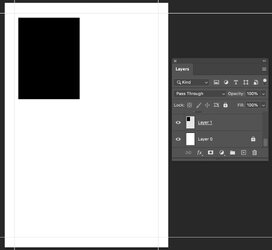
Create a new blank Layer and use the rectangular Marquee Tool to make a selection 1.5 inches wide by 2 inches high near the upper left of the document.
Fill this selected area on the new Layer with any solid color (I am using black):
No, bring in the first baby image via File > Place Embedded command, and select the first baby image. This brings the image in as a Smart Object on its own Layer (more on that later)
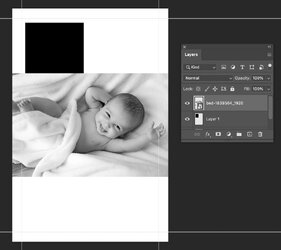
Now right-click on the image Layer and choose the option to "Create Clipping Mask."
This will make the Black Square of the lower Layer act as a mask for the first baby Image (though not yet in the right place)
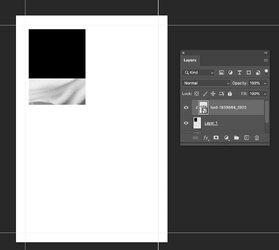
Now, using the Cmd + T (Ctrl + T on PC) keyboard shortcut, you can move and transform the image to fit in the areas clipped by the black square. Hold down the shift key when transforming to maintain the same aspect ratio and not introduce distortion:
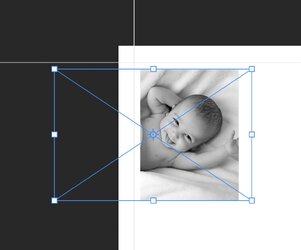
You click on the accept checkbox to end the transformation, and your first image appears in the upper left corner.
Now you repeat the same steps below for the next three images to create the final image and Layer Stack shown below:
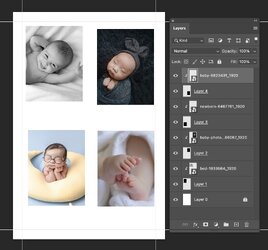
By using the Smart Objects and the transform command, you do not lose any quality of the original image. You can redo the positioning and size at any time, and all the original pixels are there. So edit to your heart's content, and then you are ready to print and cut out your images for your project.
Hope this is a helpful approach to consider.
John Wheeler
There are many ways to approach your project, so the good news is that you can choose. Based on your first request, I will show you an approach to put 1.5 x 2-inch images on a 4x6 for printing and cutting.
I am going to fit three arbitrary baby images as examples of the approach that I got off the internet:

First, create a blank document that is 4x6 inches at 300 dpi. Note I can fit four 1.5 x 2 inch images in this 4x6 size.

I set the ruler to the inch scale and left a 1/4-inch margin on all sides, using Photoshop guides to avoid the edges.

Create a new blank Layer and use the rectangular Marquee Tool to make a selection 1.5 inches wide by 2 inches high near the upper left of the document.

Fill this selected area on the new Layer with any solid color (I am using black):

No, bring in the first baby image via File > Place Embedded command, and select the first baby image. This brings the image in as a Smart Object on its own Layer (more on that later)

Now right-click on the image Layer and choose the option to "Create Clipping Mask."
This will make the Black Square of the lower Layer act as a mask for the first baby Image (though not yet in the right place)

Now, using the Cmd + T (Ctrl + T on PC) keyboard shortcut, you can move and transform the image to fit in the areas clipped by the black square. Hold down the shift key when transforming to maintain the same aspect ratio and not introduce distortion:

You click on the accept checkbox to end the transformation, and your first image appears in the upper left corner.
Now you repeat the same steps below for the next three images to create the final image and Layer Stack shown below:

By using the Smart Objects and the transform command, you do not lose any quality of the original image. You can redo the positioning and size at any time, and all the original pixels are there. So edit to your heart's content, and then you are ready to print and cut out your images for your project.
Hope this is a helpful approach to consider.
John Wheeler
- Messages
- 24,254
- Likes
- 13,737
Basically the same as Johns technique, except with Smart Objects.
Create your document.
4 inches by 6 inches at 300ppi
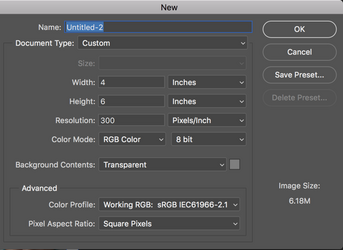
Go to LAYER > NEW FILL LAYER > SOLID COLOR
A color picker will appear
Make your color white (#ffffff)
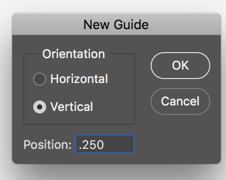
Go to VIEW > NEW GUIDE
A menu will appear
Set the orientation to Vertical
Set the position to .250
Hit OK
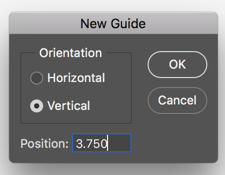
Go to VIEW > NEW GUIDE
A menu will appear
Set the orientation to Vertical
Set the position to 3.750
Hit OK
Repeat this for the horizontal guides.
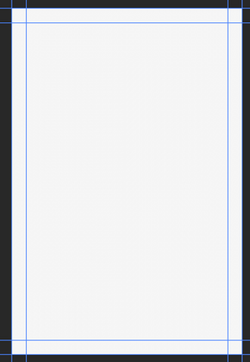
Your document should look like this....
Next
Select your Rectangle Tool (not the Rectangular Marquis Tool)
In the Tools Option bar, Make sure shape is chosen, set your Fill Color to a grey, and make sure stroke is turned off.

Click once on the document in the document window.
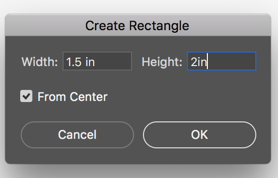
This will open a "Create Rectangle" menu
make your width 1.5in and your height 2in.
Place a check mark in the "From Center" selection.
This will create a rectangle shape layer!
With the shape layer selected/highlighted, hit Cmd/Cntrl + J 3 times. This duplicates the shape layer.
Select your Move Tool and move the shapes to the corners or wherever you want them!
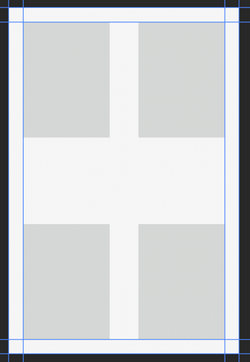
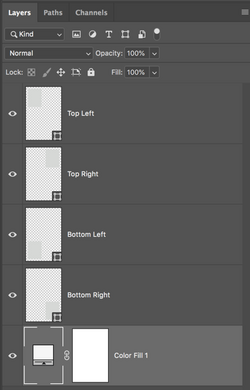
Now rename all of the shape layers according to their positions.
Your layers panel should look like this...
Choose any layer.
Right click in the body of the layer (not the thumbnail) and choose "Convert to Smart Object".
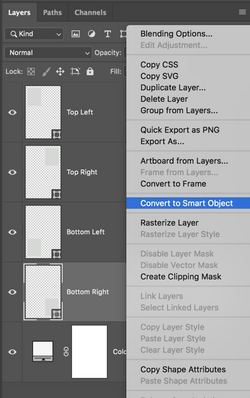
Repeat this for the remaining 3 shape layers.
FINAL STEP
Now choose a SmartObject/Shape layer and double click the thumbnail.
This will open a PSB document in a new tab.
In the PSB doc,
Go to FILE > PLACE EMBEDDED
Select the baby image you wish to be in this rectangle (panel)
Use the control handles to resize the image to fit in the rectangle/panel.
When done, hit OK
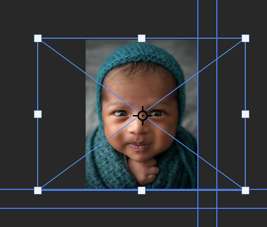
Close the PSB file and hit save!
Back in your original document you will now have the baby in that panel.
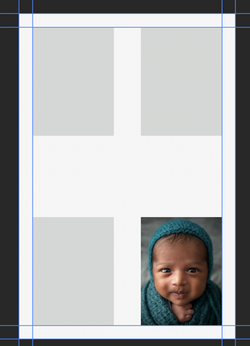
Repeat the same "Final Step" for the remaining 3 rectangle/panels.
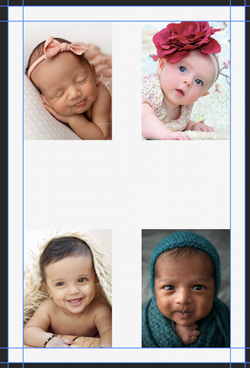
Your final layers panel will look like this......
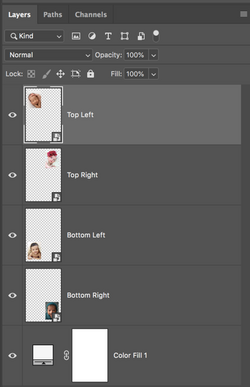
Everything is editable.
The background color can be changed.
The rectangles can be resized and moved to different positions.
If you want to change a baby's photo, just repeat the "Final Step" for each.
Here, I have repositioned the panels and changed the BG color.
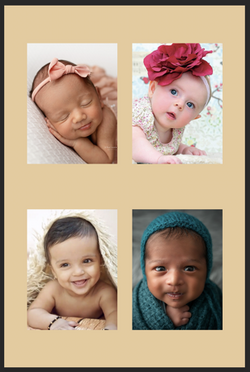
Create your document.
4 inches by 6 inches at 300ppi

Go to LAYER > NEW FILL LAYER > SOLID COLOR
A color picker will appear
Make your color white (#ffffff)
Go to VIEW > NEW GUIDE
A menu will appear
Set the orientation to Vertical
Set the position to .250
Hit OK

Go to VIEW > NEW GUIDE
A menu will appear
Set the orientation to Vertical
Set the position to 3.750
Hit OK

Repeat this for the horizontal guides.
Your document should look like this....

Next
Select your Rectangle Tool (not the Rectangular Marquis Tool)
In the Tools Option bar, Make sure shape is chosen, set your Fill Color to a grey, and make sure stroke is turned off.
Click once on the document in the document window.
This will open a "Create Rectangle" menu
make your width 1.5in and your height 2in.
Place a check mark in the "From Center" selection.
This will create a rectangle shape layer!

With the shape layer selected/highlighted, hit Cmd/Cntrl + J 3 times. This duplicates the shape layer.
Select your Move Tool and move the shapes to the corners or wherever you want them!

Now rename all of the shape layers according to their positions.
Your layers panel should look like this...

Choose any layer.
Right click in the body of the layer (not the thumbnail) and choose "Convert to Smart Object".

Repeat this for the remaining 3 shape layers.
FINAL STEP
Now choose a SmartObject/Shape layer and double click the thumbnail.
This will open a PSB document in a new tab.
In the PSB doc,
Go to FILE > PLACE EMBEDDED
Select the baby image you wish to be in this rectangle (panel)
Use the control handles to resize the image to fit in the rectangle/panel.
When done, hit OK

Close the PSB file and hit save!
Back in your original document you will now have the baby in that panel.

Repeat the same "Final Step" for the remaining 3 rectangle/panels.

Your final layers panel will look like this......

Everything is editable.
The background color can be changed.
The rectangles can be resized and moved to different positions.
If you want to change a baby's photo, just repeat the "Final Step" for each.
Here, I have repositioned the panels and changed the BG color.

Thank you very much; I will try it this weekend.Hi @cdtcpa
There are many ways to approach your project, so the good news is that you can choose. Based on your first request, I will show you an approach to put 1.5 x 2-inch images on a 4x6 for printing and cutting.
I am going to fit three arbitrary baby images as examples of the approach that I got off the internet:
View attachment 146228
First, create a blank document that is 4x6 inches at 300 dpi. Note I can fit four 1.5 x 2 inch images in this 4x6 size.
View attachment 146225
I set the ruler to the inch scale and left a 1/4-inch margin on all sides, using Photoshop guides to avoid the edges.
View attachment 146226
Create a new blank Layer and use the rectangular Marquee Tool to make a selection 1.5 inches wide by 2 inches high near the upper left of the document.
View attachment 146227
Fill this selected area on the new Layer with any solid color (I am using black):
View attachment 146229
No, bring in the first baby image via File > Place Embedded command, and select the first baby image. This brings the image in as a Smart Object on its own Layer (more on that later)
View attachment 146230
Now right-click on the image Layer and choose the option to "Create Clipping Mask."
This will make the Black Square of the lower Layer act as a mask for the first baby Image (though not yet in the right place)
View attachment 146231
Now, using the Cmd + T (Ctrl + T on PC) keyboard shortcut, you can move and transform the image to fit in the areas clipped by the black square. Hold down the shift key when transforming to maintain the same aspect ratio and not introduce distortion:
View attachment 146232
You click on the accept checkbox to end the transformation, and your first image appears in the upper left corner.
Now you repeat the same steps below for the next three images to create the final image and Layer Stack shown below:
View attachment 146233
By using the Smart Objects and the transform command, you do not lose any quality of the original image. You can redo the positioning and size at any time, and all the original pixels are there. So edit to your heart's content, and then you are ready to print and cut out your images for your project.
Hope this is a helpful approach to consider.
John Wheeler
Thank you very much! Very experienced & awesome folks here! I will give it a shot this weekend. Hopefully my old program has all these tools.Basically the same as Johns technique, except with Smart Objects.
Create your document.
4 inches by 6 inches at 300ppi
View attachment 146234
Go to LAYER > NEW FILL LAYER > SOLID COLOR
A color picker will appear
Make your color white (#ffffff)
Go to VIEW > NEW GUIDE
A menu will appear
Set the orientation to Vertical
Set the position to .250
Hit OK
View attachment 146236
Go to VIEW > NEW GUIDE
A menu will appear
Set the orientation to Vertical
Set the position to 3.750
Hit OK
View attachment 146237
Repeat this for the horizontal guides.
Your document should look like this....
View attachment 146238
Next
Select your Rectangle Tool (not the Rectangular Marquis Tool)
In the Tools Option bar, Make sure shape is chosen, set your Fill Color to a grey, and make sure stroke is turned off.
View attachment 146239
Click once on the document in the document window.
This will open a "Create Rectangle" menu
make your width 1.5in and your height 2in.
Place a check mark in the "From Center" selection.
This will create a rectangle shape layer!
View attachment 146240
With the shape layer selected/highlighted, hit Cmd/Cntrl + J 3 times. This duplicates the shape layer.
Select your Move Tool and move the shapes to the corners or wherever you want them!
View attachment 146241
Now rename all of the shape layers according to their positions.
Your layers panel should look like this...
View attachment 146242
Choose any layer.
Right click in the body of the layer (not the thumbnail) and choose "Convert to Smart Object".
View attachment 146243
Repeat this for the remaining 3 shape layers.
FINAL STEP
Now choose a SmartObject/Shape layer and double click the thumbnail.
This will open a PSB document in a new tab.
In the PSB doc,
Go to FILE > PLACE EMBEDDED
Select the baby image you wish to be in this rectangle (panel)
Use the control handles to resize the image to fit in the rectangle/panel.
When done, hit OK
View attachment 146244
Close the PSB file and hit save!
Back in your original document you will now have the baby in that panel.
View attachment 146245
Repeat the same "Final Step" for the remaining 3 rectangle/panels.
View attachment 146246
Your final layers panel will look like this......
View attachment 146247
Everything is editable.
The background color can be changed.
The rectangles can be resized and moved to different positions.
If you want to change a baby's photo, just repeat the "Final Step" for each.
Here, I have repositioned the panels and changed the BG color.
View attachment 146248
Where do you find the log?When you close a saved PSD document out of Ps, you will lose all history states. You can save the document a thousands times while working on it, and depending on what you set your history states to in prefs, you can go back to a previous state or snap shot. But as soon as that document is closed, you will lose all history states for that document.
Prefs > Performance > History and Cache > History states.
View attachment 146222
There is a History Log that can be kept in a metadata file or a text file which will tell you everything you do in any document............but it can't be recalled, it's only a log.
Prefs > History Log
View attachment 146223
- Messages
- 24,254
- Likes
- 13,737
In Ps Preferences > History LogWhere do you find the log?
Thanks, I don’t think that’s in my version.In Ps Preferences > History Log
