What's new
Photoshop Gurus Forum

Welcome to Photoshop Gurus forum. Register a free account today to become a member! It's completely free. Once signed in, you'll enjoy an ad-free experience and be able to participate on this site by adding your own topics and posts, as well as connect with other members through your own private inbox!

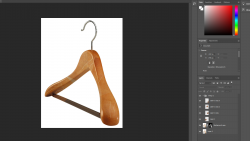
how do i edit scratches into this coat hanger


cecil777

New Member
Messages
4
Likes
0
Hello everyone,

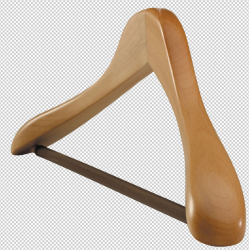
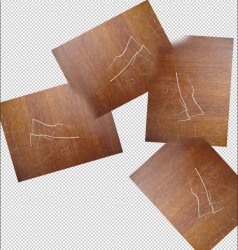
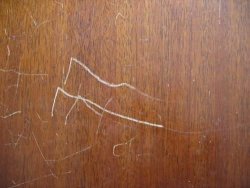
I know this sounds extremely mundane and pointless but for a school homework project i need to edit some boxcutter-like scratches onto this wooden hanger. Due to all my classes being online atm, its very hard to get a hold of the teacher and for him to actually show my stuff. So i was just wondering if any of you pros could help me out here.

I have added the picture of the hanger and the type of scratches i want to edit onto the hanger. All i essentially need to do is just replicate the scratches on the 2nd photo on the 1st.

hanger.jpg

scratch.jpg
 
This is the method I used for a quick edit:
Take the hanger, carefully select it and mask out the background.
3.png
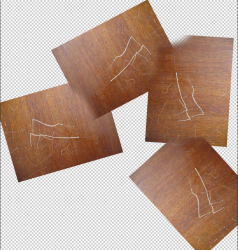
Take the scratches pic, make copies of it, rotate the copies, flip them and roughly cover them over the hanger body. Group them.
1.png
Apply "Soft Light" blending mode on them.
2.png
Give more time and you can achieve better results.

All the best and share your results with us.
 
Here's another method to create scratches.
  • Using the brush tool, set the color to 50% gray (128,128,128) and set the brush mode (not the layer) to Dissolve.
  • On a new layer, draw some scratches by hand. Apply a very small Gaussian blur to slightly soften the rough Dissolve effect.
  • Change the layer blend mode to Overlay, which, for the moment, causes your line to disappear.
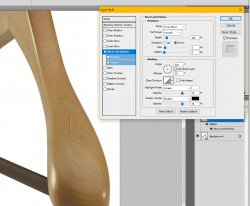
  • Apply a Bevel & Emboss layer style. I used the settings shown below, but you can experiment with these.
  • As an optional step, apply a layer mask to the scratch to make the scratch weaker in some spots vs. other spots.

scratches.jpg
 
This is the method I used for a quick edit:
Take the hanger, carefully select it and mask out the background.
View attachment 116637
Take the scratches pic, make copies of it, rotate the copies, flip them and roughly cover them over the hanger body. Group them.
View attachment 116635
Apply "Soft Light" blending mode on them.
View attachment 116636
Give more time and you can achieve better results.

All the best and share your results with us.


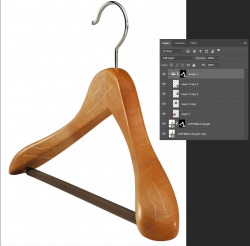
Thanks for your reply. I tried to do the same thing but I ran into this issue where the shadows of the scratch pictures would transfer over to the hanger thus changing the original color of the hanger . Ive attached an picture of my attempt.

my attempt.PNG
 
Here's another method to create scratches.
  • Using the brush tool, set the color to 50% gray (128,128,128) and set the brush mode (not the layer) to Dissolve.
  • On a new layer, draw some scratches by hand. Apply a very small Gaussian blur to slightly soften the rough Dissolve effect.
  • Change the layer blend mode to Overlay, which, for the moment, causes your line to disappear.
  • Apply a Bevel & Emboss layer style. I used the settings shown below, but you can experiment with these.
  • As an optional step, apply a layer mask to the scratch to make the scratch weaker in some spots vs. other spots.

View attachment 116645
"As an optional step, apply a layer mask to the scratch to make the scratch weaker in some spots vs. other spots."
How can i do that?
 
Cecil,
...transfer over to the hanger thus changing the original color of the hanger .
The colour change is a con for using Soft Light blending mode. Try "Pin Light" blending mode - there are different cons to using this one too. Use the blending mode that fits the purpose.
...where the shadows of the scratch pictures...
When two layers overlap, that is where you see the shadow. To avoid this, apply a mask on one of the layers so only one layer shows and there is no overlap.
"As an optional step, apply a layer mask to the scratch to make the scratch weaker in some spots vs. other spots."
How can i do that?
On the mask layer, using Brush, remembering that Black hides and White reveals, play with "Opacity" of the brush as seen on the top which shows the brush properties. If you want a scratch shown weaker, choose Black colour with Opacity set to about 10% and paint over it repeatedly to make it look more weaker each time.
 
Cecil,

The colour change is a con for using Soft Light blending mode. Try "Pin Light" blending mode - there are different cons to using this one too. Use the blending mode that fits the purpose.

When two layers overlap, that is where you see the shadow. To avoid this, apply a mask on one of the layers so only one layer shows and there is no overlap.

On the mask layer, using Brush, remembering that Black hides and White reveals, play with "Opacity" of the brush as seen on the top which shows the brush properties. If you want a scratch shown weaker, choose Black colour with Opacity set to about 10% and paint over it repeatedly to make it look more weaker each time.

When two layers overlap, that is where you see the shadow. To avoid this, apply a mask on one of the layers so only one layer shows and there is no overlap.

could you explain how to apply a mask like you did in your original picture? Theres an extra mask next to the group icon but i dont have one next to mine
 
could you explain how to apply a mask like you did in your original picture? Theres an extra mask next to the group icon but i dont have one next to mine

You can apply a mask to a Group exactly the same way that you apply a mask to a normal layer. Just click onto the Group to activate it and then add a mask to it.
 
Cecil,
could you explain how to apply a mask like you did in your original picture?
Actually, the mask applied to the group was superfluous - it is unnecessary because the scratch layers are just made to blend onto the hanger.
If you see the scratch surface layers I made:
1.png
I have taken a quick shortcut of deleting the layers that overlap onto the bottom layer (@IamSam would be furious as he considers this a sin). On serious projects, you should almost NEVER use the eraser tool. You should apply mask and then remove the parts that I erased using Black colour. This is so that if you made a mistake and realise it later, you can always revert without much hassle.

Do let me know if you are facing issues applying mask. Honestly, Post #3 by @Rich54 in this thread is the best way to apply scratches. That looks so real!
 

Back
Top