What's new
Photoshop Gurus Forum

Welcome to Photoshop Gurus forum. Register a free account today to become a member! It's completely free. Once signed in, you'll enjoy an ad-free experience and be able to participate on this site by adding your own topics and posts, as well as connect with other members through your own private inbox!

Help Printing out Work


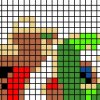
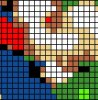
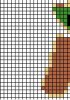
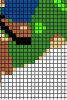
6. The final step is to output all the slices to different files so that they can be printed and distributed to the students. The process of outputing each slice to a separate file is done using the "Save for Web and Devices" dialog box.

Drag the slice selection tool that operates within that dialog box over the entire image, and then with all slices selected, pick JPEG-high from the presets. Hit "save" and select a location. Each slice will become a separate JPG file in a new directory.

Hopefully, this does what you are after and we are DONE! Let me know.

HTH,

Tom

PS - Unfortunately, the forum image uploading software re-arranges images to best fit the available space, so I doubt the order of the slices will be preserved, but you can tell which is which from the previous post, or you could have numbered them in the previous step.
 

Attachments

  • slices_01.jpg
    slices_01.jpg
    18 KB · Views: 7
  • slices_02.jpg
    slices_02.jpg
    18.8 KB · Views: 7
  • slices_03.jpg
    slices_03.jpg
    20.6 KB · Views: 7
  • slices_04.jpg
    slices_04.jpg
    16.4 KB · Views: 7
  • slices_05.jpg
    slices_05.jpg
    19 KB · Views: 7
  • slices_06.jpg
    slices_06.jpg
    19.6 KB · Views: 7
  • slices_07.jpg
    slices_07.jpg
    24.9 KB · Views: 7
  • slices_08.jpg
    slices_08.jpg
    25.7 KB · Views: 7
  • slices_09.jpg
    slices_09.jpg
    26.3 KB · Views: 7
Last edited:
That is awesome thanks. The only issue I am having is using the scan lines plug in. When I try to open it up on PS is states " Can not complete your request because it is not the right kind of document".
 
Hi Mav (...BTW, do you have a name so I don't have to refer to you as "mav" in these posts? ;-) ) -

Can you get the scanlines plugin to work on a small, simple test document, e.g., an all gray, few hundred pixels on a side, 8 bpc, sRGB PS file?

You did copy the 8bf file into the "plugins" folder, didn't you?

T
 
My name is Lucas.

So, I got the scan lines to work but, since I use the image resize method the scan lines ended up being the same width as a resized row.

I next tried the pixelate -> mosaic and that worked but, when trying to convert to index color it would not color a square a single solid color, instead it would use the chosen index colors to try and create it.

Also exactly how would you do the vertical scan lines using the layer? I was making them directly on the image but, you can not make them vertical using that method.

YOSHI1.png
 
Last edited:
"... but, since I use the image resize method the scan lines ended up being the same width as a resized row. ..."

That's one of the reasons why I suggested that you switch to the pixelate/mosaic method.


"... but, the scan lines would show up in some parts at every 2 rows instead of 1 ..."

That's often due to issues with the magnification algorithm in PS, Nyquist sampling limitations, etc.. To eliminate this as a possible cause, you need to start at 100% magnification and stay there for the duration of your processing of the image.


"... and when trying to convert to index color it would not color a square a single solid color, instead it would use the chosen index colors to try and create it. ..."


When you convert to index colors, make sure the "dither" option is off.

HTH,

Tom
 
"... Also exactly how would you do the vertical scan lines using the layer? ..."

As I said earlier, you MUST put both the horiz and vert scan lines on two separate layers. Each layer is all white except for the black scan lines, and the blending mode for each is set to "darken" or "multiply".

Here's the relevant part of my earlier description:

"Apply it once to get a set of thin black horizontal scan lines of the correct periodicity on a new white layer. I used settings (for his 1st two adjustments) of 7 and 1. Set the blending mode to darken, select the move tool (V), and used the up-down arrow keys to nudge the 1 pixel wide black lines up and down till they are in registry with the underlying pixelated image.

To get the vertical thin black lines, make a copy of the previous layer, rotate it 90 degrees, and stretch it vertically as needed to get the lines to fill the full extent of the image. Again, use the move tool and arrow keys to bump these vertical lines left and right into exact registry with the underlying pixelated image."

HTH,

Tom
.
.
.
<<<======= Don't hesitate to use the hard-to-see "Thanks" button.
 
Last edited:

Back
Top