What's new
Photoshop Gurus Forum

Welcome to Photoshop Gurus forum. Register a free account today to become a member! It's completely free. Once signed in, you'll enjoy an ad-free experience and be able to participate on this site by adding your own topics and posts, as well as connect with other members through your own private inbox!

Help needed in Photo Shop CS6 Please...


Hi Bgood -

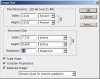
"...I am not clear why you say you have to re-enlarge the image after dropping the res...."

Unless you re-enlarge the image, the pixel dimensions are decreased by a huge factor and it will display on the web as a miniscule image.

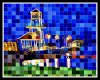
In addition, (a) IMHO, it has much more of a visual impact if you have a substantial number of pixels all with the same color (ie, not just one); and,

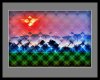
(b) With lots of pixels of the same color, you can do lots more visually interesting things to them, e.g., emboss them, split them diagonally, add texture within each square, etc. Many of the effects I used in the series I posted yesterday would have been impossible unless I had lots of pixels of the same color to work on.
----------------------

"... Is this a technique you have used in the past (it sounds as if it might be) or is it something that has come out of the OPs question? ..."

I have used these techniques many times in the past. One image, processed much like the first example in that set I had printed very large on metallic paper and was displayed as part of a one man show I had a couple of years ago. It was singled out for lots of nice comments. Quasi-abstracts processed with some of the other techniques illustrated are hanging in local doctor's offices.

Tom
 

Attachments

  • DSD_2364-tesellated-002$-Copy-xnv_650px_wide-for_web.jpg
    DSD_2364-tesellated-002$-Copy-xnv_650px_wide-for_web.jpg
    183.9 KB · Views: 32
  • DSE_0702etc$-xnv_650ps_wide_for_web.jpg
    DSE_0702etc$-xnv_650ps_wide_for_web.jpg
    117.6 KB · Views: 32
Unless you re-enlarge the image, the pixel dimensions are decreased by a huge factor and it will display on the web as a miniscule image.

But if you keep the image at 100% the pixel dimensions remain the same does it not? No need to re-enlarge the image itself because it has not been reduced. I suspect I am missing something here but for the life of me I cannot figure out what it is.


I have used these techniques many times in the past. One image, processed much like the first example in that set I had printed very large on metallic paper and was displayed as part of a one man show I had a couple of years ago. It was singled out for lots of nice comments. Quasi-abstracts processed with some of the other techniques illustrated are hanging in local doctor's offices.

Tom

Really nice images and a very cool technique. Thanks for sharing.

PS: I just showed my wife the images you posted above and she said that the work was exquisite. I do not use PS for photography or "art" but I have bookmarked this thread and will try doing some of this work myself. Very, very interesting. Thanks again.
 
Last edited:
Tom, perhaps you missed my question in the post above so I am repeating it.

Originally Posted by Tom Mann

Unless you re-enlarge the image, the pixel dimensions are decreased by a huge factor and it will display on the web as a miniscule image.

But if you keep the image at 100% the pixel dimensions remain the same does it not? No need to re-enlarge the image itself because it has not been reduced. I suspect I am missing something here but for the life of me I cannot figure out what it is.
 
Hi Bgood - No, I didn't miss it, but I wanted to get back to my Photoshop computer so I could get you some screen shots that show what's going on.

The file names tell you what each screen shot shows, but here's a summary: The first two show you the original state of a file before any changes have been made to it, whereas #3 and #4 show the state of the file after the ppi setting has been reduced by a factor of 10x (ie, from 240 ppi to 24 ppi).

The only difference within each pair (ie, 1st vs 2nd, and 3rd vs 4th) is that the first of each pair (ie, #1 and #3) shows the change in pixel dimensions in percent, whereas the second of each pair (ie, #2 and #4) show the actual number of pixels.

As you can see, after reducing the ppi by 10x, the pixel dimensions, drop by 10x whether measured in percent or in actual numbers. This is not what you thought happened.

This 100x reduction in total number of pixels is precisely what gives us the enhanced pixellation.

Perhaps what is confusing is that the "document size" (aka, "physical dimensions") reported for the image don't change even as the total number of pixels is reduced by 100x. The document size is always reported as a 8" x 8". However, that is very misleading. First, the "document size" means absolutely NOTHING if the image is going to be posted on the web or viewed electronically. Only the dimensions of the image in numbers of pixels matters for such uses.

Second, even if you print this image, in many cases, the "document size" or "physical dimensions" also mean nothing. This is because almost all on-line printing services, photo printing kiosks, mom&pop photo stores, pharmacies, etc. completely ignore the ppi and "document dimension" info embedded in the file you give them. They simply ask "What size do you want your prints?", and then adjust the ppi themselves to produce a print of the size you want.

The only time ppi and "document size" information might be used is if you are printing on your own printer from within PS. However, even if you are printing on your own printer, but using (say) the software that came with your printer, many print drivers, just like the services mentioned in the previous paragraph, simply ask you the size of the prints you want.

To summarize, the number of pixels (ie, the "pixel dimensions") must be reduced greatly to get the desired pixelation effect, and, if one wants to process it further or embed it in a web page, you have to return the pixel dimensions to its original value to have a decent size image to see, work with, etc.

I hope this clarified what is going on.

Best regards,

Tom

PS - I forgot to mention that to get a nice sharp pixelation effect, it is important to use only the "nearest neighbor" algorithm when both down- and up-rez'ing the image.
 

Attachments

  • 1a-original_settings-showing_pct_chang_in_nr_of_pixels.jpg
    1a-original_settings-showing_pct_chang_in_nr_of_pixels.jpg
    97.5 KB · Views: 12
  • 1b-orig_settings_showing_actual_numbers_of_pixels.jpg
    1b-orig_settings_showing_actual_numbers_of_pixels.jpg
    97.2 KB · Views: 11
  • 2a-dropped_to_24ppi-showing_pct_change.jpg
    2a-dropped_to_24ppi-showing_pct_change.jpg
    102 KB · Views: 13
  • 2b-dropped_to_24ppi-showing_actual_nr_of_pixels.jpg
    2b-dropped_to_24ppi-showing_actual_nr_of_pixels.jpg
    99.6 KB · Views: 14
Got it Tom (after some head scratching :) ) thanks a million for the detailed explanation of whats going on and how to do the process. I look forward to having some time to play with this technique. Much appreciated.
 
Last edited:

Back
Top