What's new
Photoshop Gurus Forum

Welcome to Photoshop Gurus forum. Register a free account today to become a member! It's completely free. Once signed in, you'll enjoy an ad-free experience and be able to participate on this site by adding your own topics and posts, as well as connect with other members through your own private inbox!

cleaning up photo using channels


thanks John, when the filters are turned off with a smart object, does that then remove changes made by that filter ? when I flatten all layers, should i include them all , even include the original one with the errors, how do i determine which layers not to include in a flatten thanks

opened a different scanned image and the single Channel Mixer Adjustment Layer, is greyed out....wondered why ???
 
Last edited:
Just found something out, if i scan as B&W then the channel mixer is not available, what would i use for a B&W scan with the same features options thanks
 
Just found something out, if i scan as B&W then the channel mixer is not available, what would i use for a B&W scan with the same features options thanks

Your file is probably tagged as Grayscale by the scanner, which disables many Photoshop features. Open the file in Photoshop and try converting it by going to Image>Mode and then selecting RGB 8 bits.
 
thanks John, when the filters are turned off with a smart object, does that then remove changes made by that filter ? when I flatten all layers, should i include them all , even include the original one with the errors, how do i determine which layers not to include in a flatten thanks

opened a different scanned image and the single Channel Mixer Adjustment Layer, is greyed out....wondered why ???
Hi @RedDwarf4Ever
Before I answer your question, I wanted to clarify some nomenclature because Photoshop has a command called Flatten which is different than just merging all the Layers into one Layer.
The key difference is that Flatten will convert the Layers down into one pixel Layer and in addition will remove any embedded transparency in the image. In cases where you don't have transprency they end up being one and the same thing. Yet in some cases you want to preserve transparency so you can overlay the image on top of a different background and have that background show through in any transparent areas.
If you want to preserve transparency then you merge all of the Layers as opposed to Flatten. Subtle difference yet wanted not to send you down the wrong path.

If you have a Smart Object and you want to convert just the Smart Object Layer to a pixel Layer, you just leave on the filters that gives the effect you want and right clck on the Smart Object Layer in the Layer panel and chose Rasterize Layer. This presents you from going back and making modifications to the Filters.

If you want to Merge multiple Layers there are choices of Merge Down (merge with the Layer immediately below or use Merge Visible which will merge all visible Layers and preserve transparency. If you want to also remove any transparency then you use Flatten.

As indicated before, I usually save my Layered file separeatley and then save to a JPEG as a separate file (It is flattened) or to a PNG where the transprency can be preserved. That way I can always go back if I or a client changes their mind and wants more changes. Cause if they do and you flattened everything, you just created a whole heck of a lot of work for yourself :)

John Wheeler
 
Just found something out, if i scan as B&W then the channel mixer is not available, what would i use for a B&W scan with the same features options thanks
I like @Rich54 answer to re-enable the commands/filters that did not work with a B&W mode image.
However, when I am doing photorestoration, I always recommend that the scan is in color and an apprirate high bit depth as the color information often aids in recovering a better image. You can always convert to B&W many different ways from within Photoshop (non-destructively too). That's just my two qurters worth (raised up from two pennies due to inflation) :)
John Wheeler

yes in the past I have always scanned in colour, 48bit, heard the sa,e reason before somewhere, but for some reason did a B&W scan, but have now rescanned in colour. Thanks
 
Hi @RedDwarf4Ever
Before I answer your question, I wanted to clarify some nomenclature because Photoshop has a command called Flatten which is different than just merging all the Layers into one Layer.
The key difference is that Flatten will convert the Layers down into one pixel Layer and in addition will remove any embedded transparency in the image. In cases where you don't have transprency they end up being one and the same thing. Yet in some cases you want to preserve transparency so you can overlay the image on top of a different background and have that background show through in any transparent areas.
If you want to preserve transparency then you merge all of the Layers as opposed to Flatten. Subtle difference yet wanted not to send you down the wrong path.

If you have a Smart Object and you want to convert just the Smart Object Layer to a pixel Layer, you just leave on the filters that gives the effect you want and right clck on the Smart Object Layer in the Layer panel and chose Rasterize Layer. This presents you from going back and making modifications to the Filters.

If you want to Merge multiple Layers there are choices of Merge Down (merge with the Layer immediately below or use Merge Visible which will merge all visible Layers and preserve transparency. If you want to also remove any transparency then you use Flatten.

As indicated before, I usually save my Layered file separeatley and then save to a JPEG as a separate file (It is flattened) or to a PNG where the transprency can be preserved. That way I can always go back if I or a client changes their mind and wants more changes. Cause if they do and you flattened everything, you just created a whole heck of a lot of work for yourself :)

John Wheeler
Thank you John, that explains a lot, so if I flatten or merge layers, is it best to do this to all layers, incl the initial one ? Just confused that if the first layer has something wrong, wont that affect the flattening merging if included…thanks again for all the help.
 
Thank you John, that explains a lot, so if I flatten or merge layers, is it best to do this to all layers, incl the initial one ? Just confused that if the first layer has something wrong, wont that affect the flattening merging if included…thanks again for all the help.
Hi @RedDwarf4Ever
If you chose the Flatten option it will only create a single pixel Layer from just the Layers where you have the visibility turned on. A warning will come up asking you if you want to delete the Layers that are not visible. This is not an option just a warning. So its only the visible Layers that get flattened and the Layers with visibility turned off get deleted.

When you use the Merge Visible command, it will Merge all the visible Layers into one Layer and leave the Layers with visibility turned off alone. So it is not flattened down to one Layer.

II suggest your create some sample files with various numbers of Layers with some Layers with visibility turn on and others off and try both options i.e. Merge Visible and Flatten. Nothing like trying it out to make the learning stick
Hope this helps
John Wheeler
 
Of course I will try that John, but still have the same question, if I have a dirty glass of water and then mmixed ‘merged’ it with a clean glass of water, I would get a glass of 50% dirty water. That’s what I can’t get my head around, the first layer has all the discolouration so if I flatten or merge it with the final layer, won’t that same thing happen ? Doesn’t seem to happen but can’t understand why, sorry I’m not trying to be think, just. Any grasp this.
 
Hi @RedDwarf4Ever
I think you are struggling with a conceptual problem so that might be harder for me to explain since I may not quite understand the source of your misconception.

Based on what you said, I will assume that with the Layers that are visible presents an image with which you are pleased e.g. the dirty glass of water looks totally clean now. If that is not the case then you are not done making adjustments yet. Once you have the final set of Layers that create the image on the screen that looks great to you that is when we do the Merge or Flatten operation.

Effectively (without getting into the details) all the Merger process is doing is copying what you see on your screen into a pixel layer and deleting all the visible Layers that created it. You may be udner the impression that the Merge operation is doing something more yet it is not. Think of it in terms of just making a copy of what you see on your screen to create that Merged Layer.
Technically there is a bit more going on yet the result is the same.

BTW - all the Flatten does above and beyond the Merge operation is remove the transparency with an assumed background color (whtie I think).

So it is literally WYSIWYG or What You See Is What You Get

I hope that helps
John Wheeler
 
Of course I will try that John, but still have the same question, if I have a dirty glass of water and then mmixed ‘merged’ it with a clean glass of water, I would get a glass of 50% dirty water. That’s what I can’t get my head around, the first layer has all the discolouration so if I flatten or merge it with the final layer, won’t that same thing happen ? Doesn’t seem to happen but can’t understand why, sorry I’m not trying to be think, just. Any grasp this.

The answer is no. Flattening an image will not allow the original discolored layer to somehow re-emerge or "pollute" the final result.
 
Thanks, so merge only uses the top layer, which would be the final finished layer, that’s clear, and the same with flatten, only uses the top layer, was confusing when it says do you want to deleted the non visible layers, got me worried I would lose image data, it’s only the top layer that’s important, i can save TIFF or PSD with the layers if I choose for a future date…..it’s terminology I think that confused me, merge doesn’t IMO merge, it just chooses the top layer and discards the others….I so hope my assumptions are now correct…..I have bought a tutorial course, to work through Photoshop really is powerful, and so many ways to do the same thing, some more efficiently than others, but with more work and needing a deeper understanding. Thanks to you and everyone else, it’s been fun. Started a new post about the colour photo with discolouration, also have a B&W photo where the detail is hidden, want to try and bring it out, worried I’ll make too many posts and get in trouble.
 
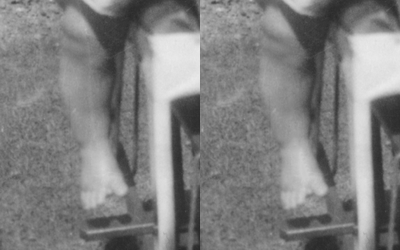
Hello, back to the original photo, Think its reasonably good now, not easy having a 60 years old photo, I have one remaining issue the left boys right leg, the creases just don't look right, I've copied & pasted a selection from the original and, it still looks terrible, maybe I`ll have to settle for this, but is there something I can do to make it look more realistic, thanks in advance
 

Attachments

Hi @ RedDwarf
With prior techniques that forum members have shared, you should get to the point where there is just a thin line down the person leg to address.
I took that image that I had and then adding another blank Layer and using the Spot healing tool with a small size just larger than the line bit by bit went down the leg in incrmemtns and "Healed" that area.
Below is a GIF animation showing the before and after. That is the approach I would take
John Wheeler
Repair-leg.gif
 
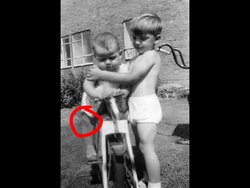
Thanks John, I’ll have to go back a few versions and get this sorted, shall I leave the toes alone, ? I think sometimes there’s only so much you can do. It’s mainly to see where the limits are to my abilities, which are not very high yet anyway, during my efforts at making the leg look better I think I’ve messed up the ’creases’ at the top of the leg, so if I go back a few versions, maybe and correct the vertical line as you show, then maybe I should just accept it, have a few others to do.
as I said, I will go back to a previous version, before I messed up the bit in the red circle10F5748B-EA7A-4CD9-AB08-A63833A24E1C.jpeg10F5748B-EA7A-4CD9-AB08-A63833A24E1C.jpeg
 
Thanks John, I’ll have to go back a few versions and get this sorted, shall I leave the toes alone, ? I think sometimes there’s only so much you can do. It’s mainly to see where the limits are to my abilities, which are not very high yet anyway, during my efforts at making the leg look better I think I’ve messed up the ’creases’ at the top of the leg, so if I go back a few versions, maybe and correct the vertical line as you show, then maybe I should just accept it, have a few others to do.
as I said, I will go back to a previous version, before I messed up the bit in the red circleView attachment 131207View attachment 131207
Hi @RedDwarf4Ever
First of all do not be hard on yourself. You are just learning and I am still learning. It improves with time and experience.
I think you are seeing the value of doing non-destructive editing. That makes going back and making adjustments that much easier with less redo work.

My own thoughts around what should be fixed or not is if some element in the image is a distraction to the main focus of the image e.g. a couple cute kids or siblings. If it is not a distractor, I leave it alone and work on that which enhances to focus or purpose of the image.

Just getting the stains out got rid of the biggest distraction so its a judgment call on how much more to do after that.

For me, other than getting rid of the stains and the surrounding lines of the stain, maybe reducing the highlights and increasing the sharpness may be all that I would do.
So in my opinion you are already doing great!
John Wheeler
 

Back
Top