What's new
Photoshop Gurus Forum

Welcome to Photoshop Gurus forum. Register a free account today to become a member! It's completely free. Once signed in, you'll enjoy an ad-free experience and be able to participate on this site by adding your own topics and posts, as well as connect with other members through your own private inbox!

cleaning up photo using channels


RedDwarf4Ever

Well-Known Member
Messages
86
Likes
7
Hi
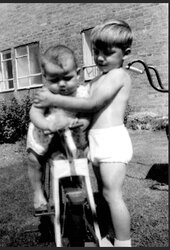
I am removing a colour hue from an old B&W photo, could be something was spilt on it. I used CHANNELS and only left the Blue selected, and it removed the colour very well. Then I used LEVELS
which improved it even further, but I cant work out how to set the CHANNELS and LEVELS changes, I save the image, but when i reload it the discolouration is as before. I know its something simple, but my research has been fruitless, thank you
 
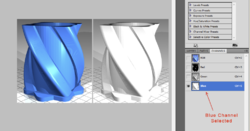
Not sure if this is your problem, but what caught my eye is that you say you left only the blue channel "selected". In the image below, the left side is the original image of a blue shape. The right side is what that image looks like when I "select" only the blue channel.

1657829078595.png


However, merely selecting the blue channel hasn't actually changed the image. If you try to save this to a new file it will revert back to the original blue, where all three channels are present. If you want to preserve the effect of only seeing the blue channel, then try this:
  • Create a new blank layer at the top of the layers palette.
  • Go into the Channels palette, select only the blue channel and make any other adjustments, as you did before.
  • Go back into the layers palette and create a new composite of your image using Stamp Visible (Shft+Ctrl+Alt+E). From here, saving your file should retain all your previous changes.

If that doesn't work, it would help if you post your actual PSD file here so others can investigate.
 
Hello
I did as you suggested, but (Shft+Ctrl+Alt+E). did nothing at all, well it actually bought the dis coloration back ?
I am no doubt over simplifying this, but it would be easier if there were a tick box to apply changes

the original file and a screenshot of what i achieved, I was very pleased with myself, until i found the changes made weren't permanent

i was just starting to the unsharp mask, when i found this out,

keith trevor colour hue removed-test.tif @ 33.3% (.jpg
 

Attachments

Ok, this should work.
  • In your PSD file, select the blue channel (as you've already done before—the stain is mostly gone).
  • While still in the channels palette, go to Select>All, and then Edit>Copy.
  • Still in the channels palette, click back onto the top RGB-Composite thumbnail to reactivate all channels.
  • Go into the layers palette and go to Edit>Paste.
Above this new layer, continue making any further changes you want, such as a Levels adjustment.


Also... here's an entirely different approach that may be easier and better:
  • Above your stained layer, open a Black & White adjustment layer.
  • The B&W adjustment contains six sliders that adjust individual color channels.
  • In your case, the Red slider and the Yellow slider will affect the stain. Try adjusting the Red slider to the left to negative 19 and the Yellow slider to 9.
 
Thank you
i first tried using convert to BfW, but it left a stain / watermark, where the discolouration had been, channels does work, but is that best avoided, pressing the key combination, gave differing results, sometimes I ended up with just one layer other times it returned the discoloured image, very confusing. I will try the second option you suggest, seems like an easier way thank you
is channels an option that’s used much ?
 
Also... here's an entirely different approach that may be easier and better:
  • Above your stained layer, open a Black & White adjustment layer.
  • The B&W adjustment contains six sliders that adjust individual color channels.
  • In your case, the Red slider and the Yellow slider will affect the stain. Try adjusting the Red slider to the left to negative 19 and the Yellow slider to 9.
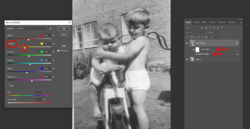
It's a good option and I had taken a poke at it before you posted. Here's where I ended up- converted to smart object first so I could go back and forth:

1657850947494.png
 
Hi @RedDwarf4Ever
Here is yet another way
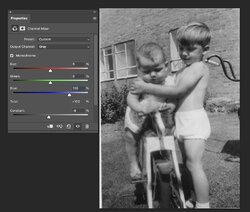
Add a single Channel Mixer Adjustment Layer, set to Monochrome, turn Red and Blue to zero and set Blue to 100.. This isolates the image to just the Blue Channel directly in the Layer Stack.
You whole image was a bit bright so just used the "Constant" slider and moved it down a tad.

Just one more way to consider. Hope this helps
John Wheeler

Screen Shot 2022-07-14 at 9.01.12 PM.jpg
 
It's a good option and I had taken a poke at it before you posted. Here's where I ended up- converted to smart object first so I could go back and forth:

View attachment 131149

this is fascinating stuff, ok i did the B&W adj layer, the figures in your screenshot are different from the text, i tried both, the ones in the image gave good results, i assume its trial and error with the colours, continually observing the changes, so how does a smart object allow you go to back and forth, is that better than having multiple layers, if indeed that's the goal
 
Hi @RedDwarf4Ever
Here is yet another way
Add a single Channel Mixer Adjustment Layer, set to Monochrome, turn Red and Blue to zero and set Blue to 100.. This isolates the image to just the Blue Channel directly in the Layer Stack.
You whole image was a bit bright so just used the "Constant" slider and moved it down a tad.

Just one more way to consider. Hope this helps
John Wheeler

View attachment 131151


Hello John, i tried a single channel adjustment layer, i did as you suggested, had to adjust contrast to -8, looking good, so many ways to achieve the same thing. There's still a `band` or `patch` on both upper legs, where the colour was removed, i assume clone stamp will be the answer to this
 
So many ways to achieve the same thing. There's still a `band` or `patch` on both upper legs, where the colour was removed, i assume clone stamp will be the answer to this

Glad you're having some success with the various methods. The clone stamp may well be the answer to your final edits, but here's something else to think about.

Up to now, you have been using these adjustment layers on the entire image, affecting the image globally. But it's possible that different parts of the image might need slightly different settings. So one approach is to use two (or more) of the same adjustment layers. The first one would be your best shot at fixing the entire image, and then adjustment layer #2 would have a layer mask so that it affects—hypothetically—only the boy's leg, where you would use slightly different settings.

Lastly, you should be aware that Unsharp Mask essentially works by identifying what it sees as edges and then boosting the local contrast at those edges. So if you've already set the image contrast to your taste, Unsharp Mask will then add even more contrast. My own opinion is that your last post is too dark, but now we're getting into matters of personal taste.
 
Rich54, do you think the shadow looks right on the left boys leg, these are things that don't have specific answers i suppose, but my artistic flair is zero, so rely on technology.....

can i use the same process with colour photos with discoloration, or is that a different process ?
 
Rich54, do you think the shadow looks right on the left boys leg, these are things that don't have specific answers i suppose, but my artistic flair is zero, so rely on technology.....

can i use the same process with colour photos with discoloration, or is that a different process ?

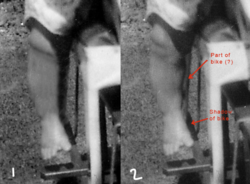
In this photo, image #1 on the left is a detail from your final edit. Image #2 is the amount of contrast I would personally use on the leg. Here's what else I see:
  • In image #2, the first red arrow points to a vertical shape alongside the boy's leg. Hard to tell, but I'm pretty sure that's part of the bicycle.
  • Also in image #2, the second arrow points to a shadow on the ground that, to me, is also from the bicycle, not the leg or foot.
  • In your version, all of these things are darkened into one unified shadow shape that also includes the shadow across the boy's leg. Along the knee and the calf, yours looks reasonably like a core shadow on the leg, but then down at the foot the shadow suddenly becomes a cast shadow, presumably below the foot. That transition at the ankle doesn't work for me. My preference is to keep those various shapes distinct from each other.

1657920053096.png


Fixing color photos with discoloration is usually much more complicated. With a B&W photo, and colored stain can first be converted to B&W. Then, it's really just a question of adjusting the lumiosity to blend the stained area. In a color photo, Hue and Saturation also become issues that need to be dealt with.
 
Rich54, do you think the shadow looks right on the left boys leg, these are things that don't have specific answers i suppose, but my artistic flair is zero, so rely on technology.....

can i use the same process with colour photos with discoloration, or is that a different process ?
If you have an example color image with stain you create another post and see what approaches forum members could share to fix it.
John Wheeler
 
I'm late to the conversation but I didn't want to leave a question unanswered:
...so how does a smart object allow you go to back and forth, is that better than having multiple layers, if indeed that's the goal

A smart object is basically a non-destructive way of making changes to an image. It also gives you the ability to transform the image without losing resolution.

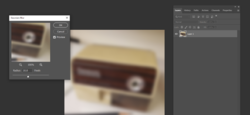
For instance, you have an image you want to blur - so you go up to Filters>Blur>Gaussian Blur:

1657933153365.png

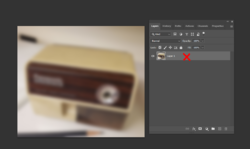
When you click OK - you have a blurred image. But now you've realized maybe you've blurred it too much.
But you can't go back and undo the filter. This is what is meant by a destructive change.

1657933932714.png
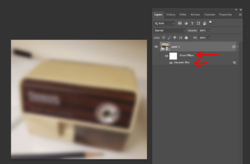
But if you turned it into a smart object and then blurred it, the filter is now within a container:

1657933359707.png

So if I made a mistake and blurred it too much, I can click on the Gaussian filter, and return to the setting - ie the original image is still intact:

1657933470696.png

I can also choose to delete the filter or just simply turn it off. The original image remains intact.

If you're doing a lot of editing, this is a non-destructive way of doing it giving you the opportunity to back in to each filter and make changes without starting from scratch.

Lots of videos available - here's one for instance:


Apologies to all for interrupting the conversation - please continue since I'm learning a few things myself along the way! :cheesygrin:

- Jeff
 
I'm late to the conversation but I didn't want to leave a question unanswered:


A smart object is basically a non-destructive way of making changes to an image. It also gives you the ability to transform the image without losing resolution.

For instance, you have an image you want to blur - so you go up to Filters>Blur>Gaussian Blur:

View attachment 131162

When you click OK - you have a blurred image. But now you've realized maybe you've blurred it too much.
But you can't go back and undo the filter. This is what is meant by a destructive change.

View attachment 131167
But if you turned it into a smart object and then blurred it, the filter is now within a container:

View attachment 131163

So if I made a mistake and blurred it too much, I can click on the Gaussian filter, and return to the setting - ie the original image is still intact:

View attachment 131164

I can also choose to delete the filter or just simply turn it off. The original image remains intact.

If you're doing a lot of editing, this is a non-destructive way of doing it giving you the opportunity to back in to each filter and make changes without starting from scratch.

Lots of videos available - here's one for instance:


Apologies to all for interrupting the conversation - please continue since I'm learning a few things myself along the way! :cheesygrin:

- Jeff

thanks jeff, will give this a practice also, I thought creating an extra layer gave safety, as if a mistake is made, the layer can be deleted, and go back to the previous one, is that just another way, or is one method better than the other, ?
 
In this photo, image #1 on the left is a detail from your final edit. Image #2 is the amount of contrast I would personally use on the leg. Here's what else I see:
  • In image #2, the first red arrow points to a vertical shape alongside the boy's leg. Hard to tell, but I'm pretty sure that's part of the bicycle.
  • Also in image #2, the second arrow points to a shadow on the ground that, to me, is also from the bicycle, not the leg or foot.
  • In your version, all of these things are darkened into one unified shadow shape that also includes the shadow across the boy's leg. Along the knee and the calf, yours looks reasonably like a core shadow on the leg, but then down at the foot the shadow suddenly becomes a cast shadow, presumably below the foot. That transition at the ankle doesn't work for me. My preference is to keep those various shapes distinct from each other.

View attachment 131160


Fixing color photos with discoloration is usually much more complicated. With a B&W photo, and colored stain can first be converted to B&W. Then, it's really just a question of adjusting the lumiosity to blend the stained area. In a color photo, Hue and Saturation also become issues that need to be dealt with.

thanks, you are perfectly right, I have a saved version before I made these changes, will go back and be more vigilant, thanks for being observant and pointing that out, it’s too easy to obliterate detail, with a misconception . Thanks again
 
thanks jeff, will give this a practice also, I thought creating an extra layer gave safety, as if a mistake is made, the layer can be deleted, and go back to the previous one, is that just another way, or is one method better than the other, ?
I bet @JeffK jumps in with his thoughts and here are mine.
Any steps you take that are non-destructive to the image pixels is a fine way to go. So adjustment Layers do that as you mentioned.
However, most of the Photoshop Commands under Filter expect to work and modify pixels. This is one area where Smart Objects shine. With a Smart Object, the original pixels are protected, and you can go back often as you want and modify the settings on the Filters with no impact to the original pixels.
Just as you can turn off the visibility of a Ajustment Layer or delete an adjustment Layer, you can do the same with any Filter on a Smart Object. I believer your were provided a link to more info on Smart Objects. Here is a link to the Adobe "Helpx" reference information about Smart Ojbects. I use them all the time: https://helpx.adobe.com/photoshop/using/create-smart-objects.html

BTW - Once you get used to Smart Objects, I suggest you check out the Camera Raw Filter. It has some amazing capabilities for adjusting images. A whole another Photoshop of capability within Photoshop. I use it from within Smart Objects all the time.

John Wheeler
 
Thank you John, yes I will have a look, I went back to a saved image before I messed up the boys leg and blended it into the pedal `arm` much better now. One question, when I flatten layers, should I flatten ALL layers including the original, only ask because the original layer had the discoloration .thanks

One last thing about the image, on the boy on the left leg, there are two horizontal crease marks, I thought there would only be one, below the knee...thanks

P.S. So if i convert an image to a smart object and don't want the changes made, do i right click convert to layers ? or would this keep the changes ?
 
Last edited:
Hi @RedDwarf4Ever
When to flatten has some tradeoffs.
I usually default to saving my Layered file as a PSD or Layered TIFF file and then export a copy to JEPG or PNG depending on how it is going to be used. That way I can always go back to the Layered File to make more adjustments if I want to tune it up. Of course the downside of that approach is you have two files unless sometime in the future you delete the PSD or TIFF file when you no longer need the Layered File.
So just tradeoffs on when to flatten.

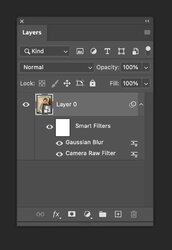
Here is a simple Smart Object with two filters applied to which I will refer for your second question:
Screen Shot 2022-07-16 at 7.12.38 AM.jpgyet

I find it rare to convert a Smart Object to Layers so that is a more advanced topic and suggest the steps below first.

You can turn off each individual filter independent of each other by clicking its icon to the left of the filter name under the Smart Object in the Layers Panel
You can also just click on the eyeball to the Left of the White Box that has "Smart Filters" text to the right of it. That turns off all fitlers for that Smart Object. Note that the white box is an optional Mask that is applied to the Filters below to selectively apply those filters from within the Smart Object. This is a separate Mask in addition to the Layer Mask that could be used.

If you did not want the overhead of the Smart Object anymore and wanted to effectively merge it all back to a pixel Layer, you just leave on the filters you want and then right click on the Smart Object and chose Rasterize Layer. I don't use this too often because I can no longer go back and make changes to the Filters at that point.

There are tons more details as you go along yet hope than answers your initial questions
John Wheeler
 

Back
Top