What's new
Photoshop Gurus Forum

Welcome to Photoshop Gurus forum. Register a free account today to become a member! It's completely free. Once signed in, you'll enjoy an ad-free experience and be able to participate on this site by adding your own topics and posts, as well as connect with other members through your own private inbox!

Automating extraction of frames from a roll


883robert

New Member
Messages
4
Likes
0
Hi. I'm trying to extract parts of an image in Photoshop and saving these parts to individual files.
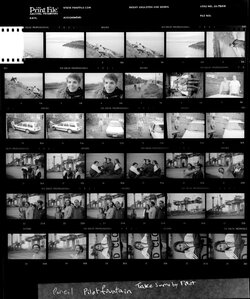
Specifically I'm digitising my negative archives. I photograph the negatives in their polythene sleeves, one photo per roll, i.e. one photo per polythene sleeve. Thus each file produced by the camera covers thirty-six individual frames.
I want to bring one of these files into Photoshop and have an action that will automatically select or slice each neg. frame and save it to a file.
I foresee the need to pay careful attention to alignment. I prefer not to adjust it for each roll. Rolls number in the thousands.
Is this doable in Photoshop or am I asking too much? A sample roll of 36 is attached.
Thanks for reading.
Robert, Australia
B050798 orig.jpg
 
Hi 883robert,
I think that it will be very difficult with actions. A script (Javascript) will be easier. I think this is possible. I created a script that does the opposite operation: it prepares contact sheets from photos found in a folder.
But I have a question : what do you intend to do with extracted photos ?
Ah, I had omitted an important aspect. Once the 36 individual pictures are extracted from the 'contact' file I would import them into my digital asset management program (IMatch). Then I could assign rmetadata and sort the sheep from the goats. The resolution of the individual files will enable me to make small prints of them. If I want bigger prints I would select the most desirable files and scan them with a Konica Minolta Dimage scanner.
My reasoning is that I know there are good pictures in my archives but they are less than one percent of the total. I simply can't afford to scan all one hundred percent individually to identify that one percent.
 
Hi @883robert
I will give you one path to take (I have used it myself with PrinFile) that is not perfect yet may meet your needs.

The key to all of this is there must be at least a few gray levels of separation from the black between the images and the images themselves. This also works better if you have scanned to PNG or TIFF and not use JPEG as JPEG hides artifacts in the large single color/tone areas which impacts the results. Another key is that you should only have one PrintFile image open in Photoshop at a time (no other documents loaded)

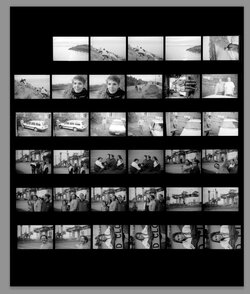
First, since PrintFile are all the same size, you can create a template that is strips of black between the rows of images to cover up the film type and the frame numbers. One manual piece is that it is best to black out partial negatives or have an effective black frame around the part you want to keep. here is an example of what the result should appear to be once those first two steps are taken:
Screen Shot 2023-07-18 at 9.15.32 AM.jpg

Then you use the command in Photoshop File > Automation > Crop and Straighten Photos
This command will search for image boundaries are extract each of them as its own open document in Photoshop.

From there you have two choices. You can save all of the open images to where you want to have them individually saved and later examined per your own needs.

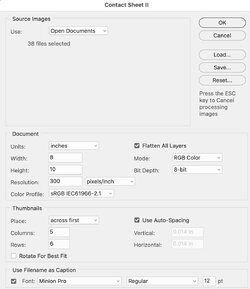
And/or alternately (and also to show how well this worked), I took all the open documents and created contacts sheets with the File >Automation> Contact Sheet II (lots of paramenters) and here is an image of what I used:

Screen Shot 2023-07-18 at 9.33.23 AM.jpg

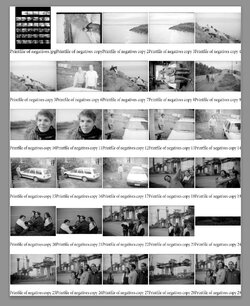
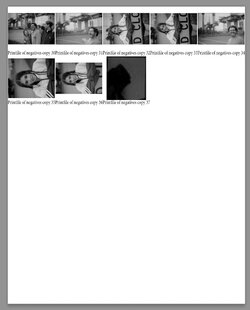
And here are the screen shots of the two contact print documents that were created:

Screen Shot 2023-07-18 at 9.18.46 AM.jpg


Screen Shot 2023-07-18 at 9.19.01 AM.jpg

Note that the extracted images were not perfect because the contrast was not very good between the border of the images and the strips between the negatives yet it did better than I expected. You can see that it did not extract each image perfectly and created an extra image with what it found.

So I think these two built in tools and setting up the initial image for them to work just might do it for you.
Just a suggestion to consider
John Wheeler
 
Hi @883robert
I will give you one path to take (I have used it myself with PrinFile) that is not perfect yet may meet your needs.

The key to all of this is there must be at least a few gray levels of separation from the black between the images and the images themselves. This also works better if you have scanned to PNG or TIFF and not use JPEG as JPEG hides artifacts in the large single color/tone areas which impacts the results. Another key is that you should only have one PrintFile image open in Photoshop at a time (no other documents loaded)

First, since PrintFile are all the same size, you can create a template that is strips of black between the rows of images to cover up the film type and the frame numbers. One manual piece is that it is best to black out partial negatives or have an effective black frame around the part you want to keep. here is an example of what the result should appear to be once those first two steps are taken:
View attachment 138657

Then you use the command in Photoshop File > Automation > Crop and Straighten Photos
This command will search for image boundaries are extract each of them as its own open document in Photoshop.

From there you have two choices. You can save all of the open images to where you want to have them individually saved and later examined per your own needs.

And/or alternately (and also to show how well this worked), I took all the open documents and created contacts sheets with the File >Automation> Contact Sheet II (lots of paramenters) and here is an image of what I used:

View attachment 138658

And here are the screen shots of the two contact print documents that were created:

View attachment 138659


View attachment 138660

Note that the extracted images were not perfect because the contrast was not very good between the border of the images and the strips between the negatives yet it did better than I expected. You can see that it did not extract each image perfectly and created an extra image with what it found.

So I think these two built in tools and setting up the initial image for them to work just might do it for you.
Just a suggestion to consider
John Wheeler
Thanks John, this is an ingenious suggestion. Can you clarify a couple of points for me?
1. What do you mean when you refer to Printfile? Is this just the image produced by my camera after photographing the sleeve of negatives?
2. Why have you suggested creating a single file using Photoshop's Contact Sheet II command? I started with all thirty six frames in a single file and want to extract thirty six individual files from them.
Regards and thanks again, Robert
Hi @883robert

1) PrintFile or more properly Print File is the name of the company/product that makes that archival negative/slide/print sleeves as per the upper left corner of your image :) :

Screen Shot 2023-07-20 at 7.52.55 AM.jpg

2) I was not trying to suggest using a single sheet as your final output. I only used that to easily show you the results of each image extraction all in one place. In your case, after doing the extraction with File > Automation > Crop and Straighten Photos, I suggest you follow that with either the File > Automation > Batch command or the File > Scripts > Image processor command to move all of your open files into individual files as you desired.

Note that the Crop and Straighten Photos command is pretty finicky in trying to determine the location of the negative edge frames. To include your partial #1 negative in the batch, you would need to make it appear as just the negative with a black background.

Even in the trail case of what I did as an experiment, it did not capture all the negatives exactly correct. One was clipped on the top and bottom and it identified a fragment of another image and made it its own image. That is why I mentioned that the negatives need some contrast with the background black.

I suggest you experiment with it to see what works best for you. I personally would not expect it to work 100% correctly under all conditions which creates some overhead that you may or may not want to put up with.

I figured it might be worth exploring for you give the alternatives of having a custom script written to do the job better.
Hope the extra details are helpful
John Wheeler
 
That's clear now John. Excellent. I'll make a template and experiment. This is promising. In the meantime I've come up with a fall back technique. Rather than import each of the 36 individual images into my digital asset management software I could import just the ex-camera 'Print File' image of all 36 frames. Then I'd assign metadata to that file based on all 36 images. When looking for a particular picture I'd search the metadata and bring up the relevant roll or rolls of 36. From them I'd choose which frame or frames I want and extract them manually. Given that the pictures I want are but a small proportion of the total number of frames I'd avoid handling the other 90%.
Between this and your clever technique I reckon I have it covered. Thanks, really.
Robert
You are very welcome Robert
 

Back
Top