What's new
Photoshop Gurus Forum

Welcome to Photoshop Gurus forum. Register a free account today to become a member! It's completely free. Once signed in, you'll enjoy an ad-free experience and be able to participate on this site by adding your own topics and posts, as well as connect with other members through your own private inbox!

White space between background and foreground


spiderdan

Member
Messages
6
Likes
0
I cut the foreground out of a picture and pasted it into a new layer. I then inversed my selection and did the same for the background. Why I didn't duplicate the background layer before cutting stuff out of it I have no idea. I' afraid I'm new at this. Anyway, there seems to be a gap between my foreground and background layers. When all layers are visible, white (which is really transparency) shows through. I took a basic photoshop class last year and I vaguely remember a method of blending the two layers so the gap becomes a sort of average of the two. It may have involved feathering. Does anyone know of such a method or a better one? Thanks ahead of time!
 
Last edited:
I don't understand; you cut out the main subject and background separately and then you "glue" them back together again? Can you be more precise please.
 
Thanks for the reply. Sort of. I "glued" them onto separate layers. Reason being so that I could adjust the color levels separately for each layer. I used the same selection to copy the foreground and background, only inversed. For some reason, when viewing both layers, there is a gap of white space (transparency) between the two layers. This would not be a huge issue, but I cut from my original background layer so it is now unusable. I suppose I really have two questions. First of, what is causing this gap and how can I avoid it in the future. Second, is there some method of blending the small gap between the two layers as I asked before.
 
Thanks for the reply. Sort of. I "glued" them onto separate layers. Reason being so that I could adjust the color levels separately for each layer.

If all you want to do is adjusting color, then you don't have to cut anything. Just make a selection first of what you want to correct and than make the actual correction.
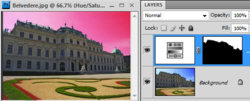
Once you're getting the hang of masks, you could use adjustment layers and add the appropriate mask like in this example:

24g7urk.jpg
 
Thanks again JLBerry. I'm afraid I'm a bit confused about what your saying. I used separate layers so that I could adjust the levels again if need be. It sounds like your saying the same can be done with masks. Could you post a link to a how to on this? It would seem my original method was not the best way. Still, I'm curious to know why it didn't work. Is a selection not an exact thing. I left the same selection and inversed, so I don't understand why there was a gap. Thanks again for the help!
 
The reason why you're getting a gap is because of the anti-alising of the selection.
But like I said, your method is not correct. It's always better to have a mask, because a mask is always saved with the file, a selection isn't. A mask can also be edited like a gray scale image, you can even apply filters to masks, there is lots of fun stuff you can do with them and they offer the most elegant solutions for all kind of future issues you might have.

In this case you don't even have to know how to create a mask; if you have an active selection and add a levels adjustment layer or any other adjustment layer (icon at bottom of layers palette), then photoshop will automatically add the proper mask to that adjustment layer based on your current selection.

Do yourself a favour; learn everything about masks, they are incredibly useful! ;)
 
Thanks JLBerry! Looks like you not only answered my question, but suggested a better way as well. Think I'll just try starting over from here. That'll give me a chance to mess with masks anyway.
 

Back
Top