What's new
Photoshop Gurus Forum

Welcome to Photoshop Gurus forum. Register a free account today to become a member! It's completely free. Once signed in, you'll enjoy an ad-free experience and be able to participate on this site by adding your own topics and posts, as well as connect with other members through your own private inbox!

Using photoshop to repair local consequences of contrast


Yacobus

Member
Messages
8
Likes
0
Hi

I have recently joined and have what is probably a simple question - but I am apparently using the wrong search terms to find it. I have edited a couple of photos using lightroom and Viveza 2 from Nik (which is not important) - the point is that the added contrast from Lightrooms 'clarity' and Nik's 'structure' (both mid-tone contrast) have left the edges of the cliffs in my photos with a distinct 'halo'. Examples included below.


So the question is: Is there a way to 'repair' the adverse effects in photoshop (as I like the overall effect and would like to retain the contrast in the rest of the image)?

Sinserely

Jacob
 

Attachments

  • IMGP3460-Edit.jpg
    IMGP3460-Edit.jpg
    4.7 MB · Views: 10
Hi Jacob...

I'm not real sure i can help, i don't use those plugins.

But initially i'd ask you what resolution the original photo is?
Most often when we get the halo affect it's because we apply a filter too strongly for the resolution of our photo. Reducing the photo in size might help a little. But not usually enough to satisfy.

There ARE other ways to increase clarity to an image that don't involve any 'destructive' editing.

One way would be to change your photo into a Smart Object. Photoshop would then apply any filters on top of the photo and not TO the photo. In that case, if you had anomalies such as halos, you could experiment with changing the Layer Blend Mode. Usually lighten or darken would work to product a decent effect without anomalies.

Another method is to apply the OTHER>High Pass filter to a duplicate of your source layer, above your source photo. Try 10 pixels to start with. Then see which of these Layer Mode looks best to you: Overlay/Softlight/Hardlight/Vividlight. Also play with the Opacity of the layer to reduce harshness but keep strong lines.

Try those and see if they might help. Try them too on the original photo without those other filters applied to it.

Hope that helps.
Take care.

Mark (aka theKeeper)...
 
Hi Mark

I am grateful for the time you have taken to reply to my post.

The original is 4628x3075.

After reading your suggestions I have been experimenting with the different settings - it seems however that even a slight increase in contrast makes the difference between the cliff and the sky stand out (white vs. dark). Perhaps I should try and paint a copied layer of the original photo back in just along the edge of the cliff.

Sincerely

Jacob

The Viveza edit was destructive as the plugin for photoshop was twice the price and I did not have photoshop then.
 
"Perhaps I should try and paint a copied layer of the original photo back in just along the edge of the cliff."

Yes, you could do that for sure. Just paint back in the very edge of the mountain.

You might also try selecting the mountains and copying them to a new layer, than apply the filter(s). That should also prevent any halo effect from happening.

I downloaded your sample photo also and while it already had the halo, i wasn't able to completely remove it without scaling down the photo considerably. I also noticed that the resolution was very high, so that at least was good to see.

Let me know how you get on with the new ideas.

Take care.
Mark...
 
Hi again

By the way - although I posted a jpg I am working in dng and tif when editing.

I ended up using the 'clone stamp tool' on the bright part of the 'problem area' - since there is ample sky available for the tool to work. I left the dark part on the cliff because it became unnoticeable once the stark contrast to the white had gone.

IMGP3460-Edit-Anja1-Edit.jpg

Again - thank you for the suggestions!

Jacob
 
Obviously, the best way to fix this is to prevent it before it ever occurred. However, it seems like you don't have this option.

Selecting edges and then cloning into them with the "darken" blending mode certainly is feasible for this image because the edge(s) in question are fairly simple. However, if the haloed edges are more intricate (eg, around leaves in a tree), I essentially automate the above process as described below.

First, desaturate the image and run it through the high pass filter in PS. I usually use a radius of a couple of pixels, ie, around the size of the halos.

The high pass filter takes the difference between a given pixel and its neighbors. No difference is displayed as an intensity value of 128. To remove bright halos, we want to select them. In other words, we only want to process edge pixels that are substantially brighter than their neighbors. An easy way to do this is to run the high pass filtered version of the image through a curve which is zero up to an intensity of 128 and then jumps to 50% and rises linearly from there to full brightness.

You next want to use the pixels surrounding each transparent (ie, halo) pixel to fill in for each transparent pixel. There are several ways to do this, but probably the simplest (but not best) way is generate a mask that will select pixels further away from the bright ones, and then apply that mask to a blurred copy of the original.

To generate that mask, simply blur the 1st mask that we just generated. I used an radius of about 5 pixels to do this. Too small, and it won't fill in wide halos, and too large, and it will be picking up color and luminosity info from too far away.

It will look horrible at this stage because we blurred everything, but don't worry, that will go away in a moment.

Next, use the mask we generated first generated to select out only the areas of the above image that were originally bright halos, and place these replacement pixels on their own layer at the top of the layer stack. Set the "blend-if" sliders for this layer to only allow these pixels to be seen where the underlying layer is fairly bright (ie, where there were bright halos).

As the final step, make another copy of the starting image, and place this on a new layer immediately under the layer described in the previous paragraph.

Doing the above steps, the halo generated by your intentional oversharpening is greatly reduced without introducing too many other artifacts, eg, loss of sharpness in the region of the halo. For halos around leaves and other intricate, geometrically complicated shapes, I find this a lot less work than trying to manually remove such halos with the clone or similar tools.

I know this method sounds complicated, but once you have done it a couple of times and get the general idea, it becomes almost second nature and can be done quite quickly. The most important aspect of it is adjusting the various radii. The attached version is just my initial guess for them. If I spent the time tweaking them, the result would be even better.


HTH,

Tom M


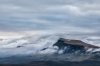
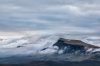
PS - I just noticed that when attachments are viewed in-line in these forums, there are considerable JPG and other artifacts, especially around sharp edges (like the mountain in this image). To correctly compare the different tweaked versions, they must be fully enlarged and viewed at 1:1.
 

Attachments

  • IMGP3460-Edit-01_ps03a-01.jpg
    IMGP3460-Edit-01_ps03a-01.jpg
    707.3 KB · Views: 5
Hi Tom

That's a thorough description, thank you!

And yes, I noticed the attachment problem when the 'corrected' picture I uploaded did not look all that different in-line. However at 100% the difference to the 'original' is noticeable.

Jacob
 

Back
Top