What's new
Photoshop Gurus Forum

Welcome to Photoshop Gurus forum. Register a free account today to become a member! It's completely free. Once signed in, you'll enjoy an ad-free experience and be able to participate on this site by adding your own topics and posts, as well as connect with other members through your own private inbox!

tutorials


luke9511

Member
Messages
5
Likes
0
hello everyone, i am wanting to edit a texture for a model i downloaded off the web it came from the game the force unleashed 2 but im wondering where do i start to learn to edit it to where i keep the details on the texture, i know my way around photoshop a little bit but not how to keep the the look of the texture or maybe make a template of it so i can just make a new one persay
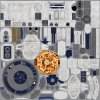
r2Unit_C.jpg
by details i mean the square parts etc, thanks for any help and advice hope to learn alot here
 
Hi luke9511,

This page is full of textures.......TEXTURES

What texture in the image you posted are you trying to edit?
 
Hi luke9511,

This page is full of textures.

What texture in the image you posted are you trying to edit?

sorry that was my bad for not explaining better i do apologize about that, i want to edit the texture i posted to look like the ones below, but when i try i loose details like the square areas etc and i was just wondering where i should go to learn how to either preserve those details or learn how to make a template of the whole texure and just add the colors/shapes i want
TAC_r2b1.jpgR2-A3.jpg
 
kinda yes but if you look at the original there is shaped in darker lines in that shape and i want to learn how to preserve those and just color in the parts that need to be but have look the same
 
I think I know what your wanting, the only thing is that I only know of one way to accomplish this and that's by creating your own templates using the Pen Tool. This will take you a very long time.

I'll post an example in a few minutes.

Hopefully someone else will have a better idea!
 
Here's what I'm referring to....

original
Screen Shot 2013-12-16 at 9.40.35 PM.png

The new template has three main layers...

Layer 1
Screen Shot 2013-12-16 at 9.40.48 PM.png

Layer 2
Screen Shot 2013-12-16 at 9.41.02 PM.png

Layer 3
Screen Shot 2013-12-16 at 9.41.18 PM.png

From here, you can customize to your hearts content!
Screen Shot 2013-12-16 at 9.49.18 PM.png
 
Ok, here's the basic steps for this technique.

If you don't know how to use the Pen Tool, then you need to find some tutorials on how to use the Pen Tool.

You use the original as a guide.
Create a new layer above the guide layer and give it a name.
Select your Pen Tool, set to path, and trace the outer boundary. When done, right click within the path and choose "make selection". You will get the marching ants.
Fill with the color you desire. Remember, these will be your ORIGINAL templates! They can be edited at any time! So color is not that important for now.

Screen Shot 2013-12-16 at 9.58.39 PM.png

Screen Shot 2013-12-16 at 10.08.22 PM.png

Turn off the layer we just filled.
Create a new layer at the top of the layers panel and name.
Using the Pen Tool, trace one of the shapes on the end. When done, right click within the path and choose "make selection". You will get the marching ants again.

Screen Shot 2013-12-16 at 10.08.40 PM.png

Fill this selection with a slightly darker color than you used before.

Screen Shot 2013-12-16 at 10.08.58 PM.png

Since there are two of these in the original, duplicate this layer.
On the duplicated layer, go to EDIT > TRANSFORM > FLIP VERTICAL. Use the Move Tool with the directional arrows to move the flipped half moon into position at the bottom.

Screen Shot 2013-12-16 at 10.09.24 PM.png

TBC.
 
Next we want to add a layer style to the two half moon shapes we just created.

Double click within the body of the top half moon layer inside the layers panel and your layers style window will open.
Select drop shadow and add input 2px for distance and 2px for size. Note that the angle is set to 90 degrees. When done click OK.

Screen Shot 2013-12-16 at 10.10.57 PM.png

Repeat the same steps as above for the lower half moon shape.

The rest is more of the same!
Pen Tool.
Select.
Fill.
(duplicate, flip if needed)
Add a layer style!
You may have to change the angle to -90 degrees on some shapes.

Screen Shot 2013-12-16 at 10.40.27 PM.png
 
Last edited:
Here it is with a Pattern and Gradient overlay added to the layer styles.

Screen Shot 2013-12-16 at 11.02.11 PM.png

Screen Shot 2013-12-16 at 11.02.22 PM.png
 

Back
Top