Hi
@NoName
I you posted a specific example, that would allow forum members to more closely examine your specific issue to see if there is a workaround.
I will give a couple suggestions you can try yet I agree with
@IamSam that you fighting a battle against some built in computationally efficiencies and shortcuts that are built in to Photoshop for performance that in many cases absolutely not give you the correct visual representation on the fly of making changes and actually even in a static situation for the image as well.
I do not have access to the actual code in Photoshop, yet I will include an zipped PSD file that will demonstrate that how Photoshop saves on computations is not do all the pixel by pixel computations once you are a ways under 100% magnification. e.g. when you are at 50% magnification, you only have 1/4 the pixels to effectively view (4 document pixels are merged to 1 pixel) so Photoshop actually does computations on a reduced number of pixels. In fact, you may not see the correct final result unless you stamp the file.
Based on those tricks in Photoshop, you might try doing the changes at 100% magnification (which in many cases of transformations is impractical if the image is much larger than the monitor at 100% magnification. Worth a try though.
One could also take the Layer(s), turn them into a Smart Object and then transform the Smart Object at 100%. This may or may not help yet the transformation is effectively being done on a stamped copy of the Layers which might help especially again if you are viewing at 100% magnification.
I am attaching a zipped PSD file to try out yet will show still shots as I walk you through it.
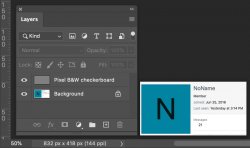
The first is a screenshot of you Gurus information on the first Layer (note I am at 100% magnification)

The second Layer is a pure B&W pixel checkerboard with the Blend set to Pin LIght (same result if you use Hard Light, Vivid Light or Linear Light). The mentioned Blends have the characteristic when the Layer has Black or White pixels is to leave them Black and White yet if it were a 50% gray pixel, the result would be the pixel from below.
Again I am at 100% magnification. The resulting image is just the Black and White Checkerboard pattern:

This should be the result at all magnifications if Photoshop did compuations always on a pixel my pixel basis. Yet, when I reduce the magnification to below a critical level ~65%, the lower level becomes exactly visible which should not happen. The best I can tell, the shortcut Photoshop is using is a reduced resolution image for computations and the top checkerboard for the calculation has averaged the pixels together to have gray pixels, which would then pass the bottom Layer on through as shown below:

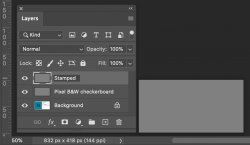
However, if I stamp the Layers to a third top Layer, the lower level is not longer visible. When stamped, it forces Photoshop to calculate on a pixel by pixel basis (not a merged reduced resolution version of the image) and the image comes out as expected:

This same type of problem happens with Layer Masks as well and the amount of Transparency in the Pixel Layer. At sub 100% magnification, you can get the wrong answers.
My example was engineered to show the problem in a dramatic fashion yet it can show up under many circumstances. It could be that the transformation at sub 100% magnification causes the same type of problem during the transformation.
Not sure this is your issue yet thought it was worth sharing. Zip file is attached below
John Wheeler


