What's new
Photoshop Gurus Forum

Welcome to Photoshop Gurus forum. Register a free account today to become a member! It's completely free. Once signed in, you'll enjoy an ad-free experience and be able to participate on this site by adding your own topics and posts, as well as connect with other members through your own private inbox!

Tricky photo healing around the eye...


jaypee

Member
Messages
13
Likes
2
Good evening (well it is here in the UK)

I am a new member, and have posted in the introduction forum, but hi again! :)

I wondered if someone might help with how I proceed with fixing up a family photo that has required healing areas around the eye.
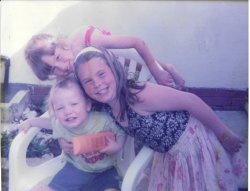
The photo has an orange streak that runs through the face. I started off fixing the RGB and then paints takingly working through the splodges in the face and hairline by using a combination of healing brush and spot healing. The hairline has been particularly tricky but I'm pleased with my efforts so far. But the eye, I just can't seem to find a way to fix the specific areas without them blending into each other too much. The eye ends up looking distorted.

I would very much appreciate any advice on the eye area, or in general if you feel that there might be an easier way to lift the orange streaking other than careful healing brush work as I have been doing.

Many Thanks! :)

compare_all.png

compare_hairline.png

compare_eye.png
 
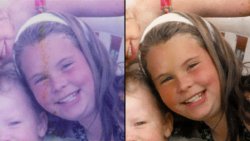
This is a fairly difficult stain, but I was able to get to this Before & After. Everything I did was focused on just this girl with the white headband. I didn't attempt to address any stains elsewhere.

compare_all2.jpg


I did this in three main phases:
  1. General color and brightness adjustment of the entire photo (setting the black, white and gray points; increasing contrast; removing excessive redness from skin).
  2. Neutralizing the color of the stained areas as much as possible using Hue/Saturation adjustments (see tutorial).
  3. Removing the rest of the stain using Frequency Separation (see tutorial).
In the frequency separation steps, I first worked on the "low" frequency colors using a series of surface blurs—on separate layers—to address the stained areas. Then on the "high" frequency texture layer, I used the patch tool to remove the stain by sampling other areas of clear skin.

Here are tutorials on targeted Hue/Saturation adjustments and on Frequency Separation. Depending on your Photoshop skills, these may be daunting. Also attaching my PSD file.

Good luck.


Attachments

This is a fairly difficult stain, but I was able to get to this Before & After. Everything I did was focused on just this girl with the white headband. I didn't attempt to address any stains elsewhere.

View attachment 127291


I did this in three main phases:
  1. General color and brightness adjustment of the entire photo (setting the black, white and gray points; increasing contrast; removing excessive redness from skin).
  2. Neutralizing the color of the stained areas as much as possible using Hue/Saturation adjustments (see tutorial).
  3. Removing the rest of the stain using Frequency Separation (see tutorial).
In the frequency separation steps, I first worked on the "low" frequency colors using a series of surface blurs—on separate layers—to address the stained areas. Then on the "high" frequency texture layer, I used the patch tool to remove the stain by sampling other areas of clear skin.

Here are tutorials on targeted Hue/Saturation adjustments and on Frequency Separation. Depending on your Photoshop skills, these may be daunting. Also attaching my PSD file.

Good luck.


Wow Rich thank you, the color looks so much better in your one than mine! How ever did you do that! I'll check out those links you sent and will have a go at following your steps above. I like to learn, but my photoshop skills are only entry level really. But i have patience, and usually thats served me well :)

I'll be using your photo above as a reference point!
 
Hi @Rich54

I tried following the tutorial you posted for "remove stains in photoshop" and all was going well. I created a clipping mask as i found that the orange stain was actually similar to the color of the sun cream bottle, so selected only the face as a trial, to be further refined.

Anyway, I found that when I got the the step where he slides the hue back to the right and watches the stain almost disappear, on my image the staining goes from brown to a yellow tone. :/


Is this the method you used? Just checking before I continue to work on it. Perhaps I'm missing something.

I appreciate the advice. I have added the original 600dpi scan for reference. [EDIT would not allow me to upload so linked instead below]

 
Last edited:
Regarding the colors, I achieved those primarily by setting the black point, white point and gray point of the entire image. If you open the PSD file that I attached, there is a layer group called Skin Color Correction. Turn off the visibility of all the other layer groups above it. Then click on the little arrow to expand the Skin Correction layer group so that you can see the individual layers within it. You'll find several Curves, Levels and other adjustments that I used. Turn off the visibility of all of them, and then turn them back on one at a time—starting from the bottom—so that you can see what each one does. You can also query YouTube for tutorials about setting the black, white and gray points, which usually takes care of most color casts and many exposure problems.

Regarding your problems with the stain tutorial, I had the same problem that you did. The method in that tutorial is a standard procedure that I use all the time, but in your photo it only produced limited success. In my PSD file, if you turn off the visibility of the layer group called Frequency Separation (plus all other layer above that), you'll see how far I was able to get following the stain-removal tutorial. Expand my layer group called Hue/Saturation to see the two individual adjustments I made.

Your photos present fairly challenging problems. Adjustmets that work well on the skin may not be so good for the clothing, and each of the three girls presents their own lighting and color challenges. If you're new to Photoshop, this particular photo may be a bit too difficult.

Yes, I was able to use your color corrections with my image by referring to your layers in the PSD so thank you :). My image now uses your technique as you have a good eye for it. You might see from my re-linked PSD.

I will continue to persist with spot fixing and healing based on the tips you have given me. I appreciate your help with this and thank you for the coloring!
 
I did want to upload my final here and just thank @Rich54 for the help, but it wont let me upload any images. Says they are too big, even with a <2mb jpg. So i'll post a link again, and apologies if this is not allowed.

Carried on with a combination of dodge, burn, blur and healing brush tools once the color was looking great. Happy with the results here, so off the print and it will be on the wall by tomorrow. :)

Three Amigos Final
 

Back
Top