What's new
Photoshop Gurus Forum

Welcome to Photoshop Gurus forum. Register a free account today to become a member! It's completely free. Once signed in, you'll enjoy an ad-free experience and be able to participate on this site by adding your own topics and posts, as well as connect with other members through your own private inbox!

touching up (real) calligraphy


Messages
15
Likes
0
Hi,

Would like some advice on touching up calligraphy in photoshop.

As the original artwork is handwritten when I scan and import the piece can sometimes look faint especially in the hairline strokes.

How can improve the piece?

I have sometimes used colour overlay to remove tone, but this sometimes thickens the line a little to much.

Have attached the piece
 

Attachments

  • Screen Shot 2013-02-21 at 13.46.38.png
    Screen Shot 2013-02-21 at 13.46.38.png
    583 KB · Views: 6
That's some beautiful handwriting, Meola.

You might try copying the layer with [Command+J] or [Control+J] then change the new layer to "Multiply". If the effect is too strong, adjust the opacity of the "Multiply" layer to reduce the effect. This should help darken some of the lighter areas.

PhotoshopScreenSnapz007.jpg

PhotoshopScreenSnapz008.jpg
 
wow... thanks, neat tip!

Also when I scan the artwork, then use the magic wand to get rid of the paper I end up losing the light detailing in the calligraphy.

I have played with the tolerance which helps a little but not enough, what do you think?
 
wow... thanks, neat tip!

Also when I scan the artwork, then use the magic wand to get rid of the paper I end up losing the light detailing in the calligraphy.

I have played with the tolerance which helps a little but not enough, what do you think?

Rather than deleting the white areas, you might try using a layer mask instead. This will achieve the same effect of hiding the background, but will do it in a non-destructive manner to better preserve your original scanned image.


(1) Open your image

r42ykof.png

(2) Activate the layer mask by clicking the "Add Layer Mask" button in the Layers Pallette.


giN1Ivd.png


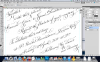
The background layer will be unlocked and renamed to "Layer 0". You will also notice the layer mask thumbnail in white to the right of the image thumbnail. Also, pay attention to the white outline which designates which part of the layer is currently active; either the image or the mask. As pictured below, the mask portion of the layer is active as indicated by the white border.


qROvPMr.png


(3) Copy your image so that it may be used as a layer mask.


Start by clicking on the Layer 0 image thumbnail (the one on the left) to activate it. You should see the white border move to that portion of the layer.


P1asBEW.png


Select all of your image by pressing either [Command+A] or [Control+A]. You should see the marching ants around the border of your image.


Copy the image to the clipboard by pressing either [Command+C] or [Control+C].


(4) Apply the layer mask.


Select the layer mask; but this time hold down [Alt/Option] while you click on the mask thumbnail. You should notice the white border around the mask thumbnail to indicate that it is active. Additionally, the canvas will turn white (that is actually your mask).

wGqFYQl.png

Paste the copy of your image onto the layer mask by pressing either [Command+V] or [Control+V]. At this point, it will look just like your original scanned image. The magic happens in the next step.

Ijyiuce.png

Ok...this is the important part. Invert the mask layer by pressing either [Command+I] or [Control+I]. This will cause the lettering to become white while the background becomes black.

AYIxkK9.png

The mask works by blocking any portion of the image that is black, and showing any portion of the image that is white. So now your lettering will be visible while the background becomes transparent.


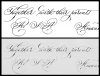
Click on the image thumbnail to see the results of the layer mask.

B05mOcQ.png

Here I added a yellow layer underneath Layer 0 just to see the results better.

vuyDjyD.png

At this point, you may want to copy Layer 0 and set the mode to "Multiply" to darken the lighter strokes of your lettering as described in my first post above. If you need the letters to be darker still, add a second (or third) multiply layer. If you need less, reduce the opacity of the multiply layer as described before.


Note that for my example, I am working from a screenshot of your posted image so the details will not be as good as with your original scanned image.


I hope this helps. No doubt some of the more advanced users here can chime in with other techniques that can help you.
 
Hi Rufinatti,

Thank you for the excellent tutorial... my scan does not quite have the same result. Have attached a copy of the original scan to see if you could perhaps get a better result than I did, and to give you an indication of what I have to work with.

Also how do you specify which layer goes under which?
lush.jpg
 
Also how do you specify which layer goes under which?

Repositioning the layers is pretty straight-forward. Just click on one of the layer thumbnails then drag it up or down to change it's position in the layer stack.

As to your scan, I'll mess with it a little bit but cannot guarantee any better results. Some of those lines are very faint and blend in with the background. Since the background isn't a uniform shade of gray (it has lots of noise in the background due to the texture of the paper), simply using the multiply trick I mentioned before will amplify that noise as well as the strokes of your letters.

Some of the folks on here are absolute wizards with photoshop and can provide better guidance than I.
 
Definitely beautiful calligraphy! As someone else said, I wish my hand was that steady.

When you have such light pen strokes, it's going to be very difficult to completely automate the process of touching up the image to make the lightest pen strokes a bit darker but retain their original thickness.


I tried a completely different approach from Rufinatti -- I imported your high resolution image into Adobe Illustrator and used the "Image Trace" function on it. This gave me a nice smooth, scalable vector graphic that I could then adjust in whatever way I wanted. My original intention was to either (a) adjust some of the defining paths to fill in the very thin, faint pen strokes; or, (b), add my own, new, stroked paths to fill in the problem areas. Approach (b) was working well, but going slowly, so I only worked on the upper LH corner of your image using this technique.

When I then rendered it as a bitmap, it didn't have as "real" of a feel as the original, so I blended back in some of the original that I had processed in ACR to increase the density of the blacks. It still looks a bit too thickened and artificial (all lines are almost equally black, no texture in the background), but at least you can see how this approach might work. You can always blend in some of the unprocessed original to retain that nice organic feel that it has.

After having played with your image for 15 or 20 min, I've come to the conclusion that if my hand was as steady as yours, I would get myself a Watcom tablet and simply touch up the scan right in PS using nothing more than the paint brush. My guess is that with this approach, you would be done with it much more quickly than fooling around with semi-automated methods, and it would likely look better.

Cheers,

Tom M
 

Attachments

  • lush-01_ps04_de_jpg-blend_AI_image_trace-crop-compare-02_600px_wide.jpg
    lush-01_ps04_de_jpg-blend_AI_image_trace-crop-compare-02_600px_wide.jpg
    145.9 KB · Views: 24

Back
Top