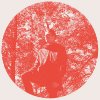
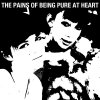
Hi, this method is called threshold and can be accessed from image>adjustments or layer>new adjustment layer. You'll be given a histogram and just move the sliders to your satisfaction.
The first image is a bit more complicated but is also done with threshold. A pattern has been created and applied over the image. IDK if it was created and placed on a separate layer or made into a pattern and done as a layer effect, pattern overlay. If you want to try this you can experiment making your own. Create a pattern and go to edit>define pattern and then you'll find it in your layer fx pattern gallery. There are many ways to achieve similar results when You don't know the exact method used. You may not get the exact result at first (or ever), but you can try different methods.
I used an image that didn't have as dark a BG so I lost most of it. In the example, there is more threshold (to the darker) applied than what I used.
So, first I applied the threshold adjustment. Then I went to layer effects and applied the pattern I created (quickly done white lines). Then I rasterized the layer style.
Next, use a hue/saturation adjustment with colorize checked. Up the sat and lightness and choose your color.
Finally I added a texturizer filter. It isn't the best choice, but closest. Good chance your example was done with a plug-in. I also made one using the notepaper filter with relief set low to almost none.
So, that's my first-attempt-at-reproducing-it guess. Others may have different methods, maybe better. But the basic method is straightforward threshold adjustment.

with texturizer

with notepaper


