Hi -
When I responded earlier, I was using my little iPhone to view your image. Now that I see it on my good PS monitor, I don't think it's just pure solarization (as if that wouldn't be enough to deal with). Rather, in addition to solariation, I think that different parts of the image were exposed to different environments (eg, some were exposed to sunlight more than the others, maybe some areas were exposed to the air whereas others were in the middle of a stack of photos, etc. etc.).
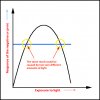
If it were a case of uniform solarization, you are exactly correct that you would have to treat different areas differently. An idealized example of this is shown in the graph below. It demonstrates that if you see a area with a certain darkness on your negative or print, it could be caused by two different amounts of light (aka, exposures).
As you correctly observed, this means that, in principle, you would have to look at each area and try to tell which part of the curve was being represented. In addition, there's an even more problematic issue: the peak of the curve is flat, so a darkening of the media by that amount could be caused by a very large range of exposures, so you couldn't possibly know what caused this amount of darkening, and hence, wouldn't have clue how to fix such areas in PS.
The bottom line is that while there are plenty of plugins, actions, etc. to simulate solarization, I have never once seen anyone successfully reverse the process in post processing.
Unfortunately, if this image is very important to you, the only way that is guaranteed to work is to get the outlines of everything in the image, and then use them as a sketch to manually paint in a completely new picture.
There is no magic button.
Tom M


