What's new
Photoshop Gurus Forum

Welcome to Photoshop Gurus forum. Register a free account today to become a member! It's completely free. Once signed in, you'll enjoy an ad-free experience and be able to participate on this site by adding your own topics and posts, as well as connect with other members through your own private inbox!

Request for sun-issue help


Yacobus

Member
Messages
8
Likes
0
Hi

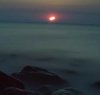
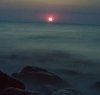
I do long exposure photography (just started recently) and one thing that has become an issue is that when shooting at the exposure times I like for water-surfaces means that the sun will travel a bit on that exposure. I am now experimenting with a shoter exposure to capture the sun and need to blend the two image. I have tried some masking and layers ways of doing it, but I have great difficulty in 'getting it right'. Any ideas appreciated - the photos I have been experimenting with are included.Please ignore the crooked horizon ... and I have not come to the mark left by a drop of water on the lens (but that will be for a future thread id I do not manage that on my own).

_IGP9908.jpg

_IGP9909.jpg

Kindly,

Jacob
 
If I understand correctly, you are trying to put the sun from the shorter exposure into the position of the (moving) sun in the longer exposure image.
 

Attachments

  • _IGP9909jpg-tjm01_acr0-ps01a-01_long_exp-moving_sun.jpg
    _IGP9909jpg-tjm01_acr0-ps01a-01_long_exp-moving_sun.jpg
    113.9 KB · Views: 28
  • _IGP9909jpg-tjm01_acr0-ps01a-02_short_exp-sharp_sun.jpg
    _IGP9909jpg-tjm01_acr0-ps01a-02_short_exp-sharp_sun.jpg
    147.7 KB · Views: 29
Last edited:
Since the two exposure are close to the same brightness, I would simply construct the layer stack shown in the attached screen capture, and then paint a suitable mask on the "sharp sun" layer to expose it. The mask I used is also shown in the attachments below. The result is the final attachment.

layer_stack.jpg

_IGP9909jpg-tjm01_acr0-ps01a-layer_mask.jpg

_IGP9909jpg-tjm01_acr0-ps01a-03a_sharp_sun_on_moving_sun_bkgnd.jpg
 
These two images had quite similar exposures (albeit taken with different exposure times). If you have some image pairs that are not as well matched, simply insert a "levels" adjustment layer immediately above the lowest layer, and adjust the sliders (mostly the middle, or "gamma" slider) to match the exposures in the vicinity of the sun.


That being said, I think you should be very concerned about the artifacts present in the two images you posted. I'm not sure what caused this. Perhaps you saved these images using a very low JPG quality factor? Although the problem is easily visible in your longer exposure, to make it easier to see, I enhanced the local contrast and attached the result below.

HTH, and best of luck,

Tom M

_IGP9909jpg-tjm01_acr0-ps01a-03b_artifacts.jpg
 
Hi Tom

I greatly appreciate your feed-back. I can see from your description that my own trials have been correct in theory and simply bad in practice (!) - I will return to Photoshop and apply you suggestions.

I had forgotten that I had changed the exposure on the one with the sun in one place ... in order to do what you have suggested ... originally it is about 3,5 stops darker than the other one. I think this contributed to the artifacts.

As for the picture quality - yes, the images was a low quality (not too many posts in the forums yet, so still learning the limits of uploads and such) - no artifacts in the original raw-files.

Again, thank you for replying,

Jacob
 
I think you need to work on the actual Taking of the photo better and use proper tools I am going to assume your using a DSLR.
So here is how I would go about setting up the camera for the shot.

Tripod a Good sterdy 1
A remote trigger so you wont get camera shake when releasing the shutter
a low iso 50 or Nikon Lo setting if your camera doesnt go that low you can get away with iso 100 - 200
Now I assume you want to go with the foggy water effect so the next step will be down to the effect you want.
Use a screw on lens ND filter the longer the exposure the higher the ND filter should be with a good ND 10 Filter you should be able to get exposures upto 30 seconds even in daylight which will produce real misty foggy water effect. But may be to much for what you need.

So lets just say ND 4 main screw on filter the reason I say screw on is because they are a lot better to stop light leaks and blowing out your image.

2nd Filter range I would invest in is Cokin filters These are amazing for landscape photography as they let you stack filters.

You can then put a graduated nd filter so it darkens up the sky more in the 1st slot

and 2nd slot you can use a graduated color filter that is maybe orange to blue gradient. There are hundreds of combination filters out there for whatever effect you want. But these colour filters will warm your sunset more and cool your water down.


As I said depending on your camera and the rest of your settings Exposure + Aperature this should Get you producing some good pictures but you will want to tweak it for the more desired look I will see if I can find an actual nd filter tutorial and post in a few mins.

But my advice is proper filters are pricey and they are that for a reason they are built well. feel free if your unsure about them to look for what i call ebay alternatives they are a lot cheaper and may be enough to get you started.
 
I'm glad to have helped, Jacob, and glad you were on the right track.

We would love to see some of your work. If possible, consider posting it here.

Sincerely,

Tom M
 
Hi Hoogle

Thank you very much for your reply - and for the suggested video. Your post made me take another look at my photos ... however I am already doing most of what you suggest and I think the 'problem' - or at least an avenue of improvement lies elsewhere ...

The central premise of this shot is that the 132 second exposure has the water as I want it while the 14 second exposure has the sun that I want. I do not see how I could have had both in a single exposure (but a shot before the sun was up would have been a different story). Obviously a shot between the two exposures might have given me the 'best of the two' - growing experience will teach me I have no doubt.

1) I indeed was on a tripod for these photos and I see no indication (on the distant hills or the rocks in the foreground) that the camera moved - even in the two minute exposure (with the 'moving' sun)

2) I use hitch filters (100 mm - non-screw) in a Lee holder - though not the very best they do get good reviews - I used exactly the method you suggested - stacking a ND 10 stop filter and a graduated filter in order to even out the contrast between sky and ground.

3) The filter I use does give a distinct color-cast, which obviously is modifiable in Lightroom/Photoshop. At the moment I am quite happy with the look that the filter makes ... it is however one of the reasons that I took both photos with identical setup - that I would get a similar white balance that would aid the combination of the photos.

As for looking at the photos again with new eyes I realize that I am a little impatient - even the 132 second exposure is very dark - two exposures up would give me much more leeway in which to make my edits. I'll have to work on that. I have included a shot from the same morning that was a little brighter and goes to show that as soon as the sun has cleared the horizon more time is allowed without it 'streaking' (154 seconds).

Kindly,

Jacob

_IGP9913-Edit.jpg
 
I would use that sky from the last image you uploaded

This is by no way a finished version this is literally taking your last image and blending it with the 1st 1 and adding a lens flair and colour overlay total editing less than 3 mins but as an idea on better quality sky.

Capture.JPG
 
Hi Jacob - You basically have a scene with a huge dynamic range, especially in the region around the sun. The standard approach these days is to use HDR techniques. You take a series of exposures a stop or two apart, and then feed them into HDR software which will use the best exposure for each part of the image and then blend them together.

Don't be worried about the dreaded "HDR" look. With just a little self-control in adjusting the parameters, one can easily avoid that. Also, many of the HDR software packages have a facility to use just one exposure in certain regions if that part of the image is moving.

You might want to take a look at a package called, Photomatix. It's currently one of the most popular HDR packages.

Tom
 
FYI, here's a rough approximation of what an HDR shot might look like. There are many variants possible. This is only one of the more conservative directions you could go in.

T
 

Attachments

  • _IGP9913-Edit-lighter-tjm01-acr-ps01a-02_698px_wide.jpg
    _IGP9913-Edit-lighter-tjm01-acr-ps01a-02_698px_wide.jpg
    132.4 KB · Views: 7

Back
Top