What's new
Photoshop Gurus Forum

Welcome to Photoshop Gurus forum. Register a free account today to become a member! It's completely free. Once signed in, you'll enjoy an ad-free experience and be able to participate on this site by adding your own topics and posts, as well as connect with other members through your own private inbox!

Reducing artifacts in flat colours


Smart Object

Member
Messages
8
Likes
1
I'm pretty experienced in Photoshop, but can't work out how to do something so simple.

In images where there's flat colour (eg book & cd covers), how do you easily get rid of any unwanted noise, without making edges blurry, or resizing down?

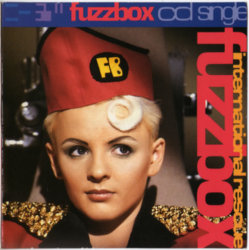
Take this image below for example. It's essentially 5 flat colours. How do I remove the jpegging without blurring the colour edges any more than they are? (click to see full size, it doesn't look so bad squeezed down in a forum page)

I tried Filter > Noise >Reduce Noise with no luck.
I thought Posterize would work but it's too harsh on the edges.

Any other suggestions?

Screamadelica Album Artwork.JPG
 
How I do it without an external plugin and on simple things like this I did the red for example is go to select colour range select the red. 2 Create a new layer and select the brush tool set the brush mode to lighten at the top left corner and then paint over the whole image with the selection still made
you get it like this.
Screamadelica Album Artwork.png
 
Hoogleman - thanks - this worked pretty well (once I did it for each colour) but still some artifacts though.

When I did the Select Colour Range on the red and it gave me the black and white image (based on the red) - is there a way to adjust these levels? I could see the jpegging was there in very light greys - if I could make them white they'd be gone out of the red - if you see what I mean?

Also, when you say 'without external plugin' - do you know of a plugin that would do this really easily?


$1r_M4x1mu$ - Thanks - tried that but it seems more for photographs. I've got a few that it might work on, but at the mo I ant to figure out this cleaning of supposed flat colours. :)
 
For such plain and few colors i use ColorRange with holding shift and small radius (about 20). And just make new solid color for each color:
reduce.jpg

For better result can always fix some things with brush on solid color's masks.
 
Hey SeniorS that looks pretty spot on!

Please can you explain the steps? At what point do you hold shift? I'm not sure how you've achieved it?
 
when you select colour range if you hold down shift and drag the eye dropper around your image it will add to your selection on that theory if you hold down ALT it will remove frome your selection. So basically go to select > colour range hold down shift key and move the eye dropper around all the red, adjust the fuzziness level slider until it is pretty much black and white in the preview icon, Then proceed you chosen way either fill paintbucket painbrush etc etc
 
For such plain and few colors i use ColorRange with holding shift and small radius (about 20). And just make new solid color for each color:
View attachment 9447

For better result can always fix some things with brush on solid color's masks.


Heeeeeelooooo! This messy gooey stuff around the edges of the top picture, that you have removed so perfectly, is the thing I am always complaining about when I post images here. So this is called Artifacts? (or Jpegging?) Why does this happen? This is what I mean I never see on my computer, but that often show up as soon as I have posted them. What do you do to make this not happen in the first place? :)
 
Heeeeeelooooo! This messy gooey stuff around the edges of the top picture, that you have removed so perfectly, is the thing I am always complaining about when I post images here. So this is called Artifacts? (or Jpegging?) Why does this happen? This is what I mean I never see on my computer, but that often show up as soon as I have posted them. What do you do to make this not happen in the first place? :)

They're Jpeg artifacts - ie a byproduct of compressing an image too heavily when saving as a jpeg, or sometimes if an image has been saved as a jpeg multiple times.

The easiest way to avoid is to save your image at as high a Jpeg quality as possible, and do it only once.

If the forum software is compressing it further (which it sounds like if there's a difference between your image and the one you see posted), host your Jpeg somewhere else yourself (eg for free at tinypic.com) and choose to embed the link tinypic gives when adding the picture to your post.
 
I tend to find you get it it more on gradients and reds when you select a colour in photoshop if you get a little warning triangle come up next to your colour picker it usually indicates your using a high colour that will possibly cause the jpeg artifact problem. However there are 2 options I find best here. A) is forget jpegs when uploading here and save them as png files it really does give a sharper image. or B) when selecting a colour check the box that says use web colours only.
 
Hey SeniorS that looks pretty spot on!

Please can you explain the steps? At what point do you hold shift? I'm not sure how you've achieved it?

I'm too late as always, Hoogleman already answered.
Here is visual preview:
colorrange.png

Instead SHIFT you can choose to press that thing in red circle.
Slide around diferent yellow (for example) values and those who you think should be yellow but shows diferent. Then press OK.
Then "make" yellow color. I prefer Layer/New Fill Layer/Solid Color.
 
They're Jpeg artifacts - ie a byproduct of compressing an image too heavily when saving as a jpeg, or sometimes if an image has been saved as a jpeg multiple times.

The easiest way to avoid is to save your image at as high a Jpeg quality as possible, and do it only once.

If the forum software is compressing it further (which it sounds like if there's a difference between your image and the one you see posted), host your Jpeg somewhere else yourself (eg for free at tinypic.com) and choose to embed the link tinypic gives when adding the picture to your post.

OK! Now I understand! Thank you!
 
Yes that is true hence it is safe a jpeg can take millions of colours but I always find if I am editing red where I am painting it in then I will select the web colours check box to choose a red that will not have that demonstrated fuzziness. if I know it is safer I will uncheck the use web colours box and no that any red around my pin should be safe if that makes sense.
 
Yes that is true hence it is safe a jpeg can take millions of colours but I always find if I am editing red where I am painting it in then I will select the web colours check box to choose a red that will not have that demonstrated fuzziness. if I know it is safer I will uncheck the use web colours box and no that any red around my pin should be safe if that makes sense.

I don´t really understand, since I never think about what kind of colors I am using, I use so many colors in things I make that it would drive me crazy if I had to think about each one. And since I don´t know what I will be using the image for when I start making it, I try to make it possible to be printed if anything actually came out that good lol, and not only for showing on the web. :)
 
As far as I understood it the warning triangle (when you select a colour) was to warn that the colour was out of printing range - ie you can use this colour on screen but don't expect it to print as bright (it then offers you the next best alternative printable colour if you want it).

The tooltip for it says: 'Warning: out of gamut for printing"

Maybe the threshold for bad jpegging also happens to be around the same level?
 
It is when a jpeg is compressed this is what I read on some other forum a while back then it compresses it to an equivalent of an ink jet printer if this is true or not I dont know but since i read that advice and use the tips I have never had a problem. If I am in doubt though I will just run the saved jpeg through a jpeg artifact cleaner filter first though just to smooth some edges.
 
OK guys, here's another type of noise problem I'm not sure how to sort.

This is an image I've scanned myself at 300dpi with unsharp mask filter on and descreen set to max my software has (175 lpi).

The graphics at the top and right are meant to be solid colours, but as you can see there's quite a bit of noise in them.

I tried using Noise > Reduce Noise, and while that certainly flattens the colours, it also rounds what were sharp corners, which I don't want.

There's also some halftone pattern still evident in the photo part, even though I had descreening set to max. What would be the best way to treat that?

Thanks!

jpbh2p.jpg
 

Back
Top