What's new
Photoshop Gurus Forum

Welcome to Photoshop Gurus forum. Register a free account today to become a member! It's completely free. Once signed in, you'll enjoy an ad-free experience and be able to participate on this site by adding your own topics and posts, as well as connect with other members through your own private inbox!

Raising white level only without losing shadowing details.


Butters

Member
Messages
18
Likes
2
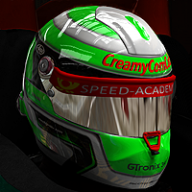
So yeah, just using the paint bucket makes the white whiter but the shadowing goes to hell :silly:

Is there a simple way to raise the white level only without losing shadowing detail (helmet)?
I'm redoing some shadowing I did long ago (very poor in areas).

Thanks a bunch, you guys helped in the past months ago, TY for that :thumbsup:
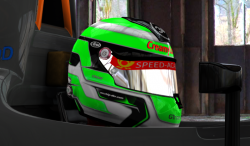
i4sm.png
 
Hi Butters
Your request is a bit unclear to me.
The white level is the face shield is already maxed out and the exposure in the windows already looks pretty good. The greens are close to maxed out as well (could be pushed just a bit)
"Increasing the white point" by itself will impact the brightest areas the most and the deep shadows the least.
So I suspect that is not what you want.
I do understand about preserving the shading in the helmet (nice btw) so if you could circle the specific areas you want addressed for increased brightness and also maybe the areas you don't want adjusted at all might help.

In general, I make the image a Smart Object and apply the Camera Raw Filter. Within the Camera Raw filter I use the Targeted adjustment brush and brush the specific areas I want to change and the sliders let me adjust those areas in a myriad of ways, exposure, contrast, whites, blacks, highlights, shadows, clarity, etc etc. Could get more specific with a better understanding.

Hope this helps yet not so sure
John Wheeler

Very sorry for the late reply, 16hour on call into work, uumph. Back home....
I should have been more clear, my apologies.

Only the white stripping in the helmet, no shield, no back ground or anything like that.
White only, and like you mentioned the white with it under the shadowing.

The helmet and shield are two completely separate dds files, I'll include the helmet below. I'd like to clean up all the gray pin stripping too (jaggies) and just the bright red in the 'Creamy" name.
As you can see :joy: (and you know) just dumping white in with the paint bucket, shadowing goes to garbage.

Helmet / visor dds - breaking shadowing: https://mega.nz/file/otdkCR4Z#6m5WXfLF8KQjoMJumd-ORmtLOZt3DKAzeanfHJbhGHM
Original helmet, before applying white: https://mega.nz/file/U1kEGIJD#Y8IEgS6bDzw6m8sDhyioVwnL4L90DeUh8gk9yBEzZ-4
Thank You John for taking a look at this for me.
Good - Bad: ;)
1.png


2.png
 
Last edited:
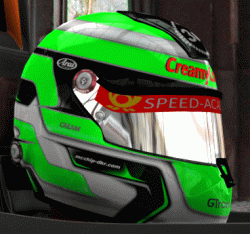
Oh and, heres what it looks like now. I did the cleanup of jaggies etc - THEN realized I broke the shadowing, filing in the white with the bucket in the beginning :joy:

302596.png
 
Hi Butters
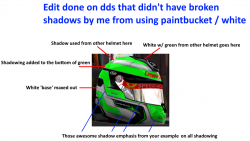
The general approach I would use is a Layer Adjustment Layer masked to just the areas of interest. I used a curves adjustment Layer yet any Adjustment Layer that can change the tone of the image may also get the desired result. I just masked off the top gray strip on the helmet. Note that in this strip, some of the white is already at the maximum level. To get the preception of higher brightness is to increase the contrast which may or may not represent exactly what you want.

My main point is that by using an adjustment Layer with Masking you can adjust the various tones pretty independently.

Hope this gives you a direction to explore and feel free to ask more questions or ask for more details. I am not aware of you skill level and I left my post here at a pretty low detail level yet more detail can be provided once you guide if we are going in the right direction (or if I am misunderstanding you needs)
John Wheeler

helmet.gif
 
Hi Butters
The general approach I would use is a Layer Adjustment Layer masked to just the areas of interest. I used a curves adjustment Layer yet any Adjustment Layer that can change the tone of the image may also get the desired result. I just masked off the top gray strip on the helmet. Note that in this strip, some of the white is already at the maximum level. To get the preception of higher brightness is to increase the contrast which may or may not represent exactly what you want.

My main point is that by using an adjustment Layer with Masking you can adjust the various tones pretty independently.

Hope this gives you a direction to explore and feel free to ask more questions or ask for more details. I am not aware of you skill level and I left my post here at a pretty low detail level yet more detail can be provided once you guide if we are going in the right direction (or if I am misunderstanding you needs)
John Wheeler

View attachment 115754

That looks Fantastic!!! On my skill level = not very high at all, not much. I'm ok from scratch, but coming back after already flattening the layers I'm completely lost.
The shadow in your example, can you do the same but use the top of the helmet with the new one I did? As you can see they're different:
HELMET_2012.jpg

I have no idea how much work that took but do you think perhaps you could do that shadowing and white level and use the shadow at the top of the helmet I posted just above?
Again my skill level is zip after I squashed everything.
IDEAL (I pray this isnt asking to much!!!):

eeeeeee.png
 
HI Butters
I can work on it later yet there is another approach to get more attention with more forum members quicker.
When posting on the "General Photoshop Board" forum, that is for requests where you want help yet you don't want someone to do it for you.
If you want the whole image processed instead of just instructional help, best to post on the "Free Photoshop Requests" forum.
That was the main reason I only did a strip of the helmet for you.
If you go ahead and take you post and move it over there, you will probably have a number of folks giving you help. I certainly will be among those folks yet it would be later on.
So a suggestion
John Wheeler
 
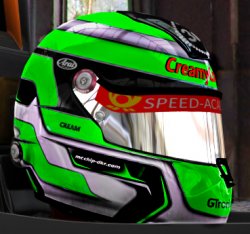
Here is another shot at it. I could not do the top changes as that version you have is a different 3D perspective so cannot directly copy and paste the information. It probably is possible to transform the top part from the other helmet yet at my time limit today.
For the rest of the image, I increased localized contrast and other tone values, increased the white point on the lower grays yet used a gradient filter as to not have as strong an impact on the lower portion of the helmet.
Looks like it might be a bit grungier this way yet the shadow details do pop out more
Hope you like it and it more is needed, maybe another forum member could step in
John Wheeler

helmet-overall.jpg
 
Here is another shot at it. I could not do the top changes as that version you have is a different 3D perspective so cannot directly copy and paste the information. It probably is possible to transform the top part from the other helmet yet at my time limit today.
For the rest of the image, I increased localized contrast and other tone values, increased the white point on the lower grays yet used a gradient filter as to not have as strong an impact on the lower portion of the helmet.
Looks like it might be a bit grungier this way yet the shadow details do pop out more
Hope you like it and it more is needed, maybe another forum member could step in
John Wheeler

View attachment 115762

Jumping ahead - I LOVE IT! Yeah, I didn't mean to imply to ask for a redo when I first posted. And when you showed that first example of shadow emphasis, I didn't know if that was 1 minute of work or 10 hehe. Its one of those things not knowing that someone really knows what they're doing does it in a snap. Vs myself, spending God knows how long trying and maybe never getting it right heheh.

So yes, PERFECT! I can swap the white "360" over.
Could ya ul your touched up dds? Love it!

Thanks so much for the help John, and with kinda how ya did it for the future.
Cheers!
 

Back
Top