What's new
Photoshop Gurus Forum

Welcome to Photoshop Gurus forum. Register a free account today to become a member! It's completely free. Once signed in, you'll enjoy an ad-free experience and be able to participate on this site by adding your own topics and posts, as well as connect with other members through your own private inbox!

Plexi stand with gradient behind


voyager133

New Member
Messages
3
Likes
1
Hi guys,

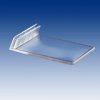
here is a photo that I wonder how they were able to have a continuous gradient behind the stand so that the gradient can be seen through the plexi stand? I tried masking the area inside the plexi stand but how do I still make it look like a semi-transparent plexi stand while also the gradient behind the stand?

Thanks for any help.
Sean
 

Attachments

  • Menu holder.jpg
    Menu holder.jpg
    11.3 KB · Views: 18
I can't tell from the tiny image that you posted, but I have a feeling that it was drawn, and is not actually a photo.

That being said, the effect can be done in-camera using only photographic techniques. If you are interested in this approach, purchase a copy of:

http://www.amazon.com/Light-Science-Magic-Introduction-Photographic/dp/0240812255

and study it.

If you want to draw it from scratch in PS or Illustrator, or make a composite, there are lots of of tutorials out there, e.g.,
http://design.tutsplus.com/tutorial...arency-in-a-cute-photo-manipulation--psd-5636

HTH,

Tom
 
Thanks for the excellent links Tom. Though what has been suggested with those links is to apply the knowledge, but it doesn't help me right away.
I am simply trying to figure out how that photo, trust me it is a photo with a real menu holder, was created. Yes it can be done in-camera, but what if the product photo originally is taken on a solid coloured background and than a gradient background needs to go behind the menu holder, is that achievable in Photoshop?
 
I would show examples, but this image is way too tiny.

Make a selection of the holder and remove it from it's background.
On a new layer, you can now add any color gradient BG you wish.

As for the reflection in the holder.....
Make a selection of the reflection area within the base of the holder and copy to it's own layer (com/cntrl + J).
Add a Hue & Sat layer, clip it, select colorize, and match the new BG gradient as best you can.
 
You could cut and past that section onto it's own layer, then lower the opacity of the layer. This is dependent upon the gradient being on it's own layer.

If not you could select the area and add color or a gradient to match the background. (on a new layer of course)
 
excuse the modelling not so easy on a laptop using the default track pad but here is a quickly whipped up perspex thingy.

step 1 the subject
perspex.png

Step 2 if the image is taken with a background
2.png

Step 3 gradient added with mode of Darken and layer mode set to lighter colour.
3.png

almost there this was with no real effort trying to match it exact just the principal
 

Back
Top