Hi
@Alexandria
I will show you the approach I used yet just understand it took some experimentation and trial and error and may require that on your end too.
I used a single Hue/Sat Adjustment Layer above the starting image. As a starter, here is the Adobe Help page to study to get a feel for what capabilities it has:
https://helpx.adobe.com/photoshop/using/adjusting-hue-saturation.html
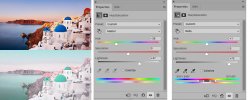
On the image below I show the before image on top and the after image on the bottom.
All I did was add a single Hue Sat Layer and pasted the settings I used to the right of the before/after images.
First, I wanted to shift all the colors from blue towards cyan which I did with the upper slider.
Then, the black point of the image was not very dark so shifted the lightness slider to the right.
This by itself looked pretty good yet the mountains were still too dark.
So I change the dropdown to red (the color of the mountains) and shifted the lightness slider to the right to lighten those up as well.
As you might guess, the exact changes needed will depend on the starting colors that are in an image. It was just a matter of selecting which colors to shift either in color, saturation, or lightness until it looked the way one desired.
Hope this is a good starting point for you
John Wheeler
