What's new
Photoshop Gurus Forum

Welcome to Photoshop Gurus forum. Register a free account today to become a member! It's completely free. Once signed in, you'll enjoy an ad-free experience and be able to participate on this site by adding your own topics and posts, as well as connect with other members through your own private inbox!

Need to understand layer mask with selection copy paste


Messages
62
Likes
4
Hi

have two photos, am copying a selection from one image to another. Am OK copying and pasting and using CTRL T to activate transform, reduced opacity to 50% lined up and works fine....BUT I wanted to use a layer mask to brush out some of he selection not needed......can someone give me the procedure to copy paste a selection, with a layer mask to allow this, tried several ways but no success.

thanks
 
Thanks, but elsewhere I have seen that the layer mask should be created in the first image with the selection active, then when te selection is copied and pasted into the second image, the layer mask is copied along also......is this just a different way ? Also, when I have tried this the brush simply paints Black, obviously I am not selecting something I should do.....confusing 😩
 
If I understand your question, you want to move a selection that has a layer mask to another image. If that's what you want, don't grab just the selected image, grab the layer with the mask and move that entire layer over.

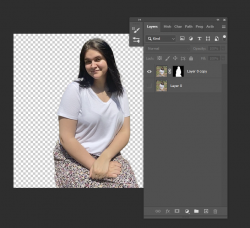
I have two images open - one with a family, one with a family member taken separately that they want added.
I first masked the background from the individual member:

1622241269336.png

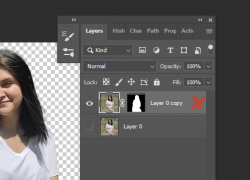
Now, I click and activate that masked layer, then click and hold on a spot on the layer next to the mask - not on the mask or on the image:

1622241672460.png

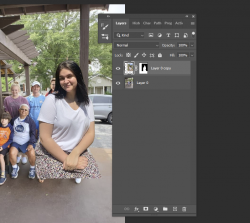
Now while still holding down on that layer, drag it over to the tab where your second image is, your second image will pop up, drag the layer down towards the center
and let go (if you're asked about profile mismatch, choose either to convert it and stay with it as is)

1622241808324.png

Now you can manipulate your image, edit the mask, make whatever change you have to make.

Is this what you're asking?

- Jeff
 
Yes I believe so, still getting my head around terminology, just when I think I have it sussed, it does t work, I tried something similar today and when I tried to brush over parts of the selection ( or should I call it a mask ???) I didn’t want, using the black selection, it actually painted black brush marks instead of erasing the mask.......

also you said “I first masked the background from the individual member:” is this the correct terminology for making a selection of a an area of the image ? When Does a selection become a mask ? Maybe it’s when a layer mask is created for a chosen image...

need to get this clear in my head, before I start my next endeavour, thanks
 
Last edited:
Are you sure you were using the brush on the mask and not on the image?
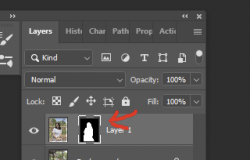
Click on the mask and make sure the mask is active before you start brushing - you'll see a bounding ox around the mask:

Mask active:

1622245765287.png

Image active:

1622245829140.png


Making a selection is, at its most basic, choosing something. You can use lasso tools, the magic want, the quick selection tool, or moving on, the pen tool.
Then you choose what to do next - mask it, move it, adjust it, etc.

Masking is the act of hiding something. So if you apply a mask to an image, the white of the mask reveals, the black of the mask hides.

I hope I've answered you questions - please let me know if you need more info.

- Jeff

1622245829157.png
 
When Does a selection become a mask ?
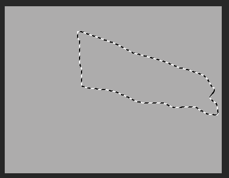
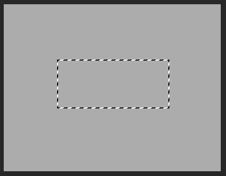
This is a selection. It involves what used to be referred to as a "marching ants" or a moving dotted line. A selection can be made with a variety of selection tools.
Screen Shot 2021-05-28 at 7.12.55 PM.png

A selection can be free standing or it can be made around a portion of an image.

Free standing...in other words not around anything in particular.
Screen Shot 2021-05-28 at 7.21.22 PM.png

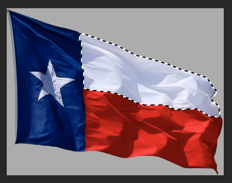
Specific selection around a portion of an image.
Screen Shot 2021-05-28 at 7.16.23 PM.png


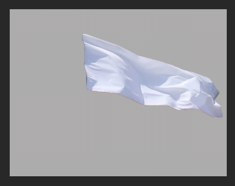
A selection becomes part of a "mask" only when it is used to create a "layer mask".
Once a selection is made into a layer mask, it's usually referred to as a "layer mask" or "masked area".
Screen Shot 2021-05-28 at 7.18.39 PM.png
Screen Shot 2021-05-28 at 7.18.30 PM.png

One needs to understand this when referring to selections and layer masks. One use for selections is to create layer masks. This however is not the constant rule. You can have an empty hide all or reveal all layer mask on a layer. It helps others to understand your questions if you are asking about selections or you are asking about layer masks.

Once a selection has been made and converted to a layer mask, the "selection" can be re-acquired by placing you cursor over the layer mask, hold Cmd/Cntrl and click.
Layer masks can be moved from layer to layer and form one document to another.

Other than what Jeff describes in post #4, another way to move layer masks (and subsequent selections) from one document to another is as follows:
With the selection active create a mask on a blank layer, select and copy (Cmd/Cntrl + C) the blank layer with the mask, paste (Cmd/Cntrl + V) the copied blank layer in the new doc, Cmd/Cntrl + click on the mask to make the selection active in the new document. Then you can save the selection in the new document.

The best way to move selections from one document to another is to copy and paste "paths". Then convert the path to a selection.
 
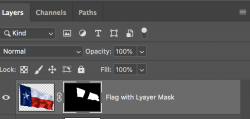
When working with a layer mask and the Brush Tool, you have to remember that you can only use variations of black and white on the layer mask itself.

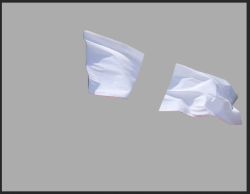
With the layer mask selected (note the brackets around the layer mask), I have used a hard round brush set to black to "mask" out part of the masked area of the flag.
Screen Shot 2021-05-28 at 7.50.23 PM.png
Screen Shot 2021-05-28 at 7.50.30 PM.png

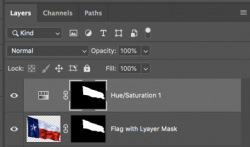
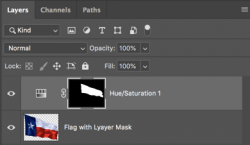
Let's say I add a H&S layer to make a color adjustment to the masked area.
Note: I can use a "selection" to add to the adjustment layers-layer mask...........or I can copy by dragging and droppping an existing layer mask from another layer using Option/Alt + click and drag the layer mask to a new layer.........or Cmd/Cntrl + click and drag the layer mask only (not copying) to a new layer. Either way works.

NOTE: Here's a problem, you can't clip the H&S adjustment layer to the flag layer with the layer mask.............a layer mask only affects the layer it's on.

You have to add a layer mask to the new adj layer so that the adjustment only affects the masked area.
Example:
Layer mask on both layers, works fine and preserves one layer mask if needed.
Screen Shot 2021-05-28 at 8.03.04 PM.png
Layer mask on the H&S adj layer only.
Screen Shot 2021-05-28 at 8.03.26 PM.png

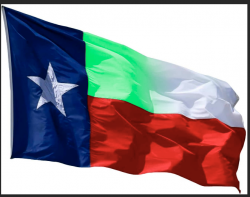
I have turned my masked area green.
Screen Shot 2021-05-28 at 8.08.51 PM.png

But if I want to just have a small portion of the masked area green, I could use the brush Tool on the (selected) layer mask to alter my color adjustment.....
Screen Shot 2021-05-28 at 8.11.53 PM.png
Screen Shot 2021-05-28 at 8.12.16 PM.png
 
Hi,
From this and other posts you’ve submitted, I think you need to mentally start over and reconceptualize how layer masks work. Here are some basic concepts. I hope this doesn’t get too long.

Every layer of any kind can have a layer mask, with the exception of the bottom Background layer:
  • When you create an Adjustment Layer (Levels, Curves, etc.) it automatically has a layer mask attached.
  • When you create a “normal” layer, it does not automatically come with a layer mask. But you can always add a mask by clicking the Mask icon at the bottom of the Layers palette.
  • If you group several layers together in a Layer Group, the Layer Group itself can have its own layer mask, if you choose to add one.
  • In a Layer Group, it is possible that the individual layers will have their own layer masks, and at the same time the Group itself can have a layer mask. In this case, the individual masks will affect only the layer they belong to, but the mask for the Group will affect every layer in the group.

You have asked whether a layer mask should be created while the selection active, or not. Creating a layer mask while a selection is active is merely a convenient shortcut—never a requirement. Until you get more comfortable with masks, I suggest you avoid all shortcuts and do everything the long way. Therefore, for now, you should never create a mask while a selection is active because it is confusing you. Instead, create the mask first (filled entirely with black or entirely with white) and then deal with the selection later. (More discussion of this to follow.)


You have asked how copy a partial selection from Photo A and paste it into Photo B, along with a mask. For now, you should do it this way:
  • Make a selection from Photo A.
  • Copy/Paste that selection into Photo B on a new blank layer and position it into place.
  • Once it’s in place, add a layer mask to that layer and mask-away whatever is not needed.

You mentioned that you once tried painting black in a mask, but instead it painted black in the image itself. That is a mistake we all make; it happened to me yesterday.
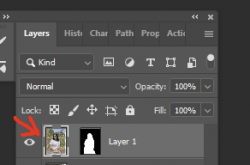
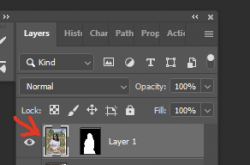
  • When you have a layer with a mask, the layers palette shows two little thumbnail boxes. The first thumbnail box is the image itself on that layer. The second thumbnail box is the mask.
  • If you click each of these little thumbnail boxes with your mouse, you’ll see that whichever one you click becomes “active” and has an enhanced border around it.
  • If you want to paint in the layer mask, then the mask thumbnail needs to be active. If you want to paint directly on the image itself, then image thumbnail needs to be active.
  • You made the mistake of having the image thumbnail active when you painted black instead of the mask thumbnail being active. We’ve all done that a million times.

You have asked, “when does a selection become a mask?” The answer is that a selection can be helpful in creating an accurate mask, but the use of selections in masking is an optional step that you will only do when you want to. Here is a discussion of masking with selections:

Once you add a mask to a layer, you paint black or white in that mask in order to hide or reveal parts of the image. One way is to simply paint freehand in the mask. But if you need more accuracy and consistency, then you can mask using selections:
  • Use any of the Selection tools to create an accurate selection of the area that needs masking. It's a good idea to save that selection in case you want to use that exact selection later on. That way, your masks will be consistent.
  • Once you have an active selection (with the “marching ants” around it), go back into your layer mask. You will now find that you can only paint within the confines of your active selection. This allows you to paint in the mask very quickly and very accurately because it is impossible for your brush to accidentally stray over the border while the selection is active.
  • If you need to accurately mask outside of that selection, then invert the selection. Once the selection is inverted, then only those areas outside of the selection are available for masking.
  • At the risk of confusing you, I will now describe the shortcut that you have tried before: If a layer has no mask attached to it, you can first make a selection of a particular area. With the “marching ants” of that selection active, click the “Create Mask” icon. At that point, a layer mask will be created and will simultaneously be filled with black & white within the borders of your selection. This is simply a shortcut and is no different than doing it the long way by (1) first creating an empty layer mask, (2) then creating a selection, (3) then filling the mask within that selection with either black or white. For now, I recommend you avoid shortcuts, but I wanted to explain it.

Let’s say you have successfully created an accurate, complicated layer mask and you now want to use it elsewhere on different layers. There are several ways to accomplish this:
  • If you duplicate your layer (Cmd/Ctrl-J), its layer mask will also be duplicated.
  • Another way: Click your mouse to activate the thumbnail of your “good” layer mask. Now hold down the Alt key while dragging the layer mask to a different layer. Your original layer mask will now be copied onto that other layer.
  • Another way: Create a new layer and create a layer mask for that layer. Hold down the Cmd/Ctrl key and click your mouse on the thumbnail for the “good” mask that you already created. That will create a “marching ants” selection that you can now use to paint black or white in the new, empty layer mask.
  • Another way: If you are not familiar with Clipping Masks then ignore this. But... if two layers are clipped to each other, then any layer mask on one will automatically affect the other.

I hope this isn’t too much information.
 
Wow this should all be added to a sticking on selections & layer masks, All my questions have been answered, will copy all these posts for reference, thank you everyone 👍
 
Can I ask a follow up question, it is related, when I have multiple layers open, e.g. moving a selection to another image, unless I flatten the layers I can’t seem to use any brush tools e.g. healing brush etc, I select it but nothing happens, is it necessary to flatten all layers before using these brush tools ? Or am I not doing something right ? Thanks again
 
moving a selection to another image,
A selection (as in marching ants) or a layer mask? Are you moving it in the same document or to a new document? If new, what method did you use? When you say selection, are talking about an area of an image that you selected and copied to it's own layer and then moved?

Once a marching ant selection is active, it can be applied to any layer, in any document, in some form and can be used with all Ps tools.

unless I flatten the layers I can’t seem to use any brush tools e.g. healing brush etc, I select it but nothing happens, is it necessary to flatten all layers before using these brush tools ?
I do apologize, but this makes no sense to me at all. I simply don't understand what it is you're doing to cause this issue.

Is there anyway you could possibly post screenshots!!!!!???? This would help out tremendously!
 
Can’t really post screenshots, it’s just I was copying and pasting a selection from one image to another, had a layer mask active, then tried to use the heal brush, but nothing happened to the image, until ing,attended all layers then it behaved normally, only thing I can think of is I had the layer Mask selected instead of the image layer, will try again....thanks
 
Just one note on top of Sam;s - never ever ever flatten a PSD file. When you flatten or merge all layers, that's it, all your adjustment layers, masks, etc, are gone.
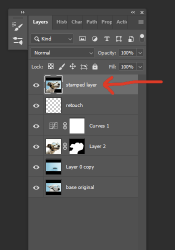
If you want to compose/stamp all the layers into one, click on your top layer, and with that layer active, hold down the Ctrl+Alt+Shift+E keys on Windows (Command+Option+Shift+E on Mac)
and make that stamped layer. This leaves all the layers below it intact while having a fully composed layer at the top.

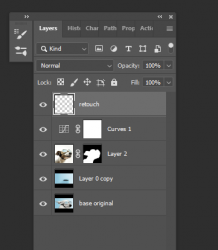
Layer stack with multiple layers and top layer active:

1622390820631.png

Now with composed/stamped layer at top:

1622390943577.png

Try to use what we call non-destructive methods in your workflow ie masking instead of deleting is non-destructive as well.

- Jeff
 
Because I don't know if this has been discussed..........you can place a selected area on it's own layer. That layer can then be easily copied and pasted to another document.

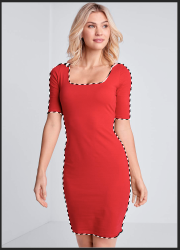
Dress with marching ant selection....
(Note: This selection can be saved SELECT > SAVE SELECTION)
Screen Shot 2021-05-30 at 11.38.16 AM.png

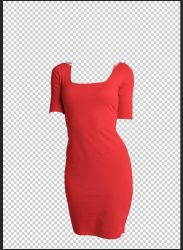
Cmd/Cntrl + J to copy and paste the selected area to it's own layer....
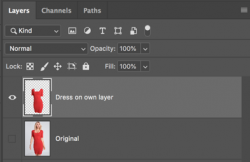
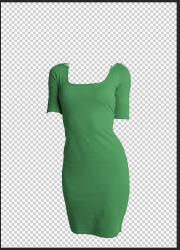
Dress on it's own layer. Not a selection but a selected area.
Screen Shot 2021-05-30 at 11.38.32 AM.png
Screen Shot 2021-05-30 at 11.41.26 AM.png

This dress layer can be moved to another document and manipulated.
Screen Shot 2021-05-30 at 11.42.32 AM.png

Layer masks are not always indicated.
 
Thanks, but......what does “layer masks are not always indicated“ mean ?

when moving or copying pasting a selection or selected area, a layer mask has to be added manually, but as it’s not always needed as in this case, if it’s just the dress that needs manipulating
 
Thanks, but......what does “layer masks are not always indicated“ mean ?
It means that a layer mask is only one option in isolating a selected area. It's not always indicated for use. It depends on what you're doing with the selected area.

when moving or copying pasting a selection or selected area,
OK.......again......marching ant selections can be saved and are used to create a selected area via layer masking, etc..............are you referring to a marching ant selection or a selected area? Since you do not post screenshots, you need to be specific with your terms so that we can understand you.
(Note: Marching ant selections can be used to determine boundaries within which to work..........they have many functions.)

a layer mask has to be added manually,
Yes and no. You can create a layer mask from a marching ant selection or it can create itself when using adjustment layers depending on the order of your workflow.

but as it’s not always needed as in this case, if it’s just the dress that needs manipulating
Correct. It all depends on what you're doing. Since I don't have screenshots to help, I have to make assumptions on what might work best for your situation.
 

Back
Top