
Photoshop Gurus Forum
Welcome to Photoshop Gurus forum. Register a free account today to become a member! It's completely free. Once signed in, you'll enjoy an ad-free experience and be able to participate on this site by adding your own topics and posts, as well as connect with other members through your own private inbox!
You are using an out of date browser. It may not display this or other websites correctly.
You should upgrade or use an alternative browser.
You should upgrade or use an alternative browser.
Specific need help to get this please
- Thread starter bolmog
- Start date

so hello first of all thanksAre you asking for the background to be removed? Do you need a Transparent Background?
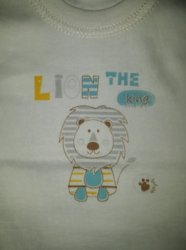
i am doing shirt print so i need all the desing in a blank page so i can print it in a paper then press it in a t Shirt
GreenManiac
Well-Known Member
- Messages
- 126
- Likes
- 274
Is this any good?
I found it easier to just redraw the entire thing. Please let me know of any changes you would like to have.

I found it easier to just redraw the entire thing. Please let me know of any changes you would like to have.

Beautiful work! Logo on the Teddy's shirt looks similar to your own profile pic.Is this any good?
I found it easier to just redraw the entire thing. Please let me know of any changes you would like to have.
wow its so goood very good job big thanks my friend can u tell me how to do it i have 2 other to do x) if you have some time maybeIs this any good?
I found it easier to just redraw the entire thing. Please let me know of any changes you would like to have.
View attachment 83525
Attachments


big thanks too you too its very good i just need 2 other if u can help if you have time if not just tell me how you did it i do it my self ^^ big thanksThis work is just a selection, it is not a vector.View attachment 83526
Attachments
Hi guys,
I was working on the Lion picture above and I have a question. Since the OP wants to learn how to do the vector drawing, I thought it may be easier if I ask the question here rather than in General Board. I can move the question to General Board if the Mods consider it best.
I traced the shape of the lion using Pen tool, like this (I only selected stroking paths and left out the filling shapes):

The selection has many different strokes of the pen tool. While using the Pen tool, "Path" was selected instead of "Shape". I wanted to stroke the path with dashed line and selected a square brush, giving it appropriate settings. I then realised that the corners are terrible, as shown here:

Essentially, the stroking rectangles do not negotiate a sharp bend, as indicated by the red circles above.
I then realised that there is a good option in Pen tool if "Shape" was selected instead of Path, there are "Stroke options" that deal with the situation well (as explained here : https://graphicdesign.stackexchange.com/questions/41309/curved-dashed-line-in-photoshop). For example, see this image with multiple bends and all of them are represented well by the stroking rectangles.

Okay, now the question : is there a way to still be able to stroke the path of the lion shape (first pic above) with dashed lines coming from "Stroke Options" rather than Brush settings obtained through "Stroke Path"? If I change the option to "Shape" instead of "Path", it now does not do anything.
I was working on the Lion picture above and I have a question. Since the OP wants to learn how to do the vector drawing, I thought it may be easier if I ask the question here rather than in General Board. I can move the question to General Board if the Mods consider it best.
I traced the shape of the lion using Pen tool, like this (I only selected stroking paths and left out the filling shapes):
The selection has many different strokes of the pen tool. While using the Pen tool, "Path" was selected instead of "Shape". I wanted to stroke the path with dashed line and selected a square brush, giving it appropriate settings. I then realised that the corners are terrible, as shown here:
Essentially, the stroking rectangles do not negotiate a sharp bend, as indicated by the red circles above.
I then realised that there is a good option in Pen tool if "Shape" was selected instead of Path, there are "Stroke options" that deal with the situation well (as explained here : https://graphicdesign.stackexchange.com/questions/41309/curved-dashed-line-in-photoshop). For example, see this image with multiple bends and all of them are represented well by the stroking rectangles.
Okay, now the question : is there a way to still be able to stroke the path of the lion shape (first pic above) with dashed lines coming from "Stroke Options" rather than Brush settings obtained through "Stroke Path"? If I change the option to "Shape" instead of "Path", it now does not do anything.
Last edited:

- Messages
- 23,829
- Likes
- 13,611
Was this made in Adobe Illustrator? We need to be careful in how we describe format outcomes so we don't mislead those who may actually need vector formatting that can only be created in Ai (and other vector based software).Here is the Lion vector I was working on.
Remember, Photoshop can not create true vector images. This is a very common misunderstanding. Photoshop does have so called vector tools and can save some vector content in some formats (psd, pdf, eps). However, Photoshop will never create a true vector file. Regardless of how you create a file and save it, Photoshop always saves both vector and raster information. You can't create vector files with Photoshop.
What Photoshop does create are vector containers with raster content. This is much different than a vector container with a vector content. If a square has a gradient fill. That gradient fill is raster based and it will suffer when scaling. A vector based program will create a vector shape with a vector gradient within that shape. That means when the shape is resized upon output, the gradient is recalculated to match the new boundaries. What Photoshop does is, upon output, it recalculates the vector container but only scales the raster contents in the container. This can result in "broken pixels" for the interior appearance.
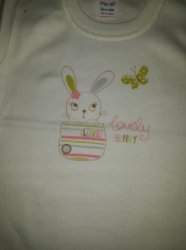
hello thanks big thanks my sir can u give me a tutorial or something so i can finish the last one ( the rabbit ) i realy need to learn this i need it to my workHere is the Lion vector I was working on. I hope the above post gives you an idea of how to go about working on the third file. If you have any questions, please ask.
View attachment 83598
and big thanks for your help guys

Here is the Lion vector I was working on. I hope the above post gives you an idea of how to go about working on the third file. If you have any questions, please ask.
My apologies. The image was created in PS entirely and thus is not a vector.
@bolmog I will endeavour to explain how I did it. Do you know any way how I can provide you a 30 MB PSD file?
- Messages
- 23,829
- Likes
- 13,611
Use a free web based file sharing/ image hosting site like MediaFire.Do you know any way how I can provide you a 30 MB PSD file?
yes as he said host it in a web site or megapload for a PS ?My apologies. The image was created in PS entirely and thus is not a vector.
@bolmog I will endeavour to explain how I did it. Do you know any way how I can provide you a 30 MB PSD file?
Thanks @IamSam.
@bolmog find the PDF of the "Lion" file I was working on. It will give you an idea of how I approached and I will explain my method a little here as well.
Link: http://www.mediafire.com/file/pe9t5w61djza4z3/1179-After1-27661526_1818949978149223_1400460710_n.psd
Step 1: Increase the resolution of the photo to 300 PPI.
Open the "Lion" T shirt photo in PS
Go to Image>Image size...
Under "Resolution" you see 72 PPI.
Change this to 300 PPI, making sure the Tick box before "Resample" is UNCHECKED. Click OK
Optional Step 2: Increase Brightness and/or contrast (To highlight the outlines better so they can be traced more easily)
Underneath the Layers Window there is a Half White circle icon (Fill/Adjustment Layer icon). Making sure your Background Layer is selected, Click that Fill/Adjustment Layer icon and select Brightness/Contrast.
Press Alt on the keyboard while hovering the mouse between the newly created Brightness/Contrast Adjustment Layer and the Background Layer. You will see that the cursor changes to a curved arrow pointing downward. Click left mouse button once to create a Clipping Mask.
Now, increase Brightness as well as Decrease Contrast.

Step 3: Preparation of the Pen tool.
Select Pen tool, next select Shape in the first pull down option. It should NOT be Path or Pixels.
In the Fill option, select No colour which is represented by a White rectangle with a Red diagonal line.
Click Stroke and on the Right most you will find a multi-coloured square. Select that one. A Colour Picker window pops up.
Our aim here is to select a colour for our line. If you are starting with the Lion image, you would press Alt button and while still pressing it, move the cursor to the Brown colour on the screen. You will notice that the mouse cursor changes to an Ink Filler, enabling you to select the needed colour. Once colour is selected, click Ok.
Next select the size of the stroke. For a 300 DPI image, I needed 6.74 stroke size. You just have to experiment and see which one is most similar to the image you are tracing.
Select the next drop down option, called "Stroke Options".

Select Dashed Line, press "More Options".
New window pops up called "Stroke".

For Align, select "Inside". For Caps, select "Butt". For Corners, select "Round". Let the "Dashed Line" be ticked. For Dash, key in 4 for Gap, select 1. You might want to alter these values as needed. Click Ok.
You are now ready to trace.
Step 4: Outline the cartoon using Pen tool
This is how I traced the image, doing multiple strokes of the pen tool.

Above image is for representation purposes to show the different strokes of the pen tool I used. Below image is more accurately the Brown Dotted lines I traced.

Once done, you will find that each stroke of the pen tool creates a new layer. Group them all into a folder and name it for convenience. I called this one "BrownDottedLines". I then traced all Grey dotted lines, making sure to change the colour before starting on them. Once again, I grouped them into a folder calling it "GreyDottedLines". This is how the image looks so far. There are no more dotted lines left to trace.

Next step is to draw filled in Shapes. Check the image below showing Pen tool options. You will find that the Fill option has a Grey colour selected and Stroke option has "No Colour" selected. Now, we are ready to trace Grey shapes.
Trace all Grey shapes using Pen tool and you will observe that as you create new anchor points, it tries to fill in the shape. Once completed with Grey shapes, group the newly created shapes in the Layers Window into a new folder. This is how the Work Progress should look like at this stage:

Continuing similarly, complete all Brown Fill Shapes and Yellow Fill Shapes to have a finished product as shown in one of the above posts.
The PSD file should help you. as you follow the instructions above. Any questions following the instructions, please ask. I hope you complete the Bunny image and showcase your work to us here. Note that it is a lot of hard work, but the result is worth it.
Best of luck.
@bolmog find the PDF of the "Lion" file I was working on. It will give you an idea of how I approached and I will explain my method a little here as well.
Link: http://www.mediafire.com/file/pe9t5w61djza4z3/1179-After1-27661526_1818949978149223_1400460710_n.psd
Step 1: Increase the resolution of the photo to 300 PPI.
Open the "Lion" T shirt photo in PS
Go to Image>Image size...
Under "Resolution" you see 72 PPI.
Change this to 300 PPI, making sure the Tick box before "Resample" is UNCHECKED. Click OK
Optional Step 2: Increase Brightness and/or contrast (To highlight the outlines better so they can be traced more easily)
Underneath the Layers Window there is a Half White circle icon (Fill/Adjustment Layer icon). Making sure your Background Layer is selected, Click that Fill/Adjustment Layer icon and select Brightness/Contrast.
Press Alt on the keyboard while hovering the mouse between the newly created Brightness/Contrast Adjustment Layer and the Background Layer. You will see that the cursor changes to a curved arrow pointing downward. Click left mouse button once to create a Clipping Mask.
Now, increase Brightness as well as Decrease Contrast.
Step 3: Preparation of the Pen tool.
Select Pen tool, next select Shape in the first pull down option. It should NOT be Path or Pixels.
In the Fill option, select No colour which is represented by a White rectangle with a Red diagonal line.
Click Stroke and on the Right most you will find a multi-coloured square. Select that one. A Colour Picker window pops up.
Our aim here is to select a colour for our line. If you are starting with the Lion image, you would press Alt button and while still pressing it, move the cursor to the Brown colour on the screen. You will notice that the mouse cursor changes to an Ink Filler, enabling you to select the needed colour. Once colour is selected, click Ok.
Next select the size of the stroke. For a 300 DPI image, I needed 6.74 stroke size. You just have to experiment and see which one is most similar to the image you are tracing.
Select the next drop down option, called "Stroke Options".
Select Dashed Line, press "More Options".
New window pops up called "Stroke".
For Align, select "Inside". For Caps, select "Butt". For Corners, select "Round". Let the "Dashed Line" be ticked. For Dash, key in 4 for Gap, select 1. You might want to alter these values as needed. Click Ok.
You are now ready to trace.
Step 4: Outline the cartoon using Pen tool
This is how I traced the image, doing multiple strokes of the pen tool.
Above image is for representation purposes to show the different strokes of the pen tool I used. Below image is more accurately the Brown Dotted lines I traced.
Once done, you will find that each stroke of the pen tool creates a new layer. Group them all into a folder and name it for convenience. I called this one "BrownDottedLines". I then traced all Grey dotted lines, making sure to change the colour before starting on them. Once again, I grouped them into a folder calling it "GreyDottedLines". This is how the image looks so far. There are no more dotted lines left to trace.
Next step is to draw filled in Shapes. Check the image below showing Pen tool options. You will find that the Fill option has a Grey colour selected and Stroke option has "No Colour" selected. Now, we are ready to trace Grey shapes.
Trace all Grey shapes using Pen tool and you will observe that as you create new anchor points, it tries to fill in the shape. Once completed with Grey shapes, group the newly created shapes in the Layers Window into a new folder. This is how the Work Progress should look like at this stage:
Continuing similarly, complete all Brown Fill Shapes and Yellow Fill Shapes to have a finished product as shown in one of the above posts.
The PSD file should help you. as you follow the instructions above. Any questions following the instructions, please ask. I hope you complete the Bunny image and showcase your work to us here. Note that it is a lot of hard work, but the result is worth it.
Best of luck.