Photoshop Gurus Forum
Welcome to Photoshop Gurus forum. Register a free account today to become a member! It's completely free. Once signed in, you'll enjoy an ad-free experience and be able to participate on this site by adding your own topics and posts, as well as connect with other members through your own private inbox!
You are using an out of date browser. It may not display this or other websites correctly.
You should upgrade or use an alternative browser.
You should upgrade or use an alternative browser.
Restoration need a litte patch up help
- Thread starter muller23
- Start date
- Status
- Not open for further replies.
hi
you can clearly see underneath vertical speed indicator picture the blueish blue writings and the grayish marks on the other page ,
it was perfectly white ,i try ed to make it digital ,i don't know why
on page 9 on top left outside ,the yellow marks ,it shouldn't be there as well,i clean the whole thing specially outsides
thanks guys
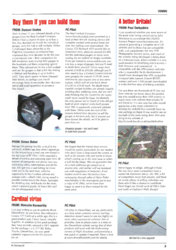
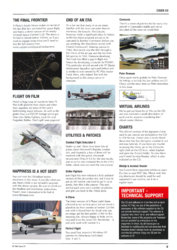


Sorry @muller23 I have been trying to see what you mean, but I do not find the marks you mentioned. I will illustrate what I mean through the attached picture.
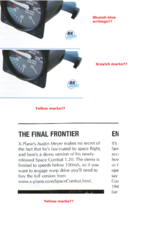
Can you please attach a similarly zoomed in picture showing where the marks are (as against posting the whole page) so it is easier to locate what you mean?

Can you please attach a similarly zoomed in picture showing where the marks are (as against posting the whole page) so it is easier to locate what you mean?
its writing from the other side of the page ,when i scanned them you could see sometimes from the other side the writing
i fixed that to put on top a black sheet,
in the older magazines i didn't do it,so now cleaning the things up,but it comes back,for some reason
i fixed that to put on top a black sheet,
in the older magazines i didn't do it,so now cleaning the things up,but it comes back,for some reason
Isac
Banned
- Messages
- 213
- Likes
- 298
I can see what you are referring to. It's called Bleed Through and as you are the first to ask about this question (that I am aware of), you will be the first person in the world to try this secret that I have created, which should remove bleed-through OR reduce it significantly.
1: Open the image and make a copy (CTRL + J) - This should be "Layer 1".
2: Because the page background colour of your image is white, add a new layer "Layer 2" above the Background Layer and fill it with WHITE.
3: Click on "Layer 1" and add a "Brightness/Contrast 1" adjustment layer, then clip it to "Layer 1". Slide the BRIGHTNESS to -150. This will show the bleed-through.
4: Click on "Layer 1" and select the "Rectangular Marquee Tool (M)" and draw a small square on a white part of the "Layer 1" (see image).
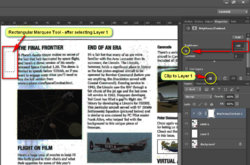
5: Copy "Layer 1" to a new "Layer 3" using (CTRL + J).
Now you should see the bleed-through disappear!
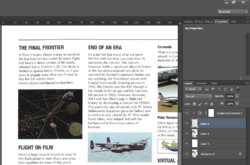
6. Deselect the small square with (CTRL + D).
7. Delete the "Brightness/Contrast 1" layer and the WHITE "Layer 2".
8. Merge "Layer 3" with "Layer 1".
You should now have "Layer 3" and the "Background" layer.
I hope this works for you
1: Open the image and make a copy (CTRL + J) - This should be "Layer 1".
2: Because the page background colour of your image is white, add a new layer "Layer 2" above the Background Layer and fill it with WHITE.
3: Click on "Layer 1" and add a "Brightness/Contrast 1" adjustment layer, then clip it to "Layer 1". Slide the BRIGHTNESS to -150. This will show the bleed-through.
4: Click on "Layer 1" and select the "Rectangular Marquee Tool (M)" and draw a small square on a white part of the "Layer 1" (see image).

5: Copy "Layer 1" to a new "Layer 3" using (CTRL + J).
Now you should see the bleed-through disappear!

6. Deselect the small square with (CTRL + D).
7. Delete the "Brightness/Contrast 1" layer and the WHITE "Layer 2".
8. Merge "Layer 3" with "Layer 1".
You should now have "Layer 3" and the "Background" layer.
I hope this works for you
@Isac
When I opened the image in PS, I do not see the blue lines. They only appear at Step 3 when I apply the Brightness/Contrast Clipping Mask layer onto Layer 1. [Meaning that the blue lines are inherent to Layer 1 and are only visible when Brightness is decreased below -70 value.]
In step 5 above, when you duplicated the rectangular marquee patch into Layer 3, the Brightness/Contrast Layer Clipping Mask is now applying itself onto the rectangular patch. That is why on Layer 1 now, you do not see the Blue lines that were visible when the Brightness/Contrast clipping mask is applied to Layer 1.
During step 7 when both the Brightness and Layer 2 are deleted, we are left with Layer 3, which is the patch and original Layer 1 which we merge in Step 8.
If I decrease Brightness on the resulting layer under -70 value, it still has the blue lines.
In effect, nothing has changed for Layer 1. It is as good as creating Layer 1 by duplicating original image, selecting a rectangular marquee, makeing it a new layer and merging that layer with layer 1.
Am I missing a step?
I propose a similar method as @Isac but branching off after Step 3.
1. Open the image in Photoshop and make a duplicate of the background layer. Hence, you will have Layer1.
2. Add a new layer on top of the Background layer but below Layer 1 and fill it with White colour. It will be called Layer 2.
3. Click on Layer 1 and add a Brightness/Contrast layer to it. Now, clip this Brightness/Contrast layer with Layer 1. Also slide the Brightness value to left most value, that being -150.
(So far, the steps are exactly the same as @Isac's post above.)
4. Add a layer mask to Layer 1. Click on the Layer mask of Layer1. (It is selected by default after its creation)
5. Go to Image>Apply Image...
6. Ensure your settings are these:
Source: No change
Layer: Merged
Channel: RGB
Tick the Invert checkbox.
Blending: Multiply
Opacity: 100%
Keep Mask Checkbox unchecked.
Select Ok.
7. You will find that the Blue lines have reduced drastically. Now, either delete Brightness/contrast layer or move the Brightness control between -60 and -10.
8. If you now make the White layer - Layer 2 - invisible (assuming the Original Background Layer is invisible), you will see that the text and pictures are on a transparent background. This separation of images+text from the background effectively reduces the blue lines. (Drawback is that the text may look light now. This can be corrected by increasing Brightness value between -60 and -10.)
9. At this stage, merge all the layers Viz White Layer 2 + Layer 1 along with its mask + Brightness/Contrast clipping mask layer (if you have not deleted it in Step 7).
If working with multiple pages, just make an Action of the above process to save time.
If any of the steps is unclear, just ask.
Isac
Banned
- Messages
- 213
- Likes
- 298
So sorry for the wrong instructions. It was a long time ago that I created the method to fix bleed through. This works better.
1. Copy BG Layer. CTRL + J. This makes "Layer 1".
2. Add "Brightness/Contrast 1" adjustment layer above "Layer 1".
3. Slide BRIGHTNESS to RIGHT +150.
4. Merge "Layer 1" and "Brightness/Contrast 1" layers.
5. Add "Brightness/Contrast 2" adjustment layer above "Brightness/Contrast 1" layer.
6. Slide BRIGHTNESS to LEFT -150.
7. Merge "Brightness/Contrast 1" and "Brightness/Contrast 2" layers.
Check for success by adding another "Brightness/Contrast" layer and Slide BRIGHTNESS to LEFT -150.
All should now be OK.
Action is attached if you want to try it.
Attachments
- Status
- Not open for further replies.

