What's new
Photoshop Gurus Forum

Welcome to Photoshop Gurus forum. Register a free account today to become a member! It's completely free. Once signed in, you'll enjoy an ad-free experience and be able to participate on this site by adding your own topics and posts, as well as connect with other members through your own private inbox!

Multiple repeatable skewed rectangular copies?


IanC

Active Member
Messages
27
Likes
1
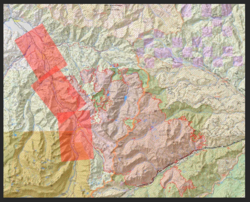
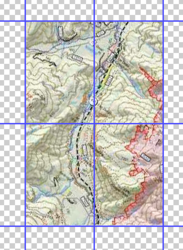
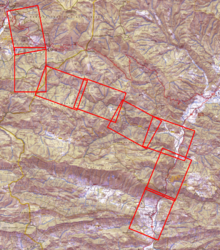
Not sure the title makes sense, so I've made an image to illustrate the problem:
1562143255177.png

I'm trying to create a 'Rolling Map' for a navigation event, and want to copy sections of map something like I've shown, before pasting to create a long thin series of images, combined into a long thin canvas ready for printing (No electronic devices allowed in the event!)

It's important that the selection rectangle is the same size every time, to keep a uniform scale, so I'm thinking I need a mask or selection rectangle or similar that I can easily paste in before re-positioning, skewing, and copying. Leaving the rectangle in place would also be useful, so's I can see where to position the next one with a suitable overlap.

The copied images will need to be rotated so the rectangle is 'level', so if this can be automated, so much the better.

I hope that makes sense, and I hope there's a simple solution. There will be something like 50+ rectangles total.

Any suggestions for the best workflow would be appreciated! TIA.
 
Last edited:
Yes this makes sense.

I don't know about automating the process, but leveling the individual areas for printing can be done quickly using the straighten feature of the Ruler Tool.

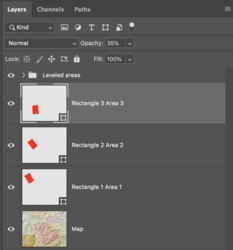
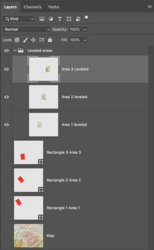
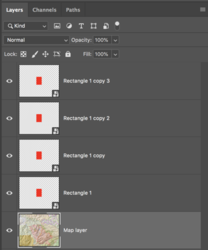
I would just use a solid rectangles created with the Rectangle Tool. Reduce it's opacity so you can visualize your positioning and overlapping. Use the Cmd/Cntrl + J command to duplicate as many times as needed.
Use Free Transform to move and position the rectangles. Be sure to name each area layer to keep track.
Screen Shot 2019-07-03 at 10.51.21 AM.png
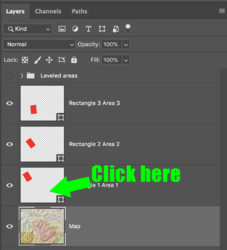
Screen Shot 2019-07-03 at 10.51.48 AM.png

Then select the map layer.
Cmd/Cntrl + click the layer of the area you would like to copy.........this makes a selection of the rectangle.
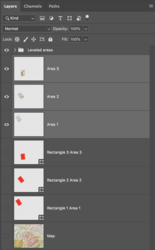
Then hit Cmd/Cntrl + J to copy that selection to it's layer. Again, be sure to name the areas to keep track.

Once you have all the areas copied to their own layers......
Screen Shot 2019-07-03 at 10.58.36 AM.png
Screen Shot 2019-07-03 at 10.58.52 AM.png

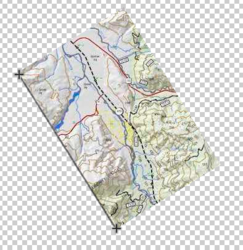
......use the Ruler Tool to straighten and the Move Tool to position.
Screen Shot 2019-07-03 at 11.01.50 AM.png

Screen Shot 2019-07-03 at 11.02.26 AM.png

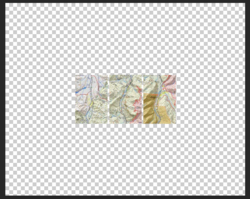
Now create a new document the exact size of your rectangle, copy & paste or drag and drop.
( You can also make a selection of area (1,2,3, leveled) copy, new doc, paste)

Ready to be printed.
Screen Shot 2019-07-03 at 11.07.08 AM.png
 
Thanks for the swift reply.

All makes sense to me, except I can't seem to use the rectangles to make the selection of the map layer. Specifically nothing seems to be happening with these two lines:

Then select the map layer.
Cmd/Cntrl + click the layer of the area you would like to copy.........this makes a selection of the rectangle.


All that happens is that I select multiple layers??

Apologies if I'm being a bit dumb, I always have a problem with PS layers. I've used CAD for 20+ years and can never get my head around the fact that they work so very differently!
 
Then select the map layer.
Cmd/Cntrl + click the layer of the area you would like to copy.........this makes a selection of the rectangle.
Then hit Cmd/Cntrl + J to copy that selection to it's layer. Again, be sure to name the areas to keep track.
By selecting or highlighting the map layer, any marching ant selection made while the map layer is selected, will be copied to it's own layer when you hit Cmd/Cntrl + J. You make the marching ant selection by holding the Cmd/Cntrl key and mouseclicking the layers thumbnail of the rectangle layer representing the area you wish to be selected/copied.
 
Thanks, I've got it now! I wasn't clicking on the actual thumbnail in the rectangle's layer, I should have known this. To avoid adding more and more layers, I've actually copied and pasted direct to the new (final) image.

The only thing I'm a little unhappy about is the straightening process. Is there a way to somehow snap and/or auto- straighten a skewed marching-ant selection? Manually positioning the ruler seems rather imprecise, and anyway I haven't worked out how to do this without rotating the whole image?
 
Is there a way to somehow snap and/or auto- straighten a skewed marching-ant selection?
Why would you need to straighten the marching ant selection? In doing so, you would only straighten the selection and not the layer (map) that was duplicated with the selection if you're using the selections properly.

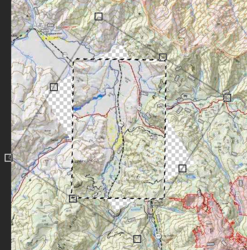
If you use free transform to rotate a selection before it is pasted to it's own layer, then you will cut holes out of your map. This will then affect any overlapping needed for the next map section.
Screen Shot 2019-07-04 at 8.25.28 AM.png

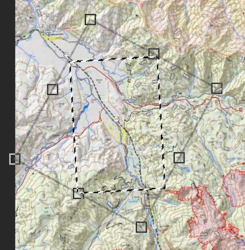
Or you can go to SELECT > TRANSFORM SELECTION to alter a selection without affecting the map layer, but you're only moving the selection and not the map section.
Screen Shot 2019-07-04 at 8.33.29 AM.png

However, if your asking about an automated way to straighten the layers of map sections created by the marching ant selections, then there's none that I'm aware of at the moment. Once all the map sections have been made, you could possibly place them in a folder and create an action or script to straighten them. This is outside my wheelhouse.

You want to straighten the map sections after they have been pasted to their own layers.

Manually positioning the ruler seems rather imprecise
This is not what I have experienced. It works perfectly for me.
Here's proof. I set up guidelines to test the accuracy of the straighten feature of the Ruler Tool. Works perfectly every time.
Screen Shot 2019-07-04 at 7.48.13 AM.png

I'm not saying that this is the only way for you to do this, it's just the easiest and fastest way I can think of for the moment. With only 50 map sections to make, this would only take about 15 to 20 minutes to complete, maybe less. In the time that you have spent trying to find a way to automate the process you could have been done.
 
Thanks again. What I meant was to straighten the copied and still-skewed rectangle (of map), upon either pasting into a new document, or assigning to a new layer.

When I said 'imprecise' re the Ruler, I meant that AFAIK there's not a way of snapping the ruler to an edge of the skewed selection - or is there? I just have to do it visually? It just seems there's a disconnect between making an exact selection, and subsequently straighten it by aligning the ruler visually.
 
With the Ruler Tool, you simply draw a line on the edge and then hit straighten layer.
Screen Shot 2019-07-04 at 10.41.57 AM.png
 
Yep, I've got that OK!

What I'm getting at, is whether there's a better way to position the ruler than zooming in and placing it visually? Like if I select the layer of the skewed map (by Ctrl + click on the layer's thumbnail), the marching ants know where the edges are. So the ants are positioned precisely and are not reliant on my eyesight. Is there a similar way to position/snap the ruler?
 
I completely understand what you're asking! There is not a way to do this!

BUT...................there might be a better way using a smart object...............I'm experimenting at the moment.
.
 
OK...........using smart objects won't help.

Here's the problem.....

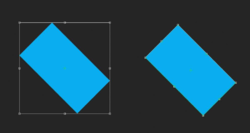
In the diagram below, on the left shows how the transform box will not fit the map sections after they have been copied and pasted to their own layer. The only way we could utilize any "snap to" function would be for the transform box to fit the map sections as shown on the right.
TransformBox_01.png

So...........for now.............using the technique described above, you will have to depend on the Ruler Tool to straighten the map sections.

I will be searching for a better way. If I find one I will definitely post it!
 
OK, I'm glad you understand I'm not just being pedantic!

It's probably my CAD background where it's pretty much a crime to ever align things visually.
 
It's probably my CAD background where it's pretty much a crime to ever align things visually.
My OCD thinks it to be criminal as well! But with Ps, you're very limited with some options.

I'm still looking at different techniques.............hopefully I will find one.
 
I think I have a way to straighten out exactly without using the ruler.
Similar workflow yet slightly different and it does use Smart Objects. Not automated yet for just 50 rectangles not sure it is worth the overhead for full automation.
I am going to try this with just text steps and if questions can add clarity.

1) Create the rectangle you want using a Shape Layer with a color fill of the desired color.
2) Critical Step - Convert this Shape layer into a Smart Object
3) Only now, reduce the Layer opacity to taste (Don't do this before turning it into a Smart Object)
4) Use Cmd+T (Cntl+T on PCs) for free transform. Move and Rotate the Shape to the first position you want (Note - do not change the size of the shape). Close the free Transform

5) Use Cmd+J on the Shape Layer to Create a duplicate Smart Object. With this new Shape Layer selected use Cmd+T again to Move and Rotate to the second slightly overlapped position.
6) Repeat #5 for all ~50 desired Shapes

7) Make minor adjustments in position and rotation again for any desired Shape Layer using Cmd+T on the appropriately selected Shape Layer (Again, don't change the size)

8) Go back to the first created Shape Layer and turn on Free Transform with Cmd+T. Don't make any changes. Just highlight the angle of rotation in the Options Bar and copy to clipboard with Cmd+C (Cntl+C on PCs). Abort the Free Transform
9) Cmd+Click on Shape Thumbnail to create the boundary selection for that Shape
10) Select the Map background Layer and use Cmd+J (Cntl+J on PCs) to create the desired strip on its own Layer
11) With the New Strip Layer selected, turn on Free Transform with Cmd+T
12) In the Options bar paste in the clipboard of the rotation previously copied.
13) Now use the arrows key and if the rotation angle was negative, delete it to make it positive. If the angle was positive, place a minus sign in front. This reverses the initial Smart Object rotation and brings back the strip to the vertical position. The Smart Ojbect keeps cumulative track of any rotation changes made during the intial creation and adjustment phases of the overlay used.

14) Repeat steps 8 thru 13 for all of the Shape Layers and you should now have all strips created on their own Layer. You now can manipulate those strip Layers as desired for printing.

Some of the above steps could be turned into actions yet not sure if that wold be worth the energy vs just cranking thru the steps by hand

I think this does the trick for the rotation issue without using the ruler and hope this is something worth considering
John Wheeler
 
Yes. I knew that using a smart object with the last technique would not work.

I was working with the idea of using smart objects from the beginning. I had just started!!! Now I don't have to continue!
Screen Shot 2019-07-04 at 4.58.03 PM.png
 

Back
Top