What's new
Photoshop Gurus Forum

Welcome to Photoshop Gurus forum. Register a free account today to become a member! It's completely free. Once signed in, you'll enjoy an ad-free experience and be able to participate on this site by adding your own topics and posts, as well as connect with other members through your own private inbox!

Merge two photos but keep shadow


Mirjam

Member
Messages
6
Likes
1
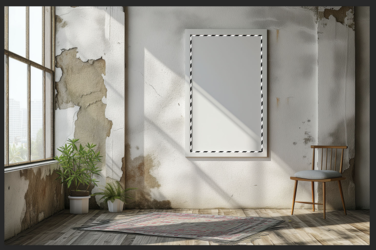
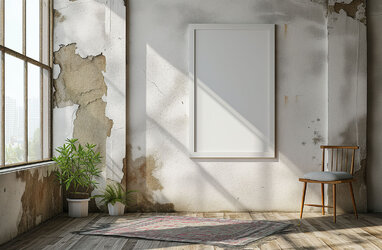
I am new here so I hope I post this in the right forum, if not let me know and I'll correct. Can someone guide me what the best way is to add a photo to the frame in the attached photo, but keep the shadow so to have a very natural effect? I tried playing around with the different layer blending options, but that give a very unnatural affect. So I basically want to add a photo the frame, but keep the shadow! I just need a few guidelines to point me in the right direction. Thank you!


mockup.jpg
 
Hello and welcome to the forum!

You are on the right track with blending options.

Add the photo you want to appear in the frame at the top of the stack. Deactivate the layer for now.
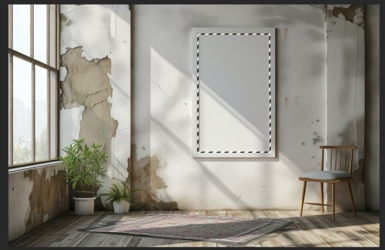
Make a selection of the ID of the frame using whatever method you are comfortable with. I used the Pen Tool but the Polygonal Lasso Tool Works great as well.
Screen Shot 2024-02-01 at 8.30.28 AM.png

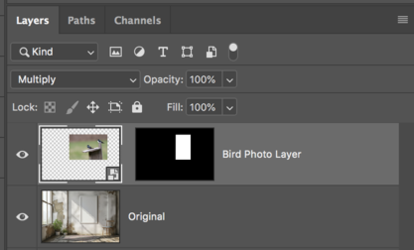
With the selection active, add a layer mask to your photo layer
Click on the link between the photo and the layer mask in your layers panel to deactivate the link.
Turn on your photo layer.
Position/resize the photo with the Move Tool and Free transform.
Screen Shot 2024-02-01 at 8.37.15 AM.png

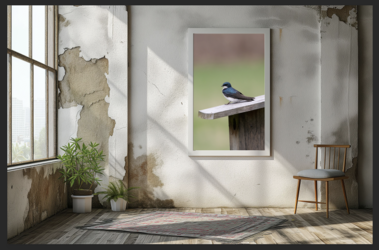
Now change the photo layers blending option to "Multiply". The original shadows appear!
Done!
Screen Shot 2024-02-01 at 8.37.30 AM.png

Screen Shot 2024-02-01 at 8.45.20 AM.png

There are also other ways to do this using smart objects, but that's a bit more involved.
 
You are absolutely GREAT and I will try this first thing tomorrow. Will let you know if I am clever enough ;-)
Thank you so much!
 
I would add one comment to @IamSam 's approach. The Multiply blend mode works perfectly here because the underlying wall is a very desaturated, neutral shade. If, hypothetically, the wall was painted red, blue or any other color, then that underlying color would interact with the Multiply blend mode and bleed through, distorting the true colors of the picture you want to place inside the frame.

A quick fix for that would be to insert a Black & White adjustment layer between your base image (the room) and the picture to be placed in the frame. The B&W adjustment layer should have the same layer mask as the frame, meaning that the B&W would only affect the rectangle of the picture frame and nothing else in the room. Once you've got that, then everything else would be the same as IamSam describes above.
 
OK, now for the Smart Object "mockup"!

Very similar to the technique above.

On a new layer, make your ID frame selection....
Screen Shot 2024-02-01 at 8.51.33 PM.png

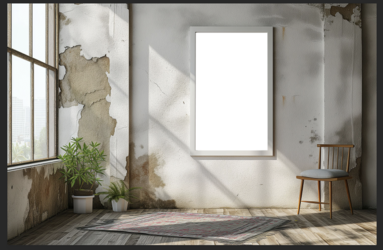
Fill with selection with white.
Screen Shot 2024-02-01 at 8.51.46 PM.png

Very Important!!!! We are now going to make a synced smart object.
Select the white rectangle layer in the layers panel. Rename it "Picture Image Smart Object".
Now right click in the body of the white rectangle layer in the layers panel that we just re-named, and choose "Convert to Smart Object".
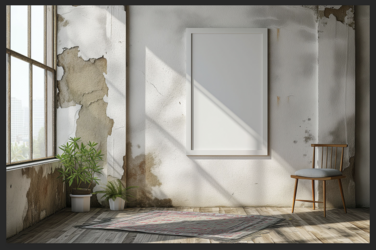
Now change it's Blending Mode to "Multiply".
It will change and look like this image below. Original shading and shadows preserved!
Screen Shot 2024-02-01 at 8.52.01 PM.png

Now Double Click on the thumbnail of the white rectangle layer we re-named "Picture Image Smart Object".
This will open a new (PSB) document labeled "Picture Image Smart Object.psb".

In the PSB document, drag and drop whatever image you want to appear in the picture frame as the uppermost layer.
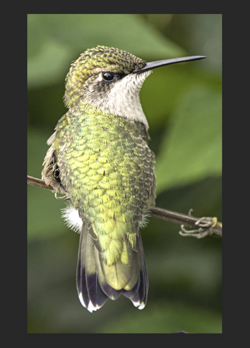
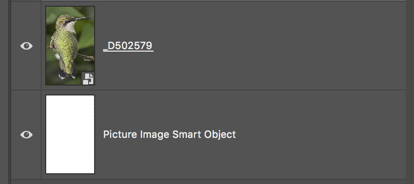
In my case, I added a Hummingbird.
Position the bird image layer how you want it to appear using the Move Tool or Free Transform (Cmd/Cntrl+T)
When your happy, save the PSB doc/file by closing and saving or hitting Cmd/Cntrl + S
What you will see in the PSB active document window....
Screen Shot 2024-02-01 at 9.29.53 PM.png

PSB Layers Panel.
Screen Shot 2024-02-01 at 8.56.06 PM.png

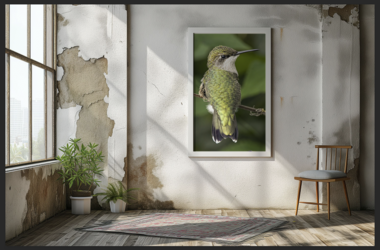
By saving the state change in the PSB doc/file, you have now updated the smart object layer in the original mockup document we have been working with!!!
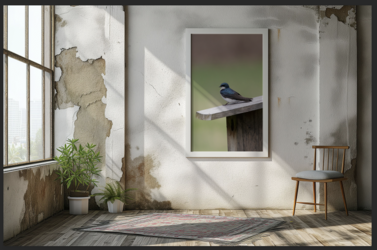
The Hummingbird appears along with original shading and shadows.
Screen Shot 2024-02-01 at 8.56.23 PM.png

If you want to change the image........double click the smart objects thumbnail as we did above and repeat the process of adding a new image by dragging and dropping.
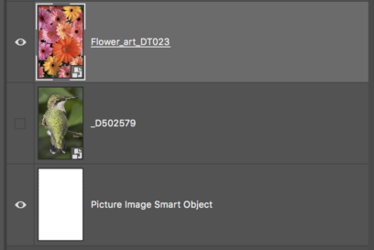
Here I have added flowers. Note I don't have to delete the first image, just deselect it by clicking the eye icon.
Save this state change to the PSB doc/file......
Screen Shot 2024-02-01 at 8.58.01 PM.png

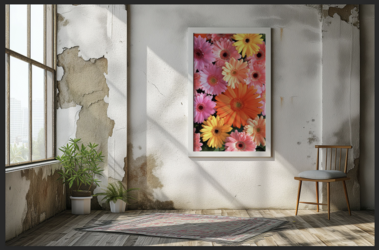
.......and PRESTO, the smart object layer in the original mockup is updated!!!
Add as many images as you like! You can go back an forth to any of your added images by clicking on the image you want, deactivating the old image, and saving the state change!
Quick and easy!
Screen Shot 2024-02-01 at 8.58.16 PM.png
 
WOW you are all great! Thank you so much for all these instructions. I was able to bring back the shadows in several of the above advised ways. Much appreciated! Have a nice weekend all. Happy I found this forum ;-)
 
I would add one comment to @IamSam 's approach. The Multiply blend mode works perfectly here because the underlying wall is a very desaturated, neutral shade. If, hypothetically, the wall was painted red, blue or any other color, then that underlying color would interact with the Multiply blend mode and bleed through, distorting the true colors of the picture you want to place inside the frame.

A quick fix for that would be to insert a Black & White adjustment layer between your base image (the room) and the picture to be placed in the frame. The B&W adjustment layer should have the same layer mask as the frame, meaning that the B&W would only affect the rectangle of the picture frame and nothing else in the room. Once you've got that, then everything else would be the same as IamSam describes above.
THANK YOU, much appreciated!
 
Hello and welcome to the forum!

You are on the right track with blending options.

Add the photo you want to appear in the frame at the top of the stack. Deactivate the layer for now.
Make a selection of the ID of the frame using whatever method you are comfortable with. I used the Pen Tool but the Polygonal Lasso Tool Works great as well.
View attachment 142636

With the selection active, add a layer mask to your photo layer
Click on the link between the photo and the layer mask in your layers panel to deactivate the link.
Turn on your photo layer.
Position/resize the photo with the Move Tool and Free transform.
View attachment 142635

Now change the photo layers blending option to "Multiply". The original shadows appear!
Done!
View attachment 142637

View attachment 142638

There are also other ways to do this using smart objects, but that's a bit more involved.
This worked very well! Thank you so much for giving me all the steps.
 
OK, now for the Smart Object "mockup"!

Very similar to the technique above.

On a new layer, make your ID frame selection....
View attachment 142652

Fill with selection with white.
View attachment 142653

Very Important!!!! We are now going to make a synced smart object.
Select the white rectangle layer in the layers panel. Rename it "Picture Image Smart Object".
Now right click in the body of the white rectangle layer in the layers panel that we just re-named, and choose "Convert to Smart Object".
Now change it's Blending Mode to "Multiply".
It will change and look like this image below. Original shading and shadows preserved!
View attachment 142654

Now Double Click on the thumbnail of the white rectangle layer we re-named "Picture Image Smart Object".
This will open a new (PSB) document labeled "Picture Image Smart Object.psb".

In the PSB document, drag and drop whatever image you want to appear in the picture frame as the uppermost layer.
In my case, I added a Hummingbird.
Position the bird image layer how you want it to appear using the Move Tool or Free Transform (Cmd/Cntrl+T)
When your happy, save the PSB doc/file by closing and saving or hitting Cmd/Cntrl + S
What you will see in the PSB active document window....
View attachment 142660

PSB Layers Panel.
View attachment 142656

By saving the state change in the PSB doc/file, you have now updated the smart object layer in the original mockup document we have been working with!!!
The Hummingbird appears along with original shading and shadows.
View attachment 142657

If you want to change the image........double click the smart objects thumbnail as we did above and repeat the process of adding a new image by dragging and dropping.
Here I have added flowers. Note I don't have to delete the first image, just deselect it by clicking the eye icon.
Save this state change to the PSB doc/file......
View attachment 142658

.......and PRESTO, the smart object layer in the original mockup is updated!!!
Add as many images as you like! You can go back an forth to any of your added images by clicking on the image you want, deactivating the old image, and saving the state change!
Quick and easy!
View attachment 142659
Will try this as well, thank you very much!
 
@IamSam - up to now I'd just been deleting any image inside the frame and then placing an image underneath to show through through the empty space. Never bothered with any shadows. This is a great approach and my lesson for the day...so far...:)
@Rich54 - and thank you for the extra tip!
 
OK, now for the Smart Object "mockup"!

Very similar to the technique above.

On a new layer, make your ID frame selection....
View attachment 142652

Fill with selection with white.
View attachment 142653

Very Important!!!! We are now going to make a synced smart object.
Select the white rectangle layer in the layers panel. Rename it "Picture Image Smart Object".
Now right click in the body of the white rectangle layer in the layers panel that we just re-named, and choose "Convert to Smart Object".
Now change it's Blending Mode to "Multiply".
It will change and look like this image below. Original shading and shadows preserved!
View attachment 142654

Now Double Click on the thumbnail of the white rectangle layer we re-named "Picture Image Smart Object".
This will open a new (PSB) document labeled "Picture Image Smart Object.psb".

In the PSB document, drag and drop whatever image you want to appear in the picture frame as the uppermost layer.
In my case, I added a Hummingbird.
Position the bird image layer how you want it to appear using the Move Tool or Free Transform (Cmd/Cntrl+T)
When your happy, save the PSB doc/file by closing and saving or hitting Cmd/Cntrl + S
What you will see in the PSB active document window....
View attachment 142660

PSB Layers Panel.
View attachment 142656

By saving the state change in the PSB doc/file, you have now updated the smart object layer in the original mockup document we have been working with!!!
The Hummingbird appears along with original shading and shadows.
View attachment 142657

If you want to change the image........double click the smart objects thumbnail as we did above and repeat the process of adding a new image by dragging and dropping.
Here I have added flowers. Note I don't have to delete the first image, just deselect it by clicking the eye icon.
Save this state change to the PSB doc/file......
View attachment 142658

.......and PRESTO, the smart object layer in the original mockup is updated!!!
Add as many images as you like! You can go back an forth to any of your added images by clicking on the image you want, deactivating the old image, and saving the state change!
Quick and easy!
View attachment 142659
When you save the new image created ... is that psb file saved somewhere on your hard drive ?
 
When you save the new image created ... is that psb file saved somewhere on your hard drive ?
Yes and no! Kinda complicated! A PSB file is saved within the container file (PSD) in which it was created. It is a temporary smart object file that is stored on your designated scratch disk and is erased when Ps is closed. The PSB file is recreated when the smart object within the PSD file, is re-opened.

An embedded Smart Object’s data is contained in the PSD; when you open the embedded Smart Object, a temporary file (PSB) is created. On saving state changes, the Smart Object is updated. When one closes the PSD file containing an embedded Smart Object, the temporary PSB file is no longer needed and will be removed the next time Photoshop is quit.
Thanls for the detailed explanation.
 

Back
Top