What's new
Photoshop Gurus Forum

Welcome to Photoshop Gurus forum. Register a free account today to become a member! It's completely free. Once signed in, you'll enjoy an ad-free experience and be able to participate on this site by adding your own topics and posts, as well as connect with other members through your own private inbox!

Matching skin tone


blasteralfred

Active Member
Messages
38
Likes
4
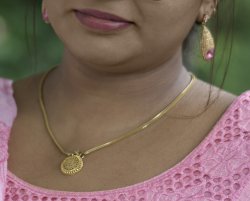
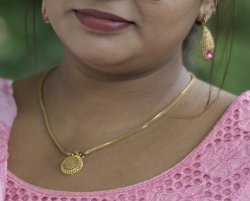
Hi, How do you match skin tone of neck and down with skin tone of face?

I was trying to figure this out. The person I photographed had applied some "heavy" makeup on the face but the rest I believe, because the face looks very much bright than the neck and below. I tried a bit with paint brush (Lighten) and Dodge tool, but I wasn't successful enough to get a perfect match. Can someone please help me / tell me how to achieve this?

PFA the sample.

Thanks in advance.
post.jpg
 
@IamSam has given you access to some excellent tutorials. I played with this myself and came up with another possible solution.
Note - I'm not sure of your level of experience with Photoshop or what your end use is. Let me know if you have questions)

- Open your image
- Select the area you want to change - in your image that would be the face area
- If you have the option, now hit Select and Mask to open the dialog
- Check you selection and make to sure to deselect the lips (and jewelry if you've selected the lower part of the ears)
- Then choose New Layer with Mask ande click OK - now you have the base layer and a new layer with only the facial area masked
- Using the eyedropper tool, make a selection of the chest area
- At the bottom of the layer stack, click on the Adjustment layer icon and choose solid color - this will then place a solid color layer over the face area in the chest color you chose
- Create a clipping mask on the color layer by right clicking on the color layer and choose the clipping mask option
- Now go up to the Blend Modes drop down menu which is default to Normal and change to Color
- The face area now turns the color of the chest. You can add a levels layer above the color layer, clip it to the color layer, and then move the output slider (the white triangle) to the left
to darken any further if you need to.
- Finally create a new layer at top and using the clone tool, blend in the face and neck layers.

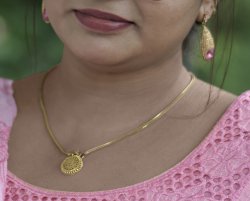
Using the above, here is my result:

skin tone edited.jpg

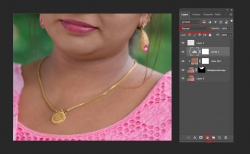
Here's what my layer panel looked like:

1606694983974.png

I've circled in red the Blend Modes options towards the top and the Adjustment Layers button at the bottom
This doesn't necessarily work in all circumstances but seemed to work on your particular image.

Let me know if you have any questions. Hope this helps!

- Jeff
 
@IamSam has given you access to some excellent tutorials. I played with this myself and came up with another possible solution.
Note - I'm not sure of your level of experience with Photoshop or what your end use is. Let me know if you have questions)

- Open your image
- Select the area you want to change - in your image that would be the face area
- If you have the option, now hit Select and Mask to open the dialog
- Check you selection and make to sure to deselect the lips (and jewelry if you've selected the lower part of the ears)
- Then choose New Layer with Mask ande click OK - now you have the base layer and a new layer with only the facial area masked
- Using the eyedropper tool, make a selection of the chest area
- At the bottom of the layer stack, click on the Adjustment layer icon and choose solid color - this will then place a solid color layer over the face area in the chest color you chose
- Create a clipping mask on the color layer by right clicking on the color layer and choose the clipping mask option
- Now go up to the Blend Modes drop down menu which is default to Normal and change to Color
- The face area now turns the color of the chest. You can add a levels layer above the color layer, clip it to the color layer, and then move the output slider (the white triangle) to the left
to darken any further if you need to.
- Finally create a new layer at top and using the clone tool, blend in the face and neck layers.

Using the above, here is my result:

View attachment 117335

Here's what my layer panel looked like:

View attachment 117337

I've circled in red the Blend Modes options towards the top and the Adjustment Layers button at the bottom
This doesn't necessarily work in all circumstances but seemed to work on your particular image.

Let me know if you have any questions. Hope this helps!

- Jeff
Hi @JeffK Thank you so much for your step by step, detailed instructions, and for the screenshot. Well, regarding my PS expertise, I am a beginner. What I am trying to accomplish is the opposite of what you explained, I am trying to apply the skin tone of face to the chest. Lemme follow your tutorial and will post here if I encounter some difficulty.

Thanks and Regards,
Alfred
 
My apologies for getting this backwards!
I went back in and, following the steps above, came up with the correct version. This one's a little tougher since you have to be careful about masking out the necklace.
Please also remember this is one way of doing it and it may work in some circumstances but not in others. Photoshop always gives you several ways to do the same thing!

Here's what I came up with:

skin tone edited REV.jpg

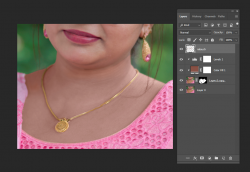
Sccreen shot of what my layers looked like:

:cheesygrin:
1606740615983.png

Photoshop is something you learn project by project. No such thing as a mistake - only a way not to do something! :cheesygrin:
Best of success in all your endeavors!

- Jeff
 
Last edited:
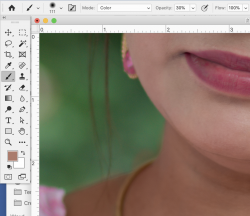
You can also use the Brush Tool set to Color.
Sample the color you like and brush over the areas you want changed. I usually set the Opacity at 30%. This gives you a little more control as not to over do it.
Works great for everything.
Screen Shot 2020-11-30 at 8.00.50 AM.png
 

Back
Top