What's new
Photoshop Gurus Forum

Welcome to Photoshop Gurus forum. Register a free account today to become a member! It's completely free. Once signed in, you'll enjoy an ad-free experience and be able to participate on this site by adding your own topics and posts, as well as connect with other members through your own private inbox!

Mask on text to remove part of it


Mylla18

Member
Messages
7
Likes
0
Hi there!
I am stuggling for a few days with an exercise I found on internet, but I do not manage to do it, and the owner of the tutorial does not answer my calls!!!
The web site I found is in French, and I also have a French photoshop (version 2020), but here is what I need to do (I'll try to find the good words for each function)

Create a text box with a word.
Add a shadow and a gradient incrustation (ok up to that!)
Add a mask (which I understood must be a vectoriel mask for text, right??)
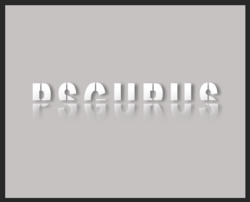
On this mask, add an ellipse to make the texte appear slowly from the bottom, and add lines so that the text appears to be cut in several places.

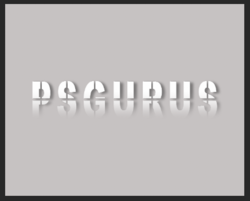
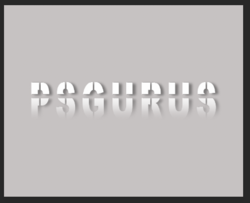
I attach the result that I am supposed to reach.
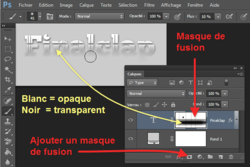
1585504029008.png

My questions:

I don't manage to draw on the mask as I could on a fusion mask. I managed to create something on the layers (as shown after), but then I cannot transform it to a vectorial mask,
And even when I managed to draw on the vectorial mask, I cannot control the width of the lines or the places of the things I draw once they are drawn, so for example, I cannot move the lines once they are drawn to check their place or the space between them.
1585504208933.png


Please help me, it is driving me crazy!!!

Thanks a lot!
Emilie
 
Hello and welcome. I have moved your thread to the proper forum.

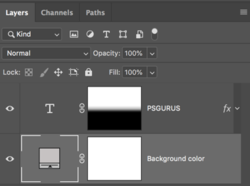
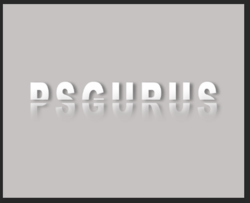
First off, you do not need a vector mask with text. If all you are doing is creating a "text fade effect" from the bottom of the text, you can use a standard layer mask.

Here I have used the Gradient Tool to create the fade effect.

Screen Shot 2020-03-29 at 2.06.35 PM.png
Screen Shot 2020-03-29 at 2.06.45 PM.png

Any lines can easily be added to the layer mask.
Screen Shot 2020-03-29 at 2.09.37 PM.png
 
I can create a "Line Template" layer that can be selected and added to the layer mask at anytime.

Screen Shot 2020-03-29 at 2.16.00 PM.png

Screen Shot 2020-03-29 at 2.15.45 PM.png
 
Hi Sam!
Thanks for your quick answer!
I don't manage to add the line... as soon as I add a line, it creates a new layer with the form... it doesn't go on the mask...

Oh I see you wrote something else!
How do you transfer the lines to the mask?
 
Definitely... when I darw a line using the line tool, it creates a new layer all the time... I cannnot have a layer with all the lines together... and I cannot change its width...
Which tool do you use??? the brush????
 
don't manage to add the line... as soon as I add a line, it creates a new layer with the form... it doesn't go on the mask...
You have to select the mask. You may be doing something else that I'm not aware of. You have to describe exactly what you are doing and what tools you are using.

How do you transfer the lines to the mask?
Once the lines are created on the template layer, turn the layer off, and then hit Cmd/Cntrl + click the thumbnail of the template layer to make a selection. Then click on the layer mask one time and fill the selection with black.
 
The following is just a suggestion.

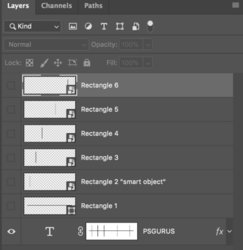
The best way to make this completely editable would be to convert the text layer into a smart object. Within the SO PSB document, you can use the Line Tool or the Rectangle Tool to create the lines which would be editable. Transfer them to a layer mask (as described above) and then save the PSB. Back in the PSD document, you would then add a layer mask to text layer and add your gradient for the fade effect.

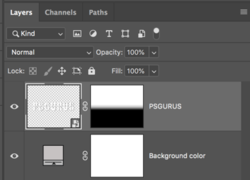
This is the PSD documents layers panel.
The text layer has been converted into a smart object.
It has a layer mask with the fade gradient added.
Screen Shot 2020-03-29 at 2.52.47 PM.png

When you double click on a smart objects thumbnail, it opens a PSB document.
Here is where you would add the lines to the text layer.
Screen Shot 2020-03-29 at 2.55.05 PM.png

Add the drop shadow to the text layer.
The lines were created with the Rectangle Tool and can be edited quickly. I did make the vertical lines smart objects as well so I would only need to edit one and the rest would be updated.
Turn off the Rectangle layers, hold down the shift key and click on each one to make the selections.
Add a layer mask or select an existing one and fill the selection with black.
Save the PSB document. Close if needed.

Here is the outcome which is slightly different than the ones above.
Screen Shot 2020-03-29 at 3.00.11 PM.png

If I don't like the lines, just double click the text layers icon to open the (SO) PSB document, then reset the layer mask, change the lines width or position, re-select, save and close the PSB.
Screen Shot 2020-03-29 at 5.26.29 PM.png
 
You have to select the mask. You may be doing something else that I'm not aware of. You have to describe exactly what you are doing and what tools you are using.
I am selecting the mask, then I clic on the Line tool (shortcode U) and when I draw a line, it is inserted on a new layer, one for each line I draw, even when the layer of the new line is selected, it adds a new one.

Once the lines are created on the template layer, turn the layer off, and then hit Cmd/Cntrl + click the thumbnail of the template layer to make a selection. Then click on the layer mask one time and fill the selection with black.
ok, this I managed thanks! but I did it with a layer on which I had no control on the placement of my lines... I'll try what you suggested in your next post! ;-)
 
When you double click on a smart objects thumbnail, it opens a PSB document.
Here is where you would add the lines to the text layer.

All fine up to there!

Add the drop shadow to the text layer.
The lines were created with the Rectangle Tool and can be edited quickly. I did make the vertical lines smart objects as well so I would only need to edit one and the rest would be updated.

ok!

Turn off the Rectangle layers, hold down the shift key and click on each one to make the selections.
Add a layer mask or select an existing one and fill the selection with black.
Save the PSB document. Close if needed.

Here you lost me...
When I turn them off and then select them, I cannot add a layer mask as the option is unavailable at this time. If I created one before, I can click on it, but then I lose my selection of the rectangle...
So then I cannot fill the selection as there is no selection...

I managed to do it without the smart object, but I had to dilate the selection to be able after to fill it. I didn't manage to do it automatically, I had to use the magic wand to select my rectangles and then I could do as you said. But in the PSB, I cannot use the wand as I have a message saying "these are filling layers"...
 
Ok! I managed, but I had to convert all the rectangles in smart object, and then use the wand to select all the black pieces, to be able to fill then this selection on the mask layer...

1585581417010.png

Jeez... that was long!!!
Even if I didn't manage every step you suggested, it worked eventually!!! And everything can be adjusted again if needed!
Thanks a lot for our help!
Emilie
 
Last edited:
I am selecting the mask, then I clic on the Line tool (shortcode U) and when I draw a line, it is inserted on a new layer, one for each line I draw, even when the layer of the new line is selected, it adds a new one.
Sorry, I did forget to address this. This is normal. This is why I suggested a template layer that could be converted to a selection and then added to the layer mask.

Here you lost me...
When I turn them off and then select them, I cannot add a layer mask as the option is unavailable at this time. If I created one before, I can click on it, but then I lose my selection of the rectangle...
So then I cannot fill the selection as there is no selection...
You are not adding a layer mask to the rectangles, you are adding a layer mask to the text layer. You are only using the (turned off) rectangles layers to make a selection that will be added to the text layers-layer mask.

Jeez... that was long!!!
Even if I didn't manage every step you suggested, it worked eventually!!! And everything can be adjusted again if needed!
Thanks a lot for our help!
Emilie
Glad something worked!!! LOL!! You're very welcome.
 

Back
Top