What's new
Photoshop Gurus Forum

Welcome to Photoshop Gurus forum. Register a free account today to become a member! It's completely free. Once signed in, you'll enjoy an ad-free experience and be able to participate on this site by adding your own topics and posts, as well as connect with other members through your own private inbox!

manually modifying RGB values


MattiaRag

New Member
Messages
3
Likes
0
Hi,

at first I apologize in case this question was repetitive, I tried finding an answer in previous discussions, but I guess I don't even know how to call the operation I am trying to carry on. I am quite new to Photoshop.

Substantially, I have many photos of a different subjects on a white background, and I would need to modify these photos making sure that the white of the background has identical RGB values (for example 255, 255, 255), and so correcting the RGB values of the whole image accordingly.

To do that, I thought to select a standard square area from the same position (for example the right bottom corner) and of the same size (like 100x100 pixel) for each photo, getting the medium blur of that area and obtain the RGB values. After that I would modify that RGB values in order to make them identical to the standard parameter (for example 255, 255 255), but making sure all the image RBG values are modified accordingly to this square area.

I hope explained well my idea, and I would like to ask if maybe someone is able to help me, or better giving me a better idea to do this kind of RGB correction.

Thanks a lot for your kind help
 
  • Open either a Levels or Curves adjustment layer. It doesn't matter which.
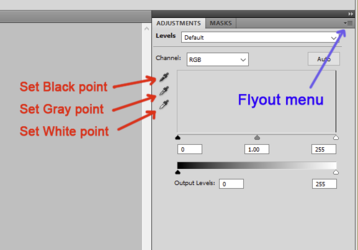
  • Find the three eyedropper icons for Black, Gray and White, like in the image below. (I have an old version of Photoshop, so yours may look different from mine.)
  • Select the white eyedropper and click it onto an area of your image that should be white. The spot that you click will then be set to white (255, 255, 255) and the rest of the image will adjust accordingly.
  • If you want a different setting than (255, 255, 255) for all of your photos, then manually adjust each of the individual color channels (R, G, B) to the white setting of your choice. Open the flyout menu and save your preset values. That saved preset can then be used on all subsequent images.

1696522190239.png


Usually, both the Black and White points are adjusted together (and sometimes the Gray point if the image has a color cast). See tutorial.

 
Hi @MattiaRag
For a complete tonal correction using the approach by @Rich54 is the way to go.

If you want to take the approach along the lines you mentioned in your post, that can be done too by just using the white point selection of the curves adjustment Layer.

There is also another alternative to do the same with a blend mode. With the eyedropper tool set to the sample size you desire, select the corner you desire to take that color sample.
Then add a Solid Color Layer above your image and accept the color in the Color Picker that pops up (it should already have the color selected by the eyedropper).
Then just set the blend mode of that Layer to Divide and the sampled area of the original area will be adjust to all white with the reest of the image adjusted appropriately.

This might be easier to use in an Action so it depends on what is easiest for you to implement with all of your images.
Just another way to achieve a desired result to consider
John Wheeler
 
I thank a lot all of you for the precious suggestions! Just found the way!
I would just need to ask to @thebestcpu how to find the solid color layer, as I can't find it in the command bars.
Best

Mattia
 
Hi @MattiaRag
The Layer above your original can be a solid color layer or just a pixel Layer that you fill with your sample color. The solid color Layer saves a little memory space yet otherwise it would work the same as long as the blend is set to divide.

Here are a couple ways to add a Solid Color Layer:

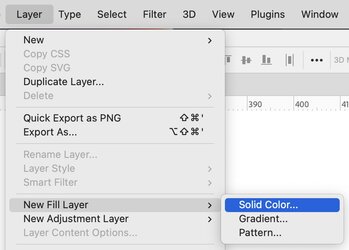
- Use the Layer > New Fill Layer > Solid Color command

Screen Shot 2023-10-07 at 11.30.25 PM.jpg

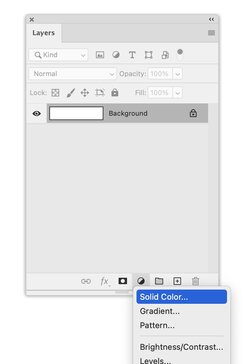
Or you can do the same thing on the Layers Panel by clicking on the "New Fill or Adjustment Layer (icon is a circle half black / half white at a slant) and then choose Solid Color

Screen Shot 2023-10-07 at 11.31.02 PM.jpg

Hope that helps
John Wheeler
 
Hi @MattiaRag
The Layer above your original can be a solid color layer or just a pixel Layer that you fill with your sample color. The solid color Layer saves a little memory space yet otherwise it would work the same as long as the blend is set to divide.

Here are a couple ways to add a Solid Color Layer:

- Use the Layer > New Fill Layer > Solid Color command

View attachment 140196

Or you can do the same thing on the Layers Panel by clicking on the "New Fill or Adjustment Layer (icon is a circle half black / half white at a slant) and then choose Solid Color

View attachment 140197

Hope that helps
John Wheeler
Dear John, thanks a lot for this clarification! Really helpful and clear
Best
Mattia
 

Back
Top