Photoshop Gurus Forum
Welcome to Photoshop Gurus forum. Register a free account today to become a member! It's completely free. Once signed in, you'll enjoy an ad-free experience and be able to participate on this site by adding your own topics and posts, as well as connect with other members through your own private inbox!
You are using an out of date browser. It may not display this or other websites correctly.
You should upgrade or use an alternative browser.
You should upgrade or use an alternative browser.
making frame
- Thread starter Sandrev
- Start date
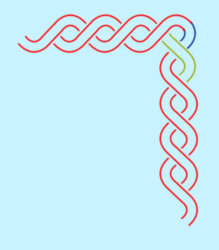
Ok, here goes... The frame is composed of one basic shape, shown in the first image below. I created it using the Pen Tool, carefully tracing from the sample that the OP provided. Create this shape on its own layer.
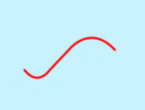
Copy this to a new layer and transform (flip) it both horizontally and vertically. Use the Move tool to position it like the image below. Then merge these two layers. (Copy this layer to a new layer and call it BackUp. De-activate the BackUp layer for now, but we'll need it later.)
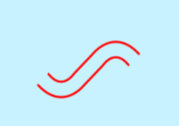
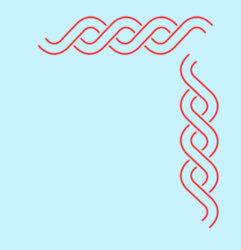
Copy this layer many times and use the Move tool to create a string of them of whatever length you want. To keep things organized, it's a good idea to group of all these layers once you've created the right number of them.

The sides of the frame are the same as the top, but the basic shape is rotated 90 degrees counter-clockwise. Create a new verticle string of shapes and position them as below to create the sides of the frame. Group all of these vertical layers as Group2. (In a minute, you'll need to nudge Group2 to get it precisely in the right spot, but for now just get it close to the image below.)
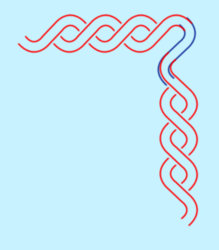
Now comes the hard part. The corners of the frame have a transition that uses the same basic shape, but some layer masking will be required. There are two shapes we'll need to make, which will be shown in blue and green so that you can see them clearly. First the blue one: use your BackUp layer that you saved earlier and copy it to a new layer. Flip it horizontally and rotate it 90 degrees counter-clockwise. Now move it into position so that it lines up nicely with the top edge of the frame to create a smooth curve. It should look like the blue shape below. Now go back to Group2 and use the Move tool to align it nicely with the blue transition shape. Don't worry about the overlap—we'll mask it later.
The last piece also uses the same basic shape, which I've shown in green. Make another copy of your BackUp layer and rotate it 90 degrees clockwise. Move it into place as shown below.
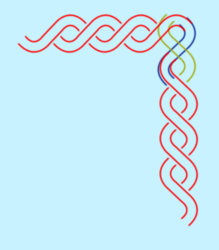
The last step is to apply a layer mask to both the blue and green shapes to mask-out the parts we don't need. The final result is below. Once you've created one of these corners you can copy the entire merged shape and rotate it to create the other three corners.

Copy this to a new layer and transform (flip) it both horizontally and vertically. Use the Move tool to position it like the image below. Then merge these two layers. (Copy this layer to a new layer and call it BackUp. De-activate the BackUp layer for now, but we'll need it later.)

Copy this layer many times and use the Move tool to create a string of them of whatever length you want. To keep things organized, it's a good idea to group of all these layers once you've created the right number of them.

The sides of the frame are the same as the top, but the basic shape is rotated 90 degrees counter-clockwise. Create a new verticle string of shapes and position them as below to create the sides of the frame. Group all of these vertical layers as Group2. (In a minute, you'll need to nudge Group2 to get it precisely in the right spot, but for now just get it close to the image below.)

Now comes the hard part. The corners of the frame have a transition that uses the same basic shape, but some layer masking will be required. There are two shapes we'll need to make, which will be shown in blue and green so that you can see them clearly. First the blue one: use your BackUp layer that you saved earlier and copy it to a new layer. Flip it horizontally and rotate it 90 degrees counter-clockwise. Now move it into position so that it lines up nicely with the top edge of the frame to create a smooth curve. It should look like the blue shape below. Now go back to Group2 and use the Move tool to align it nicely with the blue transition shape. Don't worry about the overlap—we'll mask it later.

The last piece also uses the same basic shape, which I've shown in green. Make another copy of your BackUp layer and rotate it 90 degrees clockwise. Move it into place as shown below.

The last step is to apply a layer mask to both the blue and green shapes to mask-out the parts we don't need. The final result is below. Once you've created one of these corners you can copy the entire merged shape and rotate it to create the other three corners.

Isac
Banned
- Messages
- 213
- Likes
- 298
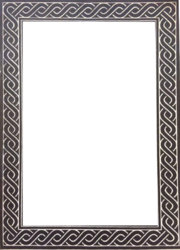
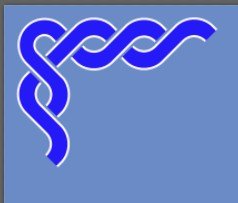
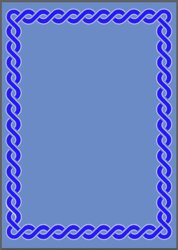
Here is another way of doing it with an action. There are lots of things to explain how I do it so I thought an action would be OK. You can slow it down to see what's happening. I basically use the Rounded Rectangle tool to get the correct shapes and join them all up. All the shapes will be in a Group called "Frame Shapes". After loading the action, just press "F9" to run it. You can remove the function key if you want to. The Action will create the pattern below and under that, is what I made up using copy and move of the corners and 'S' shape. You can add lines and borders as you wish for different effects. I've also attached a few of my frame and matte board action for you because I took a little longer than I would have liked 


Attachments
Isac, your final result is excellent. I have never investigated Actions and don't know anything about them, so I don't know how to run yours to see what you did. After using the rounded rectangle tool, what did you do to curve them into the correct shape? I tried using the Warp tool but that didn't work very well.
Rich
Rich
Isac
Banned
- Messages
- 213
- Likes
- 298
Firstly, Close Photoshop. Download (or save) the ".ATN" file/s. Save them to your Hard Disk where you will be able to find them.
Browse to where you saved the ".ATN" files and DOUBLE CLICK on the ".ATN" file (you can double-click on more than one file). Photoshop will open automatically. (no document should be open). If the Actions Palette is visible, you will see the new action/s that you double-clicked on. If the Actions Palette is not visible, press "ALT + F9" and it should appear. Actions are kept inside Actions Sets.
They are shown just like folders on your computer.
The set I have posted for you is called "Frames.atn". When it's in the Actions Palette the ".ATN" is not shown. Inside that set is the actual action called "Weaved Frame" and will run by pressing "F9". The action creates a new document to ensure the scale is not altered. That way you can drag the shapes to another document and resize them to suit.
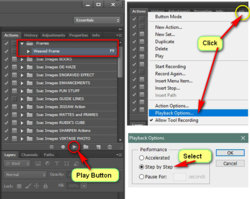
There is also a copy of the action which I accidentally forgot to delete. It was for testing different stages of the action so it's not required. You can click on it and drag it to the trash bin on the bottom of the actions palette window. To see the action steps as it runs, click the Actions Menu and select "Playback Options" then select "Step by Step" then Ok, then RUN the action.
I basically used the rounded rectangle tool to create the shape of the outer curves and use a smaller one on top of it to create the inner curve shape. With the small one selected (marching ants), I can select the larger one - press delete and it subtracts the small shape from the large shape - this will become clear when the small curve shape layer is deleted - thus leaving the proper shaped curve. Parts of the curve shapes I don't need are simply deleted. There is no warping at all. The S shape is done the same way but the top half is copied to a new layer, then flipped vertically and horizontally - moved below the top half and positioned to form the S shape and then the 2 layers are merged. The white edge is an inner stroke. After adding it, the layer is then rasterized so ends can be deleted to have the flow on effect through other parts. Very hard to explain but I'm doing my best - there are hundreds of things to do to make something like this so I hope the action shows how it was done.
When the action has completed, the corner shape and the S shape are in the group called "Frame Shapes". You just copy them and move them to where ever you need them. You will see what's happening if you select "Step by step" in the playback menu (as below), I hope this all helps.
Browse to where you saved the ".ATN" files and DOUBLE CLICK on the ".ATN" file (you can double-click on more than one file). Photoshop will open automatically. (no document should be open). If the Actions Palette is visible, you will see the new action/s that you double-clicked on. If the Actions Palette is not visible, press "ALT + F9" and it should appear. Actions are kept inside Actions Sets.
They are shown just like folders on your computer.
The set I have posted for you is called "Frames.atn". When it's in the Actions Palette the ".ATN" is not shown. Inside that set is the actual action called "Weaved Frame" and will run by pressing "F9". The action creates a new document to ensure the scale is not altered. That way you can drag the shapes to another document and resize them to suit.
There is also a copy of the action which I accidentally forgot to delete. It was for testing different stages of the action so it's not required. You can click on it and drag it to the trash bin on the bottom of the actions palette window. To see the action steps as it runs, click the Actions Menu and select "Playback Options" then select "Step by Step" then Ok, then RUN the action.

I basically used the rounded rectangle tool to create the shape of the outer curves and use a smaller one on top of it to create the inner curve shape. With the small one selected (marching ants), I can select the larger one - press delete and it subtracts the small shape from the large shape - this will become clear when the small curve shape layer is deleted - thus leaving the proper shaped curve. Parts of the curve shapes I don't need are simply deleted. There is no warping at all. The S shape is done the same way but the top half is copied to a new layer, then flipped vertically and horizontally - moved below the top half and positioned to form the S shape and then the 2 layers are merged. The white edge is an inner stroke. After adding it, the layer is then rasterized so ends can be deleted to have the flow on effect through other parts. Very hard to explain but I'm doing my best - there are hundreds of things to do to make something like this so I hope the action shows how it was done.
When the action has completed, the corner shape and the S shape are in the group called "Frame Shapes". You just copy them and move them to where ever you need them. You will see what's happening if you select "Step by step" in the playback menu (as below), I hope this all helps.
Isac
Banned
- Messages
- 213
- Likes
- 298
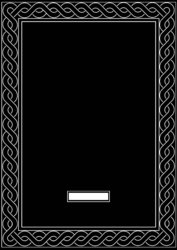
I added a few more lines to the FRAMES action that completes the frame and gives colour options. You can also drag in an image (above the BG layer). Free for all to play with. Just delete the previous version and load this one (attached. 
This is what the action creates: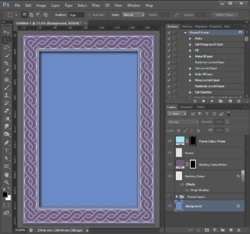
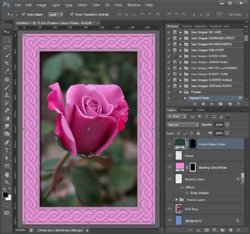
This is when you drag in an image and recolour the frame and backing.
This is what the action creates:

This is when you drag in an image and recolour the frame and backing.

Attachments
Last edited:

