What's new
Photoshop Gurus Forum

Welcome to Photoshop Gurus forum. Register a free account today to become a member! It's completely free. Once signed in, you'll enjoy an ad-free experience and be able to participate on this site by adding your own topics and posts, as well as connect with other members through your own private inbox!

'Lifting' object from its background


Bluie

Well-Known Member
Messages
90
Likes
13
Hello

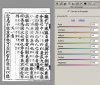
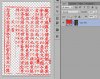
I have an image I am trying to extract from its white background using the Magic Wand Tool. When I have highlighted the white background and pressed the Delete key, the white background turns grey (as I think it should do):manu.jpg

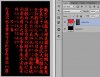
As I understood it, I then needed to import a transparent image (exactly the same size as the original manuscript image) using File | Paste. So, I have created a transparent image in a folder called photoshop_test, but when I go to File | Place, Photoshop only looks for files with non-too-common formats whereas mine is a JPEG:

image.jpg

What am I doing wrong, please?

Thanks.
 
If all your trying to do is make sure the parchment has a transparent background, I'm not sure why you need to import anything to make it work.
As you can see from your post, the picture is on a default background layer which as far as I know you can't have transparent.
You just need to double click the background layer and turn it into a normal layer. From there, you can select and delete what ever white background you want to get rid of. You then need to save the file out in a format that supports transparency like TIFF OR PNG.

That should be all you need for it to come up with a transparent background if your using it for a website or something.
Hope that helps, and if I'm completely off my rocker I'm sure a more knowledgeable member will come along to correct me. :)

Best,
Chris
 
Chris said:
You just need to double click the background layer and turn it into a normal layer. From there, you can select and delete what ever white background you want to get rid of. You then need to save the file out in a format that supports transparency like TIFF OR PNG.
I totally agree with Chris!

Double click the original layer to unlock it or copy it using command + J, then turn off the original by clicking the eye.
manu_01.jpg

Also, when you do select FILE > PLACE, make sure you have "All Readable Documents" selected from the "File Type" drop down menu here.....(arrow)
image_01.jpg
 
Last edited:
Here is a suggestion for you to make sure your symbols are black and not grey. I didn't finish up removing the parchment color but that is just clean up work you can do in the mask. BTW, this is saved as a png.

parchment.png

Duplicate the original layer and set it to multiply. Bring down the opacity a bit, maybe to 70 or 80%. Merge the layers.

Go to the channels palette and select the blue channel which is the highest contrast. Right click and duplicate it. Turn on the eyeball and turn the original blue channel eyeball off.

Make a levels adjustment, ctl/cmd + L. Move the white way over and the gamma to the right. Now use select>color range and while holding shift, click in the white a few times. Add a mask and use ct/cmd + I to invert it (or do shift + ctt/cmd + I to invert the selection first then add the layer mask). You will have the result I uploaded.
 
Many thanks to you all.

I will try your ideas today - I am determined to do it - and will post back.

Thanks again.

Bluie
 
As usual, there are many ways to reach the same goal in Photoshop.

For example, here is how you can generate a very high quality mask in ACR without using any of the classical selection tools. I find ACR very fast and versatile for such tasks.
 

Attachments

  • convert_to_grayscale_in_ACR-2.jpg
    convert_to_grayscale_in_ACR-2.jpg
    212.8 KB · Views: 35
Once you have a nice high contrast B&W image from ACR, it's easy to use this as a mask to get the printing in any color...
 

Attachments

  • use_BW_output_of_ACR_as_mask-2.jpg
    use_BW_output_of_ACR_as_mask-2.jpg
    255.5 KB · Views: 34
...or check how it will look against any background. Also, once it's in the form of a mask, it's very easy to tidy up. Here, I removed the vertical and horiz lines from the edges and first couple of columns, and then decided to see how the characters look against a black background ...

HTH,

Tom M
 

Attachments

  • easy_to_use_any_bkgnd-2.jpg
    easy_to_use_any_bkgnd-2.jpg
    262.1 KB · Views: 33
Same here. Though I just ran a kid through why he couldn't follow a tutorial as 3/4 of the original adjustments were done in Camera Raw, I often forget about how well it works unless I have a poor quality jpeg. I think this one definitely qualifies and this is the easiest and best fix, saving pixels and giving crisp, clean results. Thanks Tom.
 
Hey guys, unless I'm completely wrong I think the OP just wanted to remove the original photo from it's white background, and not the text from the parchment. Here's an original photo..... Screen Shot 2013-02-19 at 4.42.47 PM.png
 
Whoops. I re-read the 1st message in this thread and I think you're right, Sam. :eek:

Talk about overthinking the problem. Sorry about that! :redface:

Since the characters are now extracted, maybe we should point out to the OP the incredible possibility of laying these characters down on linen, cobblestones, bricks, canvas, watercolor paper, a starry night, a sign towed behind an airplane, wrapping them around the pillars of the Lincoln Memorial, etc. ... almost anything he wants. :naughty:

(Don't pay attention to me - I haven't had dinner yet.)


T
 
Haha, so easy. Well, he hopefully learned some helpful techniques that he didn't need. I was 1, surprised why he referred to it as white, but ... and 2, didn't see the wite background because it was grey, and apparently didn't read that it turned grey, especially since masking or deleting this should have been OK anyway. Well, he must've thought we were all mad! But according to his post, he figured it out despite our "advice!"
 

Back
Top