What's new
Photoshop Gurus Forum

Welcome to Photoshop Gurus forum. Register a free account today to become a member! It's completely free. Once signed in, you'll enjoy an ad-free experience and be able to participate on this site by adding your own topics and posts, as well as connect with other members through your own private inbox!

Levels adjustment layer strange behavior.


PutinHuilo

Well-Known Member
Messages
65
Likes
0
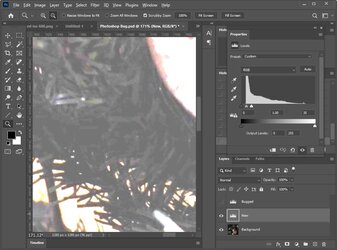
Levels adjustment layer "Bugged" been created for another layer "Old" that is now deleted.
Levels adjustment layer "New" created afterwards for the layer "Background".

Question 1:
Why level adjustment Levels adjustment layers with same exact settings give different results?

Question 2:
What settings do i use to get same results as from Levels adjustment layer "New" as currently shows in Levels adjustment layer "Bugged"?

Source file: https://www.upload.ee/files/16190203/Photoshop_Bug.psd.html
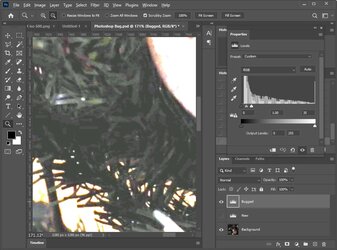
1.jpg


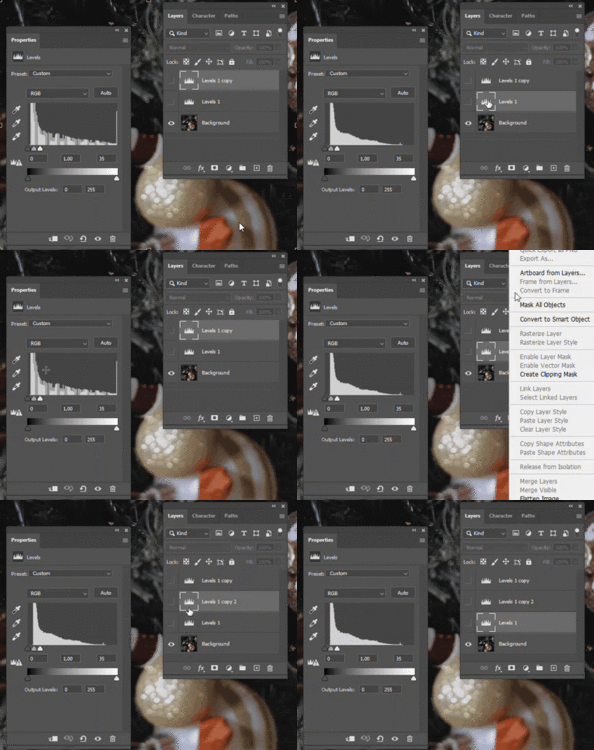
2.jpg
 
Hi @PutinHuilo

I downloaded your PSD file and spotted the issue right away.
The two Levels Adjustment Layers are not the same.
With the Levels Adjustment Layer (and many other adjustment Layers), you can adjust the overall RGB settings. Also, if you check the dropdown, you can adjust the R, G, and B channels separately.
If you look, that is where the difference is located.
The upper Levels Adjustment Layer has each R, G, and B channels adjusted, and the lower Levels Adjustment Layer has them reset to neutral.

ADDED COMMENT: You could have clicked on the "Auto" setting and had all the individual channels adjusted and did not know they were adjusted. Just a guess

Hope that helps
John Wheeler
 
ADDED COMMENT: You could have clicked on the "Auto" setting and had all the individual channels adjusted and did not know they were adjusted. Just a guess
Yes indeed i remember clicking auto at some point in time thought i undone it, but might have forgotten.


Anyhow i am trying to achieve same results as on first screenshot with the green leafs and i can't figure out how to get there i tried curves and levels adjustment layers and moved moving RGB channels separately, yet its beyond me how to achieve same results as screenshot #1.
 
Hi @PutinHuilo
Here is the approach I took to enhance the shadows.
First, I created a mask of just the dark areas
- Add a Curves Adjustment Layer
- Command Click on the RBB channel thumbnail in the Channels palette to create a luminosity selection.
- Invert that selection to make it a selection of the darker areas
- Create a Layer Mask from that selection for the new Curvres Adjustment Layer
- With the Layer Mask selected, use Threshold adjustment to narrow down the mask to just the very dark areas
- Add a little blur to soften the edges of the mask
Then I adjusted the Curves Adjustment Layer to increase the darks.

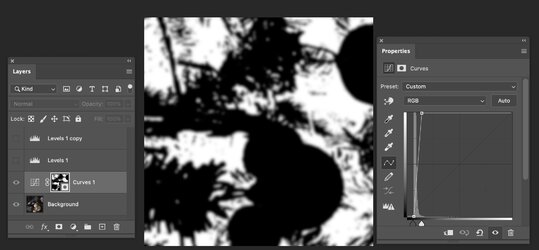
Here is the Layer Mask with the Layer Stack and the Curves adjustment Layer settings:

Screenshot 2024-01-24 at 6.10.49 PM.jpg

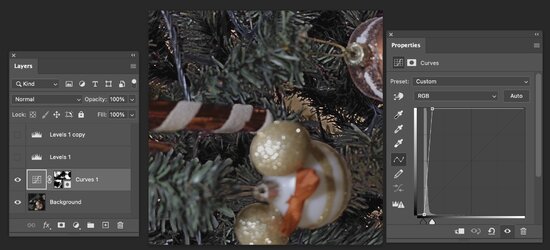
And here is the same shot with the Image Selected:

Screenshot 2024-01-24 at 6.11.26 PM.jpg

Just one approach to consider.
John Wheeler
 
Hi @PutinHuilo
Here is the approach I took to enhance the shadows.
First, I created a mask of just the dark areas
- Add a Curves Adjustment Layer
- Command Click on the RBB channel thumbnail in the Channels palette to create a luminosity selection.
- Invert that selection to make it a selection of the darker areas
- Create a Layer Mask from that selection for the new Curvres Adjustment Layer
- With the Layer Mask selected, use Threshold adjustment to narrow down the mask to just the very dark areas
- Add a little blur to soften the edges of the mask
Then I adjusted the Curves Adjustment Layer to increase the darks.

Here is the Layer Mask with the Layer Stack and the Curves adjustment Layer settings:

View attachment 142414

And here is the same shot with the Image Selected:
I am used to employ similar technique couple years ago after watching training video on youtube, but since then i stopped using Photoshop side entirely for image editing only did adjustments in ACR plugin and was happy with tools and results i am getting there.
Any chance to achieve same results as you show without all this extra hoops with layer masks etc since i am trying to recreate same effect later in video editing softwaree Davinci Resolve it will not have this masking functionality (i guess) only regular sliders.
HI @PutinHuilo
Your request required opening up Harry Potter's Book of Spells, which means it may or may not work for all circumstances to which it is applied.
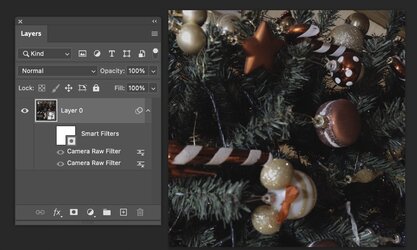
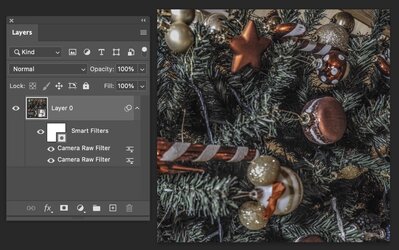
I turned your image into a Smart Object and applied the Camera Raw Filter, where I took both the Shadows and Clarity sliders all the way to the right, accepted that filter, and applied a second dose (spell) of the same filter with the same settings.

Below are the two images showing the before and after of that effect:

Before: Screenshot 2024-01-25 at 9.01.28 AM.jpg

and After

Screenshot 2024-01-25 at 9.01.39 AM.jpg


This may or may not work for your video scenario. As it turns out, it would be possible to create a curves adjustment Layer to do the same, yet trying to do so without a mask I found was a tough trial and error approach. Small adjustments in the Curves Adjustment Layer can make large and undesired changes in the image.

Hope this is helpful
John Wheeler
 

Back
Top