What's new
Photoshop Gurus Forum

Welcome to Photoshop Gurus forum. Register a free account today to become a member! It's completely free. Once signed in, you'll enjoy an ad-free experience and be able to participate on this site by adding your own topics and posts, as well as connect with other members through your own private inbox!

Layer masks and photo filters


readroberts

New Member
Messages
4
Likes
0
Having trouble with using layer masks and photo filters to emulate specific paint colors on a photo of my house.

I have been struggling with how to simulate different paint colors on a photograph of my house in Photoshop. I am able define a layer mask with a selection, and apply a color with either a color and a layer mask, or a color and a photo filter.

However, the color I see on the image is quite different than the color swatch in gray scale. The color looks close to right in regions of the selected image that are nearly white, but much too dark in areas that are darker. This is a problem because the current house colors, main and accents, are all somewhat dark, at most light gray, and mostly a darker gray.

I think that what is happening is that the hue and saturation channels of the color swatch are applied, but with the luminance channel from the selected area of the image. I supposed I could adjust levels for each feature on the house to make the highlights white, and teh dark extreme much lighter, but there must be a better way.

The Benjamin Moore Color Visualizer web tool does what I want very nicely, so it must be possible. ( Unfortunately, it is a paint to use for other reasons - too small a display, no ability to save history, or make multiple branches or copies of a projects).

Any advice would be much appreciated.
- Read Roberts
 
What color mode are you using? Try LAB.

What blend mode are you using?

Why use Photo Filter? This is not usually used for color changes.

Can you post some images? Screenshots of your layers panel as well.
 
I used RGB values for entering my custom color swatches values, for precision, as the color values for all mode values are integer. The LAB values were in the range from 3-8, but with significant fractional values. The RGB values were in the 150-233 .

I used photo filters because one of the tutorials on how to paint your house in Photoshop used them. I also tried layer masks, shown by anotehr tutorial, which seemed to work just as well. I used the blend mode 'Color'. I suspect that it is working as intended, preserving the luminance channel. My problem is that that the region I want to color is mostly a middle gray, so that applying the selected swatch will come out at least middle gray dark. The Benjamin Moore Color Visualizer web tool works around this somehow: with this tool, the same region, 'Frieze scale', painted with the same RGB color comes out as specified in the lightest areas, even if those areas are originally a middle gray, but still shows the structural details of the region,

My working PSD image file is posted here. It has examples of both layer types. The layer "Frieze scale - color & mask" illustrates the problem.
 
Sorry, I have been very busy!

I'm not sure, but I think this vid tut will be very helpful in your situation. Take a look and let us know what you think.

 
Hi @readroberts

I will provide an alternative approach to adjust both color and luminosity independently yet a couple points first.

1) If you are trying to create a specific visual color by using RGB values (or Web hex numbers) you need to know that every RGB color space used different color numbers for a given visual color.
It turns out that almost always when specific RGB numbers or specific Web Hex number is provided there it is assumed that the color space being used is sRGB. You have your document in Display P3 so the colors you will get will not match the RGB numbers you have been given by most any source of RGB color numbers. Not sure you are targeting a specific RGB number that way or not yet wanted you to be aware. If you want to match sRGB color space colors with color numbers your are given, you need to convert to sRGB color space first

2) Yes you are correct about the Color Blend mode. It takes the color from the top Layer being blend and used the Luminosity from below. It's a bit more then that because not every combination of Color (Hue and Sat) can exist at any level of luminosity. So in a bit more detail in how the blend mode is: The Hue of the top Layer is preserved, The luminosity of the Lower Level is preserved, and as much as it can, the Saturation of the top level is maintained yet Luminosity takes precedence. Luminosity in RGB mode is defined by L= .3*R + .59*G+ 0.11*B on a pixel by pixel basis.

3) So here is a way to take more control ot the desired result in Photoshop

- If you want to target specific RGB numbers open or convert to sRGB color space
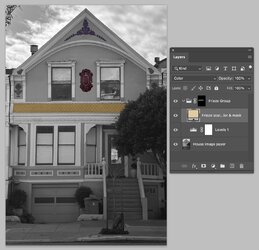
- Create a Layer Group with a Mask to represent a specific area of the image you want to independently adjust.
- Within the group place a Levels Adjustment Layer (could instead use a Curves Adjustment Layer yet if a bit harder to adjust) with Blend set to Normal.
- Above that in the group create a Solid Color Adjustment Layer and set the Blend Mode to Color. Set this Layer to the Hue and Saturation you are targeting.
- Adjust the Levels Adjustment Layer to the Luminosity you desire (typically by adjusting the Black and White Output Levels and the Gamma middle slider in the histogram)
- Do the above grouping process for each unique area on the image you want to adjust.
- The above gives you the ability to independently adjust/tune the Luminsity and Color getting you much closer to your desired end result.

Below is an example Layer Stack using your image:

Screen Shot 2023-04-20 at 11.14.17 AM.JPG

Hope this helps
John Wheeler
 

Back
Top