
Photoshop Gurus Forum
Welcome to Photoshop Gurus forum. Register a free account today to become a member! It's completely free. Once signed in, you'll enjoy an ad-free experience and be able to participate on this site by adding your own topics and posts, as well as connect with other members through your own private inbox!
You are using an out of date browser. It may not display this or other websites correctly.
You should upgrade or use an alternative browser.
You should upgrade or use an alternative browser.
Is there anything I can do to improve this photohraph?
- Thread starter Kaldanen
- Start date
Tom Mann
Guru
- Messages
- 7,222
- Likes
- 4,343
To "improve" something implies that the item has a purpose or function, and it's currently not fufilling it's purpose or function as well as u would like. Photographs can have many purposes or functions. These include rememberance of a person or occasion, decoration, selling a product, conveying an emotion, & thousands of other possible uses.
Fot anyone to give u useful / thoughtful advice on "improving" this photo, they first have to know what it's about. For example, if u tell me it's trying to document (or even just similate) an alien encounter, I'll give u different photographic advice than if u tell me that it's a shot of your little brother holding a flashlight, walking back to the tent on a Cub Scout camping trip.
So, since I can't tell what your intent is, or, for that matter, what the subject is, I have to ask you to explain a bit about this photo.
Cheers,
Tom M
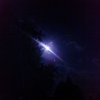
It's intended use is fan art for a band called Until Midnight. This was a picture of the so called "super moon" a month or two ago. I'd like to add a couple logos around it and was wondering if I could basically clean up the image first. While experimenting with photoshop since I made this post, I found and used the noise reducer filter and adjusted the color balance to come up with this new image. I'm not sure if what I'm explaining now is much clearer than my first post.. I know what I want, but I don't know how to ask for it hahah.
I suppose what I'm trying to do is tweak a low quality image to look like a higher quality image. Or perhaps I'm just experiencing wishful thinking.
I suppose what I'm trying to do is tweak a low quality image to look like a higher quality image. Or perhaps I'm just experiencing wishful thinking.
Attachments
Tom Mann
Guru
- Messages
- 7,222
- Likes
- 4,343
Thanks. That clarifies a lot.
Another question:
Does the fact that this bright light actually is the moon, particularly, that specific, unusually bright moon, have particular importance or significance to the band? For example, if the title cut happens to be named "Super Moon", or is there some other specific linkage?
If there is such an important linkage, the last thing u want is fans scratching their heads and wondering what in the world they are looking at. In this case u may be better served by a graphic illustration (drawn fm scratch), or a clearer photo of the moon.
Thoughts?
T
Tom Mann
Guru
- Messages
- 7,222
- Likes
- 4,343
Basically, what I'm asking is, with the hundreds of millions of images available to you, what leads u to feel that this particular image will serve the band the best?
To answer this question, u may have to carefully separate the two roles u seem to be in -- (1) a freelance photographer, and (2) the art director for this project.
T
To answer this question, u may have to carefully separate the two roles u seem to be in -- (1) a freelance photographer, and (2) the art director for this project.
T

Tom Mann
Guru
- Messages
- 7,222
- Likes
- 4,343
However, to be honest, if this general concept is interesting, I would just forget about the photo and replace it with some stylized artwork of silhouetted trees and other goodies (as I hinted at in an earlier post).
My general philosophy is that if an image is blurry, noisy and underexposed, there are very few situations in which I would use it other than perhaps as inspiration for the final product.
T
My general philosophy is that if an image is blurry, noisy and underexposed, there are very few situations in which I would use it other than perhaps as inspiration for the final product.
T
Last edited:
Thank you very much for your replies! How did you sneak the moon behind it? I was wondering all day how you were able to make the trees come out of the dark and it finally dawned on me you must be adjusting the brightness and contrast of the picture! I should have thought of that when I was adjusting the color balance ") There really isn't an importance to this moon or any other moon. I decided I wanted to delve into photoshop, from there I decided I wanted to make some stuff related to this band, and this was the best thing I had on my computer to get started with. So I went with it. But I like what you're saying.. You're actually motivating me to learn a bit more than I bargained for. I agree that I need to get some better base pictures to work with. I've started looking at free stock photos. I'm still going to pursue this, just because I started it but I don't think I'm gonna spend a bunch of time on it. There are a lotta lot of options out there.
There really isn't an importance to this moon or any other moon. I decided I wanted to delve into photoshop, from there I decided I wanted to make some stuff related to this band, and this was the best thing I had on my computer to get started with. So I went with it. But I like what you're saying.. You're actually motivating me to learn a bit more than I bargained for. I agree that I need to get some better base pictures to work with. I've started looking at free stock photos. I'm still going to pursue this, just because I started it but I don't think I'm gonna spend a bunch of time on it. There are a lotta lot of options out there.
There really isn't an importance to this moon or any other moon. I decided I wanted to delve into photoshop, from there I decided I wanted to make some stuff related to this band, and this was the best thing I had on my computer to get started with. So I went with it. But I like what you're saying.. You're actually motivating me to learn a bit more than I bargained for. I agree that I need to get some better base pictures to work with. I've started looking at free stock photos. I'm still going to pursue this, just because I started it but I don't think I'm gonna spend a bunch of time on it. There are a lotta lot of options out there.Tom Mann
Guru
- Messages
- 7,222
- Likes
- 4,343
Hi Kaldanen -
I'm glad you found some useful things in my comments.
re: "...How did you sneak the moon behind it?..."
There are many tutorials on this available on the web -- just Google {tutorial putting one object behind another photoshop}. Many are videos and they all probably do a better job describing the process than I could.
---------------
re: "...I was wondering all day how you were able to make the trees come out of the dark and it finally dawned on me you must be adjusting the brightness and contrast of the picture! ..."
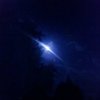
That's exactly what I did, but (a) there are many ways to do this, and (b) because the photo was so underexposed, you can only go so far before noise begins to overwhelm the image. What I did was to load the image into ACR (or LightRoom, if you have that) and bring up the brightness as much as I could in ACR. I also applied a bit of noise reduction in ACR. This left me with a vague suggestion of where the edges of the trees were, but weird magenta colored corners, popcorn noise everywhere, and unnaturally smooth areas in the image.
The magenta / red areas were the easiest to fix: I just painted over them with a soft blue brush set to "hue" blending mode.
The popcorn noise was also fairly easy to tame: I used the Dust and Scratches filter on a layer set to "Darken" blending mode.
The real problem was the complete lack of definition of the trees -- you could see there were trees there, but couldn't see any sharp edges, or detail in the centers of the trees. To fix this, I cheated. I pulled some photos of trees from my archive that were lighter against a dark background. I then superimposed one of these over the big tree on the left. Again, to get a realistic suggestion of detail in the center of the tree (eg, the trunk and branches), I had to use two slightly advanced features that you eventually will need to become familiar with: "blending modes" and the "blend IF" sliders. Look them up and play with them. There are lots of tutorials on these, as well.
The small triangular tree that's along the bottom edge, just right of center had to be handled differently. In this case, it was so featureless, I didn't even bother trying to fill in the center with fake detail. Instead, I simply wanted a better silhouette than the one on in your image. So, I brought up the lighting in that area, and put a silhouetted tree from my archive over that area, and changed the blending mode to multiply. That gave me a nicely defined silhouette. Obviously, my tree has to be a bit bigger than the area it's covering.
I hope the above explanation gave you an idea of what's involved. I know it sounds complicated, but it actually took me probably 10 times as long to write up the explanation as it took to actually do the work.
------------------
For most people, once they have built up a reasonable skill set in PS, even more difficult than the above techniques and technical details is setting a clear direction for yourself -- ie, being your own art director. When confronted with a need or a job, there are an unlimited number of things one can do in the photographic and Photoshop realms. The hardest thing is to figure out at the start of the project what is the best direction to take, ie, a "vision" and a knowledge of your tools. After that, once you have passed the conceptualization and team discussion / consensus phase, what remains is a much more of a craftsman-like endeavor, not at all like the very cerebral and abstract approach needed at the beginning of such a project. Put differently, once you (and everyone else) are convinced that the "best" art for this band might be (say) a big moon in back of some trees, then actually implementing this is a much less daunting exercise of your skills.
HTH,
Tom M
I'm glad you found some useful things in my comments.
re: "...How did you sneak the moon behind it?..."
There are many tutorials on this available on the web -- just Google {tutorial putting one object behind another photoshop}. Many are videos and they all probably do a better job describing the process than I could.
---------------
re: "...I was wondering all day how you were able to make the trees come out of the dark and it finally dawned on me you must be adjusting the brightness and contrast of the picture! ..."
That's exactly what I did, but (a) there are many ways to do this, and (b) because the photo was so underexposed, you can only go so far before noise begins to overwhelm the image. What I did was to load the image into ACR (or LightRoom, if you have that) and bring up the brightness as much as I could in ACR. I also applied a bit of noise reduction in ACR. This left me with a vague suggestion of where the edges of the trees were, but weird magenta colored corners, popcorn noise everywhere, and unnaturally smooth areas in the image.
The magenta / red areas were the easiest to fix: I just painted over them with a soft blue brush set to "hue" blending mode.
The popcorn noise was also fairly easy to tame: I used the Dust and Scratches filter on a layer set to "Darken" blending mode.
The real problem was the complete lack of definition of the trees -- you could see there were trees there, but couldn't see any sharp edges, or detail in the centers of the trees. To fix this, I cheated. I pulled some photos of trees from my archive that were lighter against a dark background. I then superimposed one of these over the big tree on the left. Again, to get a realistic suggestion of detail in the center of the tree (eg, the trunk and branches), I had to use two slightly advanced features that you eventually will need to become familiar with: "blending modes" and the "blend IF" sliders. Look them up and play with them. There are lots of tutorials on these, as well.
The small triangular tree that's along the bottom edge, just right of center had to be handled differently. In this case, it was so featureless, I didn't even bother trying to fill in the center with fake detail. Instead, I simply wanted a better silhouette than the one on in your image. So, I brought up the lighting in that area, and put a silhouetted tree from my archive over that area, and changed the blending mode to multiply. That gave me a nicely defined silhouette. Obviously, my tree has to be a bit bigger than the area it's covering.
I hope the above explanation gave you an idea of what's involved. I know it sounds complicated, but it actually took me probably 10 times as long to write up the explanation as it took to actually do the work.
------------------
For most people, once they have built up a reasonable skill set in PS, even more difficult than the above techniques and technical details is setting a clear direction for yourself -- ie, being your own art director. When confronted with a need or a job, there are an unlimited number of things one can do in the photographic and Photoshop realms. The hardest thing is to figure out at the start of the project what is the best direction to take, ie, a "vision" and a knowledge of your tools. After that, once you have passed the conceptualization and team discussion / consensus phase, what remains is a much more of a craftsman-like endeavor, not at all like the very cerebral and abstract approach needed at the beginning of such a project. Put differently, once you (and everyone else) are convinced that the "best" art for this band might be (say) a big moon in back of some trees, then actually implementing this is a much less daunting exercise of your skills.
HTH,
Tom M