What's new
Photoshop Gurus Forum

Welcome to Photoshop Gurus forum. Register a free account today to become a member! It's completely free. Once signed in, you'll enjoy an ad-free experience and be able to participate on this site by adding your own topics and posts, as well as connect with other members through your own private inbox!

Is it possible to blend light effects with separate layers?


NoName

Active Member
Messages
32
Likes
3
Hello all,

I'm wondering if its possible to achieve a blended light effect with the layers separated.

Right now, the only way I see to give lighted effects that awesome blended look is if a brush with color dodge is used on an image and on the layer that the image is on. Using the same brush on a different layer situation on top of the image's layer does not work well at all.

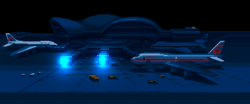
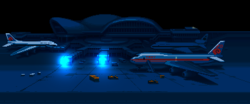
I have attached examples to show what I mean. In case A, the brush is used on two separate layers - the effect is not achieved. In case B, the same brush is used, but on the layer which contains the image. The effect is achieved in this case, but the layers are not separate.

Is it possible to achieve Case B on a separate layer? I'm fine with whatever technique is used, doesn't necessarily have to be a brush. I tried the usual (outer glow, inner glow, blur etc.) but wasn't able to replicate the effect on a separate layer.

Thanks in advance!

Case A
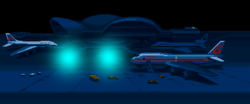
Case A.png

Case B

Case B.png
 
Hey, can you please post the original image that contains the original lighting? At full size as well?
 
Thanks for the reply IamSam!

Please note that the above images were only examples I put up to illustrate my question. I have attached an original, but its not "the" original (which I didn't save). The outcomes should be the same regardless (color dodge brush with white color applied on the image will give that nice blended glow with this image too) .

Please see the attached file (full size).Original.png

Thanks!
 
Lighting effects can only be applied to objects which contain pixel information. The problem with Case A is that the new layer is empty so you're simply applying a soft brush to transparent space that doesn't have any image information.

Being that this is Photoshop there are a million different ways to do one thing, but I will tell you how a few ways I know how to do what you want.

[1] The quickest and easiest way would be to duplicate the entire image onto a new layer, set the new layer to Color Dodge and use the brush to get the lighting effect you want. Then use a reveal all layer mask with a brush set to black and in the mask paint out everything you don't want to see.

Only do the following technique and the following substeps if you want the highlighted areas to be on their own separate layer. I will admit this is a weird way to work, but it gives you the flexibility of only having specific regions to work without having to duplicate the entire image and then masking. This is also useful when making complex custom shapes.
[2] Make a selection around the areas you want to be highlighted. There are various ways to make a selection from the various lasso tools to the pen tool which I'm sure you know so it all depends upon what tool you want to use and how precise you want to be if you're a perfectionist. Once you make your selection if you have multiple areas you want then hold the shift key and keep making selections around the objects you want.
[2a] Your selections are complete. Keep them active and at any time don't deselect until this method is complete. Now hit Ctrl+Alt+T (PC) or Command+Option+T (Mac) and open up the transform box. This isn't the normal transform box as you're about to find out. Click and hold inside the transform box and move your selection(s) around (doesn't matter where). When you make selections around certain areas or objects then open up the transform box with the added Alt / Option Photoshop will make copies of the objects inside your selections and make them into their own separate assets when you move or transform them. This is called making a "step".
[2b] Hit enter to close the transform box, but keep your selections active still now go to Edit--->Copy. Once you have copied them to the clipboard you can hit delete to get rid of the copied assets on the original layer.
[2c] Create a new layer and hit Ctrl+V (PC) / Cmd +V (Mac) and paste your new assets on their own layer. You can modify them any way you want, resize them, reposition them, etc. Now you can set the new layer to color dodge and paint those new assets with your lighting effect and it will only affect them.
[2b] If you want more of the same assets to put on another layer and place them in a different position simply press Shift+Ctrl+Alt+T (PC) / Shift+Cmd+Option+T (Mac) and as long as you keep hitting T while holding the other three then Photoshop will keep making copies. This is Step & Repeat.
 
@CyberNexxus

Lighting effects can only be applied to objects which contain pixel information. The problem with Case A is that the new layer is empty so you're simply applying a soft brush to transparent space that doesn't have any image information.
This is not true. Any color (aka, pixel information) applied to a new transparent layer via the Brush Tool can be altered by changing the blending mode of that layer thereby affecting the way it interacts with the layer(s) below it. You can use this to create lighting effects. The problem is that you may not be able to create the exact lighting effect you desire.

[1] The quickest and easiest way would be to duplicate the entire image onto a new layer, set the new layer to Color Dodge and use the brush to get the lighting effect you want. Then use a reveal all layer mask with a brush set to black and in the mask paint out everything you don't want to see.
This is a viable idea that will work. Technically you are working with a new and separate layer, but I'm not certain that this answers the OP's question.

I'm not certain why you explained the selection, transform, and step and repeat..................you may have to explain your reasoning more clearly.
 
IamSam said:
his is not true. Any color (aka, pixel information) applied to a new transparent layer via the Brush Tool can be altered by changing the blending mode of that layer thereby affecting the way it interacts with the layer(s) below it. You can use this to create lighting effects. The problem is that you may not be able to create the exact lighting effect you desire.
You're right, any lighting effect can be applied to a new layer via blending modes just not the effect you want to achieve. I did know better, but thanks for correcting me.

IamSam said:
This is a viable idea that will work. Technically you are working with a new and separate layer, but I'm not certain that this answers the OP's question.
Probably not the answer the OP was looking for or expecting, simply an alternative method.

IamSam said:
I'm not certain why you explained the step and repeat..................you may have to explain your reasoning more clearly.
LOL, did I throw you for a loop on that one? In my defense I did state it was a weird way to work, but if done correctly it will get the same results.

The original question was: "I'm wondering if its possible to achieve a blended light effect with the layers separated." Technically, the answer is yes. It's just a matter of how you go about it.

I interpret this to mean there are only certain areas he wants to affect and may not want the whole image on a new layer. He wants simply only certain highlighted areas with the effect on a new layer.

So lets say there are a couple of crates, maybe one or two baggage carts where he wants the effect. By making selections only around the desired areas he can then use the step part of the process to create new copied assets. Without deselecting he can then copy them to the clipboard and once on the clipboard he can delete them off the original layer. Then create a new layer and paste them onto it.

There you go, you now have the objects or areas you want pulled out of the image and on their own separate layer without duplicating the whole of the image. Basically you're just using the step part as an alternative extraction. Then he can apply the lighting effect he wants to the extracted regions or assets on their own layer.

I mentioned this method in case he wanted to create more of those objects. So if he wants more of those crates or baggage carts on other layers he can repeat since it's already copied to the clipboard. Of course I probably should have mentioned that every time he repeats PS will transform the new objects more than likely changing their dimensions. However, I think if he doesn't scale when making the step the transformations on the repeats will be slight.

In essence, IamSam, I have a weird way of working in Photoshop......................just run with it bud :silly:
 
Last edited:
Hi NoName

I may be confused on your request and the other options posted, yet why not have your two separate Layers, Select both of those Layers and convert the pair to a Smart Object, and then apply the Lighting Effects Filter to that Smart Object. Not only does it apply the Lighting effects to both Layers this way yet it also allows you to go back and change the Lighting Effects later.

This seems like a pretty straightforward approach to meet your needs unless I misunderstand what your are trying to do.

John Wheeler
 
OK, I could be very wrong but here is how I interpret the inquiry.

He has this image which he created (on the image layer itself) by using the Brush Tool with the tools blending mode set to "color dodge". The layer in the layers panel is set to "normal" blending mode.
Case B.png

The question is how does he create the same lighting effect without having to use the Brush Tool on the actual image layer or a copy of the image layer? He want's to use a separate layer(s) to create the same effect. I assume that the separate layer would be a new transparent layer.

Using the layer mask suggestion is, as I stated, technically a separate layer, but defeats the purpose because your still using a copy of the image layer.
 
IamSam said:
OK, I could be very wrong but here is how I interpret the inquiry.
No more wrong than I my friend. Oh wait, shouldn't have said that...wrong is an absolute term and not subject to gradation :giggle:. Anyway, I'm just wrong and I don't know what the answer is.
IamSam said:
The question is how does he create the same lighting effect without having to use the Brush Tool on the actual image layer or a copy of the image layer? He want's to use a separate layer(s) to create the same effect. I assume that the separate layer would be a new transparent layer.
Ok, I get that. The effect is the result of his brush tool settings and the way it's interacting with the color information on the image layer. The only way I know to get the same effect on a separate layer is to extract from the image layer the areas you want to highlight with the effect and put them on their layer. Technically, you're not copying the image layer just certain regions of it.

It's just my understanding that the image will have to be duplicated or at least certain parts of it in order to achieve the effect on another layer.

As far as getting the same effect on a new transparent layer without duplicating the image...I don't have the foggiest idea or know if it's even possible since as far as I know it goes back to how the brush is interacting with the pixels underneath it. Take away the image and you lose the effect.

IamSam said:
using the layer mask suggestion is, as I stated, technically a separate layer, but defeats the purpose because your still using a copy of the image layer.
Yet, still a viable method in achieving the effect on a separate layer.

Running with your interpretation then lets answer his question: Is it possible to create the same lighting effect without having to use the Brush Tool on the actual image layer or a copy of the image layer? Probably not.

If it is possible I would like to know myself and would consider that useful information since it would save a lot of time by being able to set up the brush and apply the effect on a new layer without having to go through steps of recreating the effect..
 
Thanks for the additional explanation IamSam and I think there are a couple ways to do this is the OP is doing a brush with white and brush blend set to color dodge

Approach 1) Put a Layer above the original image and fill with total black and set the Layer blend to Color Dodge. Brush white in normal brush blend mode on this second black Layer

Approach 2) Put a Layer above the original image and fill with 50% gray and set the Layer blend to Vived Light. Brush white in normal brush blend mode on this second gray Layer.


I believe the above two approaches will not work identically the same as direct brushing on the mage if you are brushing with a non white color yet will provide similar effects.

Hope this helps

John Wheeler
 
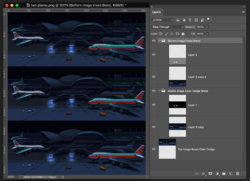
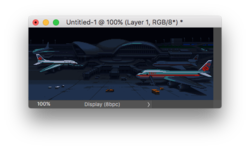
I added the two approaches from my prior post along with using a brush on the actual image for comparison. For reference, the brush used was pure white, minimum hardnewss with Blend mode of brush set to normal for the tow approaches mentioned in my prior post and to Color Dodge when applying directly to the image. I used 8 clicks of the Brush for all options for both locations in the image and you can see the results are quite similar

Top image was applying Color Dadge Blend Brush directly to image
Middle image was using Approahc 1 from prior post
Lowest image was using Approach 2 from prior post

It appears these two approaches are pretty close to meeting the OP needs without masks and pretty straightforward

John Wheeler

Color-Dodge-Options.jpg
 
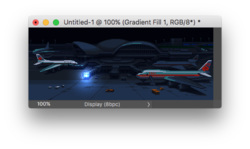
I don't know if that helps.. because I maybe misunderstood problem.. but will propose my solution anyway ;)
It answers the "question": "achieve a blended light effect with the layers separated. But Its not using brush.

1. open your image
Zrzut ekranu 2018-10-30 o 08.17.08.png
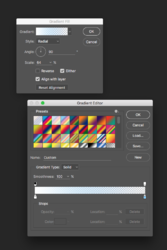
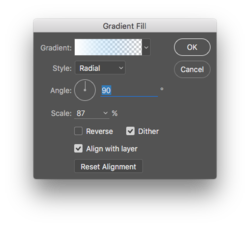
2. Add gradient adjustment layer and set it similar to this
Zrzut ekranu 2018-10-30 o 08.17.53.png
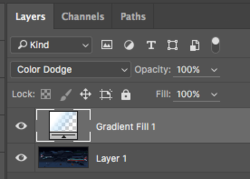
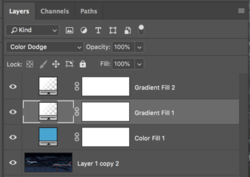
3. Change blend mode to color dodge
Zrzut ekranu 2018-10-30 o 08.18.04.png

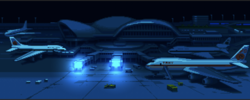
Here is a result:
Zrzut ekranu 2018-10-30 o 08.18.17.png

Nice thing, that is non-destructive, and you can change size of the light just by editing scale slider in gradient
Zrzut ekranu 2018-10-30 o 08.18.24.png
 
Excellent idea revenart! Thanks!

I just want to add, to position the gradient, you can click and drag the gradient when when the "Gradient Fill" adjustment window is open. To open, just double click the "Gradient Fill" icon in the layers panel.

You will, of course, have to add a second Gradient Fill adjustment layer for each light.
Screen Shot 2018-10-30 at 10.30.20 AM.png
Screen Shot 2018-10-30 at 10.30.42 AM.png
 

Back
Top