What's new
Photoshop Gurus Forum

Welcome to Photoshop Gurus forum. Register a free account today to become a member! It's completely free. Once signed in, you'll enjoy an ad-free experience and be able to participate on this site by adding your own topics and posts, as well as connect with other members through your own private inbox!

Is It Just Me..? #2 Linear Gradient Gripe.


Status
Not open for further replies.

MrToM

Guru
Messages
3,595
Likes
3,322
PS CC 2014
Win7 x64

Its unlike me to throw in the towel so readily but I've wasted too much time on this already and still :banghead:

The Scene:
A LINEAR (As in NOT logarithmic) Gradient from Black to White across 256 pixels going from Left to Right.

The Problem:
For some reason PS decides to duplicate a single column of pixels meaning that the last column is always 254 and not 255 (White).

The duplicated column is random as far as I can tell.
Over 256 pixels I'd expect the first to be 0 and the last to be 255.
It also appears that the width is irrelevant.....the last column is never 255!

Settings:

Gradient:
Type: Solid
Smoothness: 0% (LINEAR...IMPORTANT!)
Black to White (0,0,0) to (255,255,255)
Opacity: 100% for both.

Tool:
Style: Linear
Mode: Normal
Opacity: 100%
Reverse: UNCHECKED
Dither: UNCHECKED
Transparency: UNCHECKED

If anyone can confirm this is the case I'd appreciate it.....or if you have a solution or any idea what this crusty old f*rt is doing wrong then I'd appreciate that even more.

Regards.
MrTom.
 
Hi Mr Tom
An interesting PS characteristic. That one would be for an Adobe software engineer I think.
Just as another tidbit of information the gradient is close to yet not really linear. The image below shows what an input output curve shows when placing the 0 to 255 black to white gradient across horizontally on the screen and what you get vertically (aka like an Adjustment Curves Layer)

So the "anomaly" is more than just the "ending" color value. FYI

Screen Shot 2015-04-30 at 9.36.48 AM.png

PS - I will add that some columns are duplicated where the line is more horizontal compare to 45 degrees and some values are skipped when the line is more vertical than 45 degrees
 
Last edited:
Thanks for that, appreciated.

The question really only applies to a LEFT to RIGHT Gradient though, as in my initial post.

...Just as another tidbit of information the gradient is close to yet not really linear...

Not sure why this is....adding 1 to each of the RGB values from 0,0,0 for a total of 255 times is about as linear as you can get.
If only PS would do that I'd be happy.

Regards.
MrTom.
 
Hard to know what the original thinking was for gradients with a S curve yet it can be considered legacy at this point and not doubt will never change.

If you look at a histogram you would think you would get a flat histogramScreen Shot 2015-04-30 at 10.40.50 AM.png yet with the applied S curve from Adobe you get doubling up in darks and highlights and gaps in the midtones. It will be smoother for larger area gradients yet it shows the issue well:
 
Interesting.

Also found a pilot error on my part. I had discovered that my default black to white gradient had been corrupted so I reset the presets for the gradient tool. Unfortunately that when using the gradient the smoothness defaulted to the S curve.

So this time I with the reset gradient and also manually setting the smoothness to 0, I took a 256 pixel square document and placed the gradient. I also opened up the info panel to make sure that I started the gradient at x=0 and also ended at x=255 (that was important). I also used the Shift key to make sure the gradient was perfectly horizontal as before. When I did so, the gradient came out perfectly flat histogram:

Screen Shot 2015-04-30 at 11.26.41 AM.png

I am using Photoshop CC, sRGB (not sure it matters), and am on Mac OSX 10.10

Thanks for posting Mr Tom as I am learning something about the gradient subtleties.
 
...Interesting...
That's not the word I had in mind! :bustagut:

I think you're onto something though.....

So far I've been using a 'Fixed Size' rectangular marquee of 256 x 20px and either using the Gradient Tool direct or going through LAYER > FILL > GRADIENT

Both give the same result.....BUT.....

If I create a document of those sizes and do the same thing it works fine!
I get the same histo as yourself.

Sooooooo it must be something to do with the marquee....right?
I mean if nothing else changes it has to be that....doesn't it?

I'd very much appreciate it if you could you try using a marquee and seeing if that gets you the 'wrong' result.

I was aware of problems with the marquee before as it was giving me transparency for 1px around the edge...despite everything being set not to do so.

Somehow I managed to get rid of that but maybe its a glitch with my prefs file.....but if its the same for you I can rule that out.

Thanks for your time and effort so far....very much appreciated.

(It could also be a MicroSoft / Windows problem which wouldn't surprise me in the least)

Regards.
MrTom.


EDIT:
Here's another odd thing...

A Document of 1024 x 50px works as far as the end colour is white but just look at those spikes!
Curiously they are @ 25% 50% & 75%
The Blue channel has an added spike @ 5% too......weird!

1024x50px_Histo.png
 
Last edited:
Hi Mr Tom
I am now convinced this is an algorithm issue in PS. That could have been fixed at some point yet will no doubt just be left the same. I still have to try it out with a Marquee yet have tried out both
- Layer > New Fill Layer > Gradient (with gradient set as you specified)
- Layer > Layer Style > Gradient Overlay (with gradient as you specified)
Both gave the same results on a 256x256 horizontal gradient document to getting to 255 and only 254.

I show the histogram below (in Color mode instead of RGB). I got yet also found another problem and that the gradient did not stay true grayscale. Close yet not exact. For the X values of ~128 to 157 the R values continue increasing monotonically yet the G and B values lag by 1 bit giving a slight red tinge of 1% saturation. I did a hue map to show where it occurred in the gradient. Given the consistency of location it looks like an algorithm problem to me (slight rounding error or something similar).

Not a big deal except for those that expect PS algorithms to be exact and make sense :)

I will try the Marquee approach in a bit.

Screen Shot 2015-04-30 at 1.52.22 PM.png

Screen Shot 2015-04-30 at 1.52.50 PM.png
 
Hi Mr Tom

I checked this out with the Rectangular Marquee Tool as well using a fixed 256x256 pixel selection.
Do note that I reset all of my tools as I was not getting a hard edge for some reason.

With the above in place, I could get a perfect gradient with even histogram using the gradient tool yet if I used either the
- Layer > New Fill Layer > Gradient (with gradient set as you specified)
- Layer > Layer Style > Gradient Overlay (with gradient as you specified)

I would get the gap at 255 and the red band for Hue in the ~128 to 157 range.

I think this is solely a different between using the gradient tool or the automatic fill tools. They have apparently a slightly different piece of code. Not surprising as I have seen similar "off by 1" issues elsewhere in PS.

Hope this was helpful.
 
...I was not getting a hard edge for some reason...
Sounds like the issue I described in post #7...?
I also tried a much larger marquee and then transformed it down to 256 x 20px ensuring that 'Nearest Neighbour' was the interpolation method.....still crap.

...Hope this was helpful...
Certainly it was, and I thank you very much for your continued experimentation.

I've tried several further workflows and none of them work....even the document at 256px wide gives me the error now.

I also tried a document (and marquee) of 254px wide with a gradient from 1,1,1 to 254,254,254 and guess what....it was even worse! Three spikes right in the middle and some values just totally missing too.......outrageous!

The closest I got was to have a 255px wide document. Using the same gradient this gave me a perfect gradient minus the 255 at the end.....which is fine as adding a 1px wide strip on the end is far easier than manually creating the whole thing from scratch.

My initial thoughts on this were as you've stated that its a 'mathematical' error in rounding off.....what with PS using 'standardized' notation and so forth it stands to reason its going to be out.

I just needed confirmation that this was the case and it seems so.

I don't have this issue with CC though, nor CS6 so what they've done to 2014 I dunno, but its bloody annoying!

Thanks again for all your help, appreciated.

If you do have any more thoughts please post them.......the clean ones that is.

Regards.
MrTom.
 
Mr. Tom...
Just for my own curiosity, why is it important to you that the gradient be mathemetically perfect? Surely nobody's eye can detect the difference between 254 white and 255 white. Although it's certainly an annoying glitch, I'm not sure what the practical implications are. Thanks.
 
Good question Rich54

You are right....the human eye probably couldn't detect such a small variation...but...PS doesn't work by looking at it, it goes by the numbers.

Another thread of mine about 'Tolerance' is in need of a post to explain what I've discovered.
The 'Magic Wand' (Being the simplest example) uses 'Tolerance' and in order to explain how it works I need a sample image.....a gradient.

A precise gradient.

Otherwise, its pointless saying "...and you click on this pixel and these pixels also get selected..." if the image contains randomly generated pixels.

[ I got on my soapbox at this point but deleted it. ] :bustagut:

So that's basically the reason.

Besides that, PS SHOULD work as intended....not keep me guessing.
Imagine trying to use a Blend Mode if all the calculations were 1 value out....nightmare!

Thanks for the question.

Regards.
MrToM.
 
Not that it really matters but just to add some fuel to my own fire I came across this little gem this afternoon...

Using the Colour Picker I set RGB to be 118, 211, 118 ..... so both the R and B are the same.

Using ExtendScript toolkit to get those values back it gives me these values...

R = 117.492370605469
G = 211.000671386719
B = 117.500152587891

Note that the R and B values are different!

So PS can't even be wrong consistently!

Sheesh.....inaccuracy in its inaccuracies... :bustagut:

Regards.
MrToM.
 
MrTom

There is a simple solution to this - STOP LOOKING AT THE OUTPUT FROM SCRIPTLISTENER :)

I think we have similar afflictions to such data issues so just to "make your day", I did the same thing with using the color picker and did not get the same results as you.

In 8 bit mode

var idRd = charIDToTypeID( "Rd " );
desc4.putDouble( idRd, 118.000000 );
var idGrn = charIDToTypeID( "Grn " );
desc4.putDouble( idGrn, 211.000000 );
var idBl = charIDToTypeID( "Bl " );
desc4.putDouble( idBl, 118.000000 );

In 16 bit mode

var idRd = charIDToTypeID( "Rd " );
desc16.putDouble( idRd, 118.000000 );
var idGrn = charIDToTypeID( "Grn " );
desc16.putDouble( idGrn, 211.000000 );
var idBl = charIDToTypeID( "Bl " );
desc16.putDouble( idBl, 118.000000 );

I suggest resetting preferences and when using the color picker typing in the numbers manually (don't trust the sliders to be accurate).

I am using Mac OSX 10.10.3 and also Photoshop CC with its associated ScriptListener.

BTW - your numbers were off from each other by 1/(2^15) or one bit in the Photoshop data space. Go figure.
 
I appreciate your response, and your results are what I get too.....for CC...as stated in post #10.

My problem is with CC 2014, on Windows, as stated in the very first line of post #1.

I don't doubt for a second that Mac Maths is far superior to MS.
CC maths is also far superior to CC 2014 maths....and its there that the problem lies.

In my latest findings I did not use the scriptListener but if I had I doubt my results would be any different.

I also DID type the numbers in....not that it matters....118 is 118 however its entered.

For some reason Adobe have 'done something' to CC 2014 which is causing these inaccuracies, both CS6 and CC are spot on.

To be honest the value of the error is irrelevant, its the fact that it HAS an error that is the issue.

[/quote] ...one bit in the Photoshop data space... [/quote]

Now that IS interesting.....I didn't check that one.
Thanks.

Regards.
MrToM.
 
Well, just to give it a go I downloaded CC 2014 (I am a late adopter) and the scriptlistener log is still spot on with a Mac with 8 or 16 bit mode.
I am using the Adobe color picker and accessing it through clicking on the foreground chip in the tools panel.
Strange that the Windows version has enough difference in their code to come up with two different numbers which are seemingly the same.

I do understand you comment that the difference does not matter practically, yet that there is a difference is a concern.
 
Thanks everyone for all your help.....its been emotional.

Further investigation revealed this article which covers just about everything we've discussed here and explains the reasoning behind it.....how I never found it before I don't know but still...

http://www.rags-int-inc.com/PhotoTechStuff/ColorCalculator/AdobeMath.html

For those of you that don't read it, its an article nearly 10 years old which outlines all the mathematical inaccuracies with Photoshop.

Although the issue has been raised with Adobe many, many times over the last 10 years or so nothing has been done to rectify it.....its old outdated code and Adobe just wont change it.

It appears from the comments left here that Mac users have it lucky and the problem doesn't exist......Windows users will just have to continue to tolerate a substandard piece of software....well I will anyway.

All I can say is don't ever trust your "colourpicker".....nor the "info panel" for that matter....or the "magic wand".....or the "Colour range".....in fact anything to do with colour.......so pretty much anything in Photoshop in general really.

This all kind of links in to my other thread about Tolerance too....it explains why that doesn't work neither.

So...sorry its been a wasted journey for a solution, but at least now its pretty clear why the problem exists.

Regards.
MrToM.
 
I recently found the root cause of the Ops problem in this old post and a solution which I document below.

In recap, the OP wanted a linear black-to-white horizontal gradient on a 256-pixel wide document, yet all approaches ended in 254 instead of a complete white of 255.

The root cause of the problem is to determine the gray level step needed at each pixel, PS divides the gradient by one less than the actual width of the document. E.g., in the OPs case, PS divides the gradient into 256 transitions instead of 255.

The solution is to draw the gradient from the left side of the document to the pixel line one pixel to the left of the right edge of the document. A simple example below is using a four-pixel document to clarify what is happening.

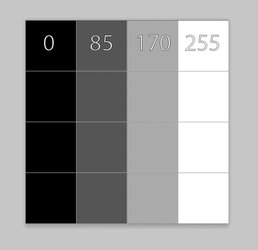
Here is the desired result when running a gradient on a four-pixel document:

Desired.jpg

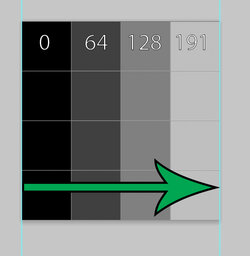
However, when I drag the gradient from the left side of the document to the right side, here is what I get. The increments are 256/4 or 64 bits per step. This increment leaves no room to complete the gradient to 255.

Partial-Gradient.jpg

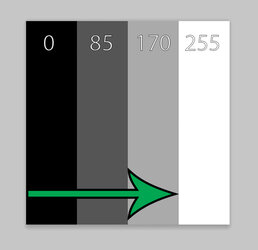
To make it work, drag the gradient to one pixel away from the far right edge (three pixels wide). PS will divide the black-to-white gradient into three increments, or approximately 256/3 = 85 for each step. Since gradients continue to the document's end, it automatically adds the last increment.

Full-Correct-Gradient.jpg

There are specific requirements (some mentioned before in this thread) to make it a perfectly linear gradient.

- Be in RGB Color mode
- Have View > Snap turned on and View > Snap To with Guides turned and Grid to lock the gradient at the correct points when drawing the gradient.
- Use guides at the zero point and also at the endpoint minus one pixel, so it snaps to the correct place
- Use the foreground-to-background gradient with the foreground set to black and the background set to white (the legacy Black-to-White gradient has potential issues I won't cover here).
- Set the Options Bar Mode=normal,0 no dither, 100% opacity, reverse is not checked, and blending mode set to Normal. For Photoshop 2022 and beyond, set the Gradient Mode to Classic.
- Open the gradient editor and set the smoothness slider to zero.
- It's best to keep color spaces the same after drawing the gradient (the conversion may not preserve the exact linearity).
- Set the eye dropper to Point Sample for accurate pixel value measurements

The above is to make a simple linear gradient. One needs to turn off all the bells and whistles associated with gradients and bypass the PS gotchas.

And if you have read this far, you are also a real PS nerd :).
 
Last edited:
Status
Not open for further replies.

Back
Top