
piattrocks
Member
- Messages
- 9
- Likes
- 0
Hey guys,
I'm making a comic book, and we've got a huge problem that I think could be fixed with something simple.
After our inker inks a page, we scan it, and I've got to get rid of the background so that we can put the colors behind it. But we're getting so much data loss here that we've got to stop drawing in real life and start fixing things on the computer.
I usually set the document to black and white mode, use the brightness / contrast to get it a little darker, and then use the "curves" tool. This gets rid of the grey, but crushes our line quality. Little details like hair are lost completely.
I was searching through the forums for a solution, and I found this post...
http://www.photoshopgurus.com/forum...eliminating-grey-backround-scanned-image.html
but I'm not sure what was done - or if it's even the same kind of problem, because the final version still had a background in that PSD file.
http://unlikelyheroesstudios.com/grey_sample.jpg
original...
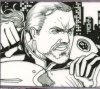
http://unlikelyheroesstudios.com/getting_rid_of_grey_after_pic.jpg
after the curves (and placing a solid red layer behind the black inked layer)
I put links because this is my first post (google searches for the answer took me to that link I mentioned) and I can't just directly upload the file until I've been here for a while.
Anyone have any ideas?
- Justin
I'm making a comic book, and we've got a huge problem that I think could be fixed with something simple.
After our inker inks a page, we scan it, and I've got to get rid of the background so that we can put the colors behind it. But we're getting so much data loss here that we've got to stop drawing in real life and start fixing things on the computer.
I usually set the document to black and white mode, use the brightness / contrast to get it a little darker, and then use the "curves" tool. This gets rid of the grey, but crushes our line quality. Little details like hair are lost completely.
I was searching through the forums for a solution, and I found this post...
http://www.photoshopgurus.com/forum...eliminating-grey-backround-scanned-image.html
but I'm not sure what was done - or if it's even the same kind of problem, because the final version still had a background in that PSD file.
http://unlikelyheroesstudios.com/grey_sample.jpg
original...
http://unlikelyheroesstudios.com/getting_rid_of_grey_after_pic.jpg
after the curves (and placing a solid red layer behind the black inked layer)
I put links because this is my first post (google searches for the answer took me to that link I mentioned) and I can't just directly upload the file until I've been here for a while.
Anyone have any ideas?
- Justin


")