What's new
Photoshop Gurus Forum

Welcome to Photoshop Gurus forum. Register a free account today to become a member! It's completely free. Once signed in, you'll enjoy an ad-free experience and be able to participate on this site by adding your own topics and posts, as well as connect with other members through your own private inbox!

Image that looks different on black background and on white


danilotl

New Member
Messages
2
Likes
0
Hi,

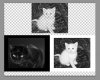
Today I saw a picture that looks different on black background and on white. There is an example attached. Does anybody knows how to do this? I found an explanation on the link below, but doesn't worked for me (when I create the subtract layer, it doesn't result on a transparency layer):

graphicdesign.stackexchange.com/questions/9088/image-that-looks-different-on-black-background-and-on-white

All I know is that the final image must be a PNG file, with transparency on it... But don't know how to merge the two images to get the effect of different images depending on the background color (black or white).

Can anybody help me to understand that effect?
 

Attachments

  • IMG-20140520-WA0013.png
    IMG-20140520-WA0013.png
    1.1 MB · Views: 1
Select layer. Hold ctl/cmd and click on I. This will invert the selection from white to black and so on.

You may want to add a levels adjustment (to both of them actually) if your image has this little contrast. It may not look good in the inverted version. Deepen the darks and pull the whites out a bit.
 
Sorry, but I didn't understand how this will work to get the final effect... What I want to do is like the example of the cats images in the link I've posted. There are two different images, and after applying some layer effects and merging them, it will result in a single image that will look different on black or white background. Another image to exemplify. The top image is the final image I want to create based on two different images... Look how it look different depending of the background color.
 

Attachments

  • Untitled-2.jpg
    Untitled-2.jpg
    173 KB · Views: 16
Ah. To do that, you must select the cat and mask it off, but not the eyes. Then just apply a layer mask. This is the third icon from the left at the bottom of the layer stack.

If you want, you can invert the mask and do the opposite to the image.
 
danilotl - I could not get the effect from the tutorial to work well. It's not very well written and a bit confusing in one part. I also think there is some preperation steps that have been left out. I will have to mess around with it to see if I can figure out what needs to be done to make it work.
 

Back
Top