What's new
Photoshop Gurus Forum

Welcome to Photoshop Gurus forum. Register a free account today to become a member! It's completely free. Once signed in, you'll enjoy an ad-free experience and be able to participate on this site by adding your own topics and posts, as well as connect with other members through your own private inbox!

I am so lost


Mike Petzold

New Member
Messages
3
Likes
0
Hello everyone, today our team leader asked me to come up with a room door sign, to let people know who live in that room, well i wanted to do something nice, and make it "cool" so i started trying to learn ps6... well my head hurts now, i was hoping to just add a picture, put our team number on it, along with Name, Position, and phone number on the door sign... and not just all plain text

the first picture is of an old band logo, and its our TEAMs name "Anvil" i liked the picture because i didnt know how to make text like it
anvil600.jpg

Then our team number is 5 so i was trying to kinda put the 5 behind it? somehow, and PS was making me draw lines around letter and stuff, and it was realy hard on a laptop touch pad... think it told me to use lasso or something

once that is done on top of a stand paper, i would be adding the person information on it... so after hours and hours i failed, :( couldnt get the 5 behind the anvil, using all those layers and things, and it turned out really nasty

View attachment anvil5.psd Hmm not sure what that number mean, was trying to add my ruff draft

lets try it in jpeg
anvil5.jpg
Now i will be playing with it more, and i know i have to find a better way to draw the outline in anvil, but think i will need a mouse for that

I also have no idea, but wanted to make the letter I into a dagger facing down with the handle above the top of the other letters and pointing down and ending at the same place as the I

Any ANY helpful hints would be nice, i can see i will be working on this all night, lol

Thanks for any help at all, and sugestions or samples and pointing me in the right direction

Mike
 
Hi Mike, sorry your having issues.

As a general rule, I will not open a psd file from an unknown and un-trusted source.

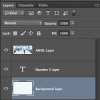
So, without knowing how you have your layers structured, I can only tell you that the number five (5) should be on its own separate layer and placed below the ANVIL layer. This will cause the number 5 to appear behind the anvil layer.

Screen Shot 2013-12-24 at 2.50.12 PM.png

Screen Shot 2013-12-24 at 2.50.22 PM.png
 
Last edited:
I did a very simple dagger addition.

I found a dagger that I liked and opened it in Ps.

Screen Shot 2013-12-24 at 3.02.32 PM.png

I then used the Rectangular Marquee Tool to make a selection around the area I wanted to remove from the dagger......

Screen Shot 2013-12-24 at 3.02.49 PM.png

And then hit delete....

Screen Shot 2013-12-24 at 3.03.01 PM.png

I then used the Move Tool to move the dagger blade to the ANVIL document.
I placed the Dagger layer under the ANVIL layer and above the the Number 5 layer.
I used Command + T (Free Transfer mode) to re-size the blade.
With the Move Tool again, I placed the blade just behind and below the letter I.

Screen Shot 2013-12-24 at 3.03.23 PM.png

I also clipped a Hue & Saturation adjustment layer above the dagger layer and changed it's color to blue.

Screen Shot 2013-12-24 at 3.03.37 PM.png
 
wow thank you for a fast response...i have my 5 on one layer, then the anvil, then a background layer, but it doesnt come out like yours
anvil5fade.jpg
as you can see the 5 is faded in some spots behind the anvil picture, did you have to outline the whole area with lasso or something, then? if you did you really did draw very well, and streight...
 
Lol, Zee! Your absolutely right! Great call!

Mike, you need to remove the white background from the ANVIL layer!

Do you know how to do this?
 
No i do not... i am looking at all the little buttons, to look and find something that might say something about removing background, cant seem to find it... this program is really big, i cant wait till i know how to use it
 
Removing the background from this particular image/text is not really that easy unless you have a working and knowledgeable understanding of the selection tools and how they work. It would take me too long to explain what is readily available on the net.

I think the best thing would be for you to take a look at some of these tutorials:

http://www.youtube.com/results?search_query=Photoshop selection tools&sm=3
 
press these buttons as you see them:

photoshop-magic-wand-tool.gif

then click the white on the layer with the text on it.
then press delete.

voila, white gone.
 
The Quick Selection Tool is a brush and you must adjust it to an appropriate size. You must also understand that you can add and subtract a selection, the default setting is to add, and by pressing and holding the alt/option key, you can subtract.
 
Last edited:
Sorry Zee, the first two times I tried the MWT it did not work!

I restarted Ps, and it worked!

If you use the Magic Wand Tool, lower your tolerance to about 10.
 
Last edited:
A better and more accurate way to eliminate the white background is to duplicate the ANVIL layer. Call the new layer Step One. On that new layer, open the Layer Styles tool. Go to the General Layer Blending screen (default) center bottom section called Blend If. Hover your mouse over the right side where the white colored arrow resides. Hold down Ctl and Alt buttons and click the white arrow slider. It will split into two sliders. Using the split out slider, set the left half to about 240 or so. This should remove the white background.

Now you are left with light parts missing on the text. Copy the original layer again and name it Step Two. Invert the Step Two layer by holding down Ctrl and I keys together. Use the Magic Wand Tool to select only the outer portions of the text borders on the Step Two layer. Make sure you have Contiguous checked. Set the Tolerance to 2. Holding down the Shift key, select the open white area, the center inset of the A text, the lower inset of the N and the inset between the I and L.

Once you have your selections highlighted by the "moving ants," go to Select > Modify > Feather. Set the factor to 1 pixel and click Okay. Delete the selected black areas. Remove the selection highlighter by going to Select > Deselect. Invert the layer once more time to return to default colors.

Merge the two layers called Step One and Step Two together. You can eliminate the original layer and save your file with a new name.
 

Back
Top